> ## Documentation Index
> Fetch the complete documentation index at: https://cometchat-22654f5b-docs-v6-beta2-flutter-uikit.mintlify.site/llms.txt
> Use this file to discover all available pages before exploring further.
# Push Notifications (Legacy)
> Push notification setup guides.
**Legacy Notice**: This extension is already included as part of the core messaging experience and is scheduled for deprecation in the near future.
Please note: Legacy extensions are no longer actively maintained and will not receive feature updates or enhancements.
Learn how to send push notifications to mobile apps and desktop browsers.
Push notifications will work in iOS and Android apps as well as desktop browsers that support [Push API](https://caniuse.com/#feat=push-api). These browsers include:
1. Chrome 50+
2. Firefox 44+
3. Edge 17+
4. Opera 42+
## Implementation
1. If you are new and want to implement Token-based Push Notifications in your app, follow our platform-specific guides:
1. [JavaScript](#web) (Web)
2. [Android](#android)
3. [iOS](#ios-fcm)
4. [Flutter](#flutter)
5. [React Native](#react-native)
6. [Capacitor, Cordova & Ionic](#capacitor%2C-cordova-%26-ionic)
2. For Android and iOS we also have setup that allows the usage of Native calling screens:
1. [Android - Connection Service](#android-connection-service)
2. [iOS - APNs](#ios-apns)
3. [Token management](#token-management) to manage FCM and APNs tokens for the logged-in user.
4. [Mute functionality](#mute-functionality) to mute certain conversations or implement DND.
## Web
The Push Notification extension allows you to send push notifications to mobile apps and desktop browsers.
Push notifications will work in all desktop browsers which support [Push API](https://caniuse.com/#feat=push-api). These include:
1. Chrome 50+
2. Firefox 44+
3. Edge 17+
4. Opera 42+
Push notifications sample app for Web (React)
View on Github
## Firebase Project Setup
Visit [Firebase Console](https://console.firebase.google.com) and login/signup using your Gmail ID.
### Step 1: Create a new Firebase Project
This is a simple 3 step process where:
1. You give a name to your project
2. Add Google Analytics to your project (Optional)
3. Configure Google Analytics account (Optional)
Click on Create and you are ready to go.
### Step 2: Add Firebase to your Web App
1. Click on the Web icon on the below screen and Register your app with a nickname.
2. Once done, click on Continue to Console.
### Step 3: Download the service account file
## Extension settings
### Step 1: Enable the extension
1. Login to [CometChat](https://app.cometchat.com/login) and select your app.
2. Go to the Extensions section and Enable the Push Notifications.
3. Open the settings for the extension and add all the mentioned settings and hit save.
### Step 2: Save your settings
On the Settings page you need to enter the following:
1. **Set extension version**
* If you are setting it for the first time, Select `V2` to start using the token-based version of the Push Notification extension.
* If you already have an app using `V1` and want to migrate your app to use `V2`, then Select `V1 & V2` option. This ensures that the users viewing the older version of your app also receive Push Notifications.
* Eventually, when all your users are on the latest version of your app, you can change this option to `V2`, thus turning off `V1` (Topic-based) Push Notifications completely.
2. **Select the platforms that you want to support**
* Select from Web, Android, Ionic (Deprecated), React Native, Flutter & iOS.
3. **Notification payload settings**
* You can control if the notification key should be in the Payload or not. Learn more about the FCM Messages [here](https://firebase.google.com/docs/cloud-messaging/).
4. **Push payload message options**
* The maximum payload size supported by FCM and APNs for push notifications is approximately 4 KB. Due to the inclusion of CometChat's message object, the payload size may exceed this limit, potentially leading to non-delivery of push notifications for certain messages. The options provided allow you to remove the sender's metadata, receiver's metadata, message metadata and trim the content of the text field.
* The message metadata includes the outputs of the Thumbnail Generation, Image Moderation, and Smart Replies extensions. You may want to retain this metadata if you need to customize the notification displayed to the end user based on these outputs.
5. **Notification Triggers**
* Select the triggers for sending Push Notifications. These triggers can be classified into 3 main categories:
1. Message Notifications
2. Call Notifications
3. Group Notifications
* These are pretty self-explanatory and you can toggle them as per your requirement.
## Web App Setup
### Step 1: Folder and files setup
Create a folder with the following three files:
| Files | Description |
| ------------------------- | ------------------------------------------------------------------------------------------- |
| index.html | Displays a simple User Login Form. |
| PushNotification.js | File with the logic to initialize CometChat and Firebase. |
| firebase-messaging-sw\.js | Service worker shows Push Notifications when the tab is either in the background or closed. |
### Step 2: Add the Firebase Config to the HTML File
1. Go to the Firebase Console and click on the Web app and open up the Settings page.
2. Go to the "General" tab on the Settings page.
3. Scroll down and copy the Firebase SDK snippet and paste in the \ tag of your index.html file.
### Step 3: Setup index.html file
1. Include the latest CometChat library using CDN.
2. Register the service worker file.
3. Also, include the `PushNotification.js`.
4. The \ has a simple form:
1. Text input for UID.
2. Login button.
3. Logout button.
Once done, your `index.html` file should look like this:
```html theme={null}
Push Notification Sample
Push Notifications (Legacy)
```
### Step 4: Setup the service worker file
1. Use `importScripts` to include the `firebase-app.js` and `firebase-messaging.js` files in the service worker.
2. Also paste in the `FIREBASE_CONFIG` object again in this file.
3. Initialize the Firebase object using the config.
4. Call the messaging() on the Firebase object.
Once done, your `firebase-messaging-sw.js` file should look like this:
```js theme={null}
importScripts('https://www.gstatic.com/firebasejs/7.21.0/firebase-app.js');
importScripts(
'https://www.gstatic.com/firebasejs/7.21.0/firebase-messaging.js'
);
const FIREBASE_CONFIG = {
// Your Config
};
// Initialize firebase in the service worker.
firebase.initializeApp(FIREBASE_CONFIG);
// Start Receiving Push Notifications when
// the browser tab is in the background or closed.
firebase.messaging();
```
### Step 5: Setup the PushNotification.js file
Now our simple web app has the following:
1. Setup required to start using Firebase SDK.
2. Service worker registration when the index.html loads for the first time.
Next, we can focus on the flow to setup CometChat login process along with the steps required to setup Push Notifications using Firebase Cloud Messaging (or FCM).
During login:
1. Initialize CometChat.
2. Login using CometChat user.
3. Ask for the User's permission to show Push Notifications.
4. If permission is granted, obtain the `FCM_TOKEN`.
5. Register the obtained `FCM_TOKEN` with the extension.
During logout:
1. First delete the token using the firebase object.
2. Logout CometChat user.
The above steps have been implemented in the `login` and `logout` functions in the `PushNotifications.js` file. You can copy paste the below code. Do not forget to replace the `APP_ID`, `REGION`, `AUTH_KEY` of your app in the code below.
```js theme={null}
const APP_ID = 'APP_ID';
const REGION = 'REGION';
const AUTH_KEY = 'AUTH_KEY';
const APP_SETTING = new CometChat.AppSettingsBuilder()
.subscribePresenceForAllUsers()
.setRegion(REGION)
.build();
let FCM_TOKEN = '';
let loginButton;
let logoutButton;
const login = async () => {
const UID = document.getElementById('uid').value;
if (!UID) {
document.getElementById('uid').focus();
return;
}
loginButton.disabled = true;
console.log('Initiating login... ');
try {
// CC init
await CometChat.init(APP_ID, APP_SETTING);
// User login
const loginResponse = await CometChat.login(UID, AUTH_KEY);
console.log('1. User login complete', loginResponse);
CometChat.getLoggedinUser().then((user) => console.log(user.name));
// Change the page title
document.title = UID + ' logged in';
// Fetch the FCM Token
const messaging = firebase.messaging();
FCM_TOKEN = await messaging.getToken();
console.log('2. Received FCM Token', FCM_TOKEN);
// Register the FCM Token
await CometChat.registerTokenForPushNotification(FCM_TOKEN);
console.log('3. Registered FCM Token');
logoutButton.disabled = false;
} catch (error) {
console.error(error);
}
};
const logout = async () => {
console.log('Initiating logout...');
loginButton.disabled = true;
logoutButton.disabled = true;
try {
// Delete the token
const messaging = firebase.messaging();
await messaging.deleteToken();
// Logout the user
await CometChat.logout();
console.log('5. Logged out');
// Refresh the page.
init();
window.location.reload();
} catch (error) {
console.error(error);
}
};
const init = () => {
// Basic initialization
loginButton = document.getElementById('loginButton');
logoutButton = document.getElementById('logoutButton');
loginButton.addEventListener('click', login);
logoutButton.addEventListener('click', logout);
logoutButton.disabled = true;
};
window.onload = () => {
// Call the initialization function on load.
setTimeout(init, 300);
};
```
## Start receiving Push Notifications
1. You can now host the project folder using Nginx, Apache web server, or even VSCode Live server extension.
2. Launch the web app in a browser and open the browser console to see the logs.
3. Enter the UID of the user and click on login.
4. When asked for permission to show notifications, click on Allow.
5. Once you see logs saying that the FCM Token has been registered, either send the browser tab to the background or close it completely.
6. Send a message to this logged-in user from another device (using our Sample Apps) and you should be able to see the Push Notifications.
## Stop receiving Push Notifications
1. Reopen the previous closed browser tab and click on logout.
2. The `FCM_TOKEN` will be deleted on the extension's end on the `CometChat.logout()` call.
3. As a good practice, the `FCM_TOKEN` should also be deleted using the `firebase.messaging().deleteToken()`.
## Custom body for notifications
To send custom body for notifications or to receive notification of `CustomMessage`, you need to set metadata while sending the `CustomMessage`.
```js theme={null}
var receiverID = 'UID';
var customData = {
latitude: '50.6192171633316',
longitude: '-72.68182268750002',
};
var customType = 'location';
var receiverType = CometChat.RECEIVER_TYPE.USER;
var metadata = {
pushNotification: 'Your Notification Message',
};
var customMessage = new CometChat.CustomMessage(
receiverID,
receiverType,
customType,
customData
);
customMessage.setMetadata(metadata);
CometChat.sendCustomMessage(customMessage).then(
(message) => {
// Message sent successfully.
console.log('custom message sent successfully', message);
},
(error) => {
console.log('custom message sending failed with error', error);
// Handle exception.
}
);
```
## Android
The Push Notification extension allows you to send push notifications to mobile apps and desktop browsers. In this section, we will see how to send Push Notifications to your Android app using Firebase Cloud Messaging or FCM.
Use Connection Service
If you want to use the System's native call service to handle calls, please refer to our guide on [Android - Connection Service](#android-connection-service)
Android Push notifications sample app
View on Github
## Firebase Project Setup
Visit [Firebase Console](https://console.firebase.google.com) and login/signup using your Gmail ID.
### Step 1: Create a new Firebase Project
On your Firebase Console, create a new project.
This is a simple 3 step process where:
1. You give a name to your project
2. Add Google Analytics to your project (Optional)
3. Configure Google Analytics account (Optional)
Click on Create and you are ready to go.
### Step 2: Add Firebase to your Android App
1. Click on the Android icon as shown on the screen below.
2. Register your Android app by providing the following details:
1. Android Package name
2. App nickname (optional)
3. Debug signing certificate SHA-1 (optional)
3. Download the `google-services.json` file and place it in the required location in your project.
4. Add Firebase SDK by copying and pasting the snippets in the Project-level `build.gradle` file.
5. Add Firebase SDK by copying and pasting the snippets in the App-level `build.gradle` file.
6. Click on 'Continue to Console' to finish the setup.
### Step 3: Download the service account file
## Extension settings
### Step 1: Enable the extension
1. Login to [CometChat](https://app.cometchat.com/login) and select your app.
2. Go to the Extensions section and Enable the Push Notifications extension.
3. Open the settings for this extension and save the following.
### Step 2: Save your settings
On the Settings page you need to enter the following:
1. **Set extension version**
* If you are setting it for the first time, Select `V2` to start using the token-based version of the Push Notification extension.
* If you already have an app using `V1` and want to migrate your app to use `V2`, then Select `V1 & V2` option. This ensures that the users viewing the older version of your app also receive Push Notifications.
* Eventually, when all your users are on the latest version of your app, you can change this option to `V2`, thus turning off `V1` (Topic-based) Push Notifications completely.
2. **Select the platforms that you want to support**
* Select from Web, Android, Ionic (Deprecated), React Native, Flutter & iOS.
3. **Notification payload settings**
* You can control if the notification key should be in the Payload or not. Learn more about the FCM Messages [here](https://firebase.google.com/docs/cloud-messaging).
4. **Push payload message options**
The maximum payload size supported by FCM and APNs for push notifications is approximately 4 KB. Due to the inclusion of CometChat's message object, the payload size may exceed this limit, potentially leading to non-delivery of push notifications for certain messages. The options provided allow you to remove the sender's metadata, receiver's metadata, message metadata and trim the content of the text field.
* The message metadata includes the outputs of the Thumbnail Generation, Image Moderation, and Smart Replies extensions. You may want to retain this metadata if you need to customize the notification displayed to the end user based on these outputs.
5. **Notification Triggers**
* Select the triggers for sending Push Notifications. These triggers can be classified into 3 main categories:
1. Message Notifications
2. Call Notifications
3. Group Notifications
* These are pretty self-explanatory and you can toggle them as per your requirement.
## Android App Setup
In the Firebase Project setup, we did the following things:
1. Added google-services.json file to the project.
2. Added the required Firebase SDK snippets to the Project-level build.grade file.
3. Added the required Firebase SDK snippets to the App-level build.gradle file.
If you want more details, check the [Firebase Documentation](https://firebase.google.com/docs/cloud-messaging/android/client).
### Step 1: Register the FCM Token on user login
1. Initialize CometChat and then login your user.
2. On successful login, you can register the obtained FCM Token using `CometChat.registerTokenForPushNotification()` function call. (You can see the process of getting the FCM Token in the next step)
```java theme={null}
CometChat.registerTokenForPushNotification(MyFirebaseMessagingService.token, new CometChat.CallbackListener() {
@Override
public void onSuccess(String s) {
Log.e( "onSuccessPN: ",s );
}
@Override
public void onError(CometChatException e) {
Log.e("onErrorPN: ",e.getMessage() );
}
});
```
```kotlin theme={null}
CometChat.registerTokenForPushNotification(MyFirebaseMessagingService.token, object : CallbackListener() {
override fun onSuccess(s: String?) {
Log.e("onSuccessPN: ", s)
}
override fun onError(e: CometChatException) {
Log.e("onErrorPN: ", e.message)
}
})
```
To fetch the registered token you can use below Firebase method.
```java theme={null}
FirebaseInstanceId.getInstance().getInstanceId().addOnCompleteListener(
new OnCompleteListener() {
@Override
public void onComplete(@NonNull Task task) {
if (!task.isSuccessful()) {
return;
}
token = task.getResult().getToken();
//CometChat.registerTokenForPushNotification(token, CometChat.CallbackListener());
}
});
```
```kotlin theme={null}
FirebaseInstanceId.getInstance().getInstanceId()
.addOnCompleteListener(object : OnCompleteListener() {
fun onComplete(task: com.google.android.gms.tasks.Task) {
if (!task.isSuccessful()) {
return
}
token = task.getResult().getToken()
//CometChat.registerTokenForPushNotification(token,CometChat.CallbackListener())
}
})
```
### Step 2: Receive notifications
1. The FCM Token can be received by overriding the `onNewToken()` method. This token is stored as a String variable. You can choose to store it in SharedPreferences as well.
2. To receive messages, you need to override the onMessageReceived(RemoteMessage remoteMessage).
3. [PushNotificationService.java](https://github.com/cometchat/cometchat-push-notification-app-android/blob/v4-push-notifications-extension/app/src/main/java/com/cometchat/pushnotificationsample/PushNotificationService.java) has the code that provides a way you can handle messages received from CometChat users and groups.
4. CallNotificationAction.class is a BroadcastReceiver which is used to handle call events when your app is in the background state.
5. Since Android O, there have been certain restrictions added for background tasks and users cannot launch intent directly from the service. More details [here](https://developer.android.com/guide/components/activities/background-starts).
6. We suggest you to create notification channel inside your application class. After Android O, it is necessary to register notification channel to allow notifications of your apps.
```java theme={null}
private void createNotificationChannel() {
// Create the NotificationChannel, but only on API 26+ because
// the NotificationChannel class is new and not in the support library
if (Build.VERSION.SDK_INT >= Build.VERSION_CODES.O) {
CharSequence name = getString(R.string.app_name);
String description = getString(R.string.channel_description);
int importance = NotificationManager.IMPORTANCE_HIGH;
NotificationChannel channel = new NotificationChannel("2", name, importance);
channel.setDescription(description);
channel.enableVibration(true);
channel.setLockscreenVisibility(Notification.VISIBILITY_PUBLIC);
// Register the channel with the system; you can't change the importance
// or other notification behaviors after this
NotificationManager notificationManager = getSystemService(NotificationManager.class);
notificationManager.createNotificationChannel(channel);
}
}
```
* You also need to add both of the above-mentioned files in your AndroidManifest.xml to make Push notification work in the background as well.
```xml theme={null}
```
## Advanced
### Converting Push Notification Payloads to Message Objects
CometChat provides a method `CometChatHelper.processMessage()` to convert the message JSON to the corresponding object of `TextMessage`, `MediaMessage`, `CustomMessage`, `Action` or `Call`.
This code needs to be added to the `onMessageReceived()` method of the `FirebaseMessagingService` class.
```java theme={null}
CometChatHelper.processMessage(new JSONObject(remoteMessage.getData().get("message"));
```
Type of Attachment can be of the following the type\
`CometChatConstants.MESSAGE_TYPE_IMAGE`\
`CometChatConstants.MESSAGE_TYPE_VIDEO`\
`CometChatConstants.MESSAGE_TYPE_AUDIO`\
`CometChatConstants.MESSAGE_TYPE_FILE`
Push Notification Payload sample for text and media messages-
```json theme={null}
{
"alert": "Nancy Grace: Text Message",
"sound": "default",
"title": "CometChat",
"message": {
"receiver": "cometchat-uid-4",
"data": {
"entities": {
"receiver": {
"entityType": "user",
"entity": {
"uid": "cometchat-uid-4",
"role": "default",
"name": "Susan Marie",
"avatar": "https://assets.cometchat.io/sampleapp/v2/users/cometchat-uid-4.webp",
"status": "offline"
}
},
"sender": {
"entityType": "user",
"entity": {
"uid": "cometchat-uid-3",
"role": "default",
"name": "Nancy Grace",
"avatar": "https://assets.cometchat.io/sampleapp/v2/users/cometchat-uid-3.webp",
"status": "offline"
}
}
},
"text": "Text Message"
},
"sender": "cometchat-uid-3",
"receiverType": "user",
"id": "142",
"sentAt": 1555668711,
"category": "message",
"type": "text"
}
}
```
```json theme={null}
{
"alert": "Nancy Grace: has sent an image",
"sound": "default",
"title": "CometChat",
"message": {
"receiver": "cometchat-uid-4",
"data": {
"attachments": [
{
"extension": "png",
"size": 14327,
"name": "extension_leftpanel.png",
"mimeType": "image_png",
"url": "https://s3-eu-west-1.amazonaws.com/data.cometchat.com/1255466c41bd7f/media/1555671238_956450103_extension_leftpanel.png"
}
],
"entities": {
"receiver": {
"entityType": "user",
"entity": {
"uid": "cometchat-uid-4",
"role": "default",
"name": "Susan Marie",
"avatar": "https://assets.cometchat.io/sampleapp/v2/users/cometchat-uid-4.webp",
"status": "offline"
}
},
"sender": {
"entityType": "user",
"entity": {
"uid": "cometchat-uid-3",
"role": "default",
"name": "Nancy Grace",
"avatar": "https://assets.cometchat.io/sampleapp/v2/users/cometchat-uid-3.webp",
"status": "offline"
}
}
},
"url": "https://s3-eu-west-1.amazonaws.com/data.cometchat.com/1255466c41bd7f/media/1555671238_956450103_extension_leftpanel.png"
},
"sender": "cometchat-uid-3",
"receiverType": "user",
"id": "145",
"sentAt": 1555671238,
"category": "message",
"type": "image"
}
}
```
### Handle Push Notification Actions.
**Step 1. Process push notification payload and grab BaseMessage object**
To open a chat view, firstly you will need a BaseMessage object. You can grab this from the push notification payload received in `onMessageReceived(RemoteMessage message)`. You need to call `CometChat.processMessage()` method to process push notification payload.
```java theme={null}
@Override
public void onMessageReceived(RemoteMessage remoteMessage) {
try {
JSONObject messageData = new JSONObject(remoteMessage.getData().get("message"));
BaseMessage baseMessage = CometChatHelper.processMessage(messageData);
//Process BaseMessage and show Notification
} catch (JSONException e) {
e.printStackTrace();
}
}
```
**Step 2 . Handle Notification Actions**
You can launch the chat view after you tap on the Message Notification by creating PendingIntent and set it with NotificationBuilder object.
CometChatMessageListActivity is part of UI Kit Library. You can replace CometChatMessageListActivity with your required class.
## Android Connection Service
Learn how to send Push Notifications to your Android app using Firebase Cloud Messaging or FCM.
Android Push notifications sample app
View on Github
## Firebase Project Setup
Visit [Firebase Console](https://console.firebase.google.com/) and login/signup using your Gmail ID.
### Step 1: Create a new Firebase Project
On your Firebase Console, create a new project.
This is a simple 3 step process where:
1. You give a name to your project
2. Add Google Analytics to your project (Optional)
3. Configure Google Analytics account (Optional)
Click on Create and you are ready to go.
### Step 2: Add Firebase to your Android App
1. Click on the Android icon as shown on the screen below.
2. Register your Android app by providing the following details:
1. Android Package name
2. App nickname (optional)
3. Debug signing certificate SHA-1 (optional)
3. Download the google-services.json file and place it in the required location in your project.
4. Add Firebase SDK by copying and pasting the snippets in the Project-level build.gradle file.
5. Add Firebase SDK by copying and pasting the snippets in the App-level build.gradle file.
6. Click on 'Continue to Console' to finish the setup.
### Step 3: Download the service account file
## Extension settings
### Step 1: Enable the extension
1. Login to [CometChat](https://app.cometchat.com/login) and select your app.
2. Go to the Extensions section and Enable the Push Notifications extension.
3. Open the settings for this extension and save the following.
### Step 2: Save your settings
On the Settings page you need to enter the following:
1. **Set extension version**
* If you are setting it for the first time, Select `V2` to start using the token-based version of the Push Notification extension.
* If you already have an app using `V1` and want to migrate your app to use `V2`, then Select `V1 & V2` option. This ensures that the users viewing the older version of your app also receive Push Notifications.
* Eventually, when all your users are on the latest version of your app, you can change this option to `V2`, thus turning off `V1` (Topic-based) Push Notifications completely.
2. **Select the platforms that you want to support**
* Select from Web, Android, Ionic (Deprecated), React Native, Flutter & iOS.
3. **Notification payload settings**
* You can control if the notification key should be in the Payload or not. Learn more about the FCM Messages [here](https://firebase.google.com/docs/cloud-messaging).
4. **Push payload message options**
The maximum payload size supported by FCM and APNs for push notifications is approximately 4 KB. Due to the inclusion of CometChat's message object, the payload size may exceed this limit, potentially leading to non-delivery of push notifications for certain messages. The options provided allow you to remove the sender's metadata, receiver's metadata, message metadata and trim the content of the text field.
* The message metadata includes the outputs of the Thumbnail Generation, Image Moderation, and Smart Replies extensions. You may want to retain this metadata if you need to customize the notification displayed to the end user based on these outputs.
5. **Notification Triggers**
* Select the triggers for sending Push Notifications. These triggers can be classified into 3 main categories:
1. Message Notifications
2. Call Notifications
3. Group Notifications
* These are pretty self-explanatory and you can toggle them as per your requirement.
## Android App Setup
In the Firebase Project setup, we did the following things:
1. Added google-services.json file to the project.
2. Added the required Firebase SDK snippets to the Project-level build.grade file.
3. Added the required Firebase SDK snippets to the App-level build.gradle file.
If you want more details, check the [Firebase Documentation](https://firebase.google.com/docs/cloud-messaging/android/client).
### Step 1: Register the FCM Token on user login
1. Initialize CometChat and then login your user.
2. On successful login, you can register the obtained FCM Token using `CometChat.registerTokenForPushNotification()` function call. (You can see the process of getting the FCM Token in the next step)
```java theme={null}
CometChat.registerTokenForPushNotification(MyFirebaseMessagingService.token, new CometChat.CallbackListener() {
@Override
public void onSuccess(String s) {
Log.e( "onSuccessPN: ",s );
}
@Override
public void onError(CometChatException e) {
Log.e("onErrorPN: ",e.getMessage() );
}
});
```
```kotlin theme={null}
CometChat.registerTokenForPushNotification(MyFirebaseMessagingService.token, object : CallbackListener() {
override fun onSuccess(s: String?) {
Log.e("onSuccessPN: ", s)
}
override fun onError(e: CometChatException) {
Log.e("onErrorPN: ", e.message)
}
})
```
To fetch the registered token you can use below Firebase method.
```java theme={null}
FirebaseInstanceId.getInstance().getInstanceId().addOnCompleteListener(
new OnCompleteListener() {
@Override
public void onComplete(@NonNull Task task) {
if (!task.isSuccessful()) {
return;
}
token = task.getResult().getToken();
//CometChat.registerTokenForPushNotification(token, CometChat.CallbackListener());
}
});
```
```kotlin theme={null}
FirebaseInstanceId.getInstance().getInstanceId()
.addOnCompleteListener(object : OnCompleteListener() {
fun onComplete(task: com.google.android.gms.tasks.Task) {
if (!task.isSuccessful()) {
return
}
token = task.getResult().getToken()
//CometChat.registerTokenForPushNotification(token,CometChat.CallbackListener())
}
})
```
### Step 2: Setup ConnectionService.
**ConnectionService** is an abstract service used to handle VoIP & other calls. It is part of android.telecom package which helps to handle telecom services. ConnectionService can be used either as System-Managed Service where System defined UI is shown to handle the calls. It can also be used as Self-Managed Service where users can show their own calling UI to handle the calls.
*Note - Currently the sample app uses system-managed connection service, So the System UI will be displayed to handle incoming calls.*
Learn more about [ConnectionService](https://developer.android.com/reference/android/telecom/ConnectionService).
| Files | Description |
| ------------------------------------------------------------------------------------------------------------------------------------------------------------------------------------------------------------------------- | ------------------------------------------------------------------------------------------------------------------------------------------------------------------------------------------------------------ |
| [CallConnectionService.java](https://github.com/cometchat/cometchat-push-notification-app-android/blob/v4-push-notifications-extension/app/src/main/java/com/cometchat/pushnotificationsample/CallConnectionService.java) | Custom ConnectionService file which is used to handle incoming & outgoing calls. It is used to manages the ConnectionService with your app. It also handles PhoneAccounts and bind it's services to Telecom. |
| [CallConnection.java](https://github.com/cometchat/cometchat-push-notification-app-android/blob/v4-push-notifications-extension/app/src/main/java/com/cometchat/pushnotificationsample/CallConnection.java) | Custom Connection class which is used to handle the callbacks of ConnectionService. Call backs such as onAnswer(), onReject(), onHold(), etc. |
| [CallManager.java](https://github.com/cometchat/cometchat-push-notification-app-android/blob/v4-push-notifications-extension/app/src/main/java/com/cometchat/pushnotificationsample/CallConnectionService.java) | It is used to manages the ConnectionService with your app. It also handles PhoneAccounts and bind it's services to Telecom. |
### Step 3: Receive notifications
1. The FCM Token can be received by overriding the `onNewToken()` method. This token is stored as a String variable. You can choose to store it in SharedPreferences as well.
2. To receive messages, you need to override the onMessageReceived(RemoteMessage remoteMessage).
3. [PushNotificationService.java](https://github.com/cometchat/cometchat-push-notification-app-android/blob/v4-push-notifications-extension/app/src/main/java/com/cometchat/pushnotificationsample/PushNotificationService.java) has the code that provides a way you can handle messages received from CometChat users and groups.
4. Since Android O, there have been certain restrictions added for background tasks and users cannot launch intent directly from the service. More details [here](https://developer.android.com/guide/components/activities/background-starts).
5. You also need to add the above-mentioned MyFirebasMessagingService.java fil in your AndroidManifest.xml to make Push notification work in the background as well.
```xml theme={null}
```
### Converting Push Notification Payloads to Message Objects
CometChat provides a method `CometChatHelper.processMessage()` to convert the message JSON to the corresponding object of `TextMessage`, `MediaMessage`, `CustomMessage`, `Action` or `Call`.
This code needs to be added to the `onMessageReceived()` method of the `FirebaseMessagingService` class.
```java theme={null}
CometChatHelper.processMessage(new JSONObject(remoteMessage.getData().get("message"));
```
Type of Attachment can be of the following the type\
`CometChatConstants.MESSAGE_TYPE_IMAGE`\
`CometChatConstants.MESSAGE_TYPE_VIDEO`\
`CometChatConstants.MESSAGE_TYPE_AUDIO`\
`CometChatConstants.MESSAGE_TYPE_FILE`
Push Notification Payload sample for text and media messages-
```json theme={null}
{
"alert": "Nancy Grace: Text Message",
"sound": "default",
"title": "CometChat",
"message": {
"receiver": "cometchat-uid-4",
"data": {
"entities": {
"receiver": {
"entityType": "user",
"entity": {
"uid": "cometchat-uid-4",
"role": "default",
"name": "Susan Marie",
"avatar": "https://assets.cometchat.io/sampleapp/v2/users/cometchat-uid-4.webp",
"status": "offline"
}
},
"sender": {
"entityType": "user",
"entity": {
"uid": "cometchat-uid-3",
"role": "default",
"name": "Nancy Grace",
"avatar": "https://assets.cometchat.io/sampleapp/v2/users/cometchat-uid-3.webp",
"status": "offline"
}
}
},
"text": "Text Message"
},
"sender": "cometchat-uid-3",
"receiverType": "user",
"id": "142",
"sentAt": 1555668711,
"category": "message",
"type": "text"
}
}
```
```json theme={null}
{
"alert": "Nancy Grace: has sent an image",
"sound": "default",
"title": "CometChat",
"message": {
"receiver": "cometchat-uid-4",
"data": {
"attachments": [
{
"extension": "png",
"size": 14327,
"name": "extension_leftpanel.png",
"mimeType": "image/png",
"url": "https://s3-eu-west-1.amazonaws.com/data.cometchat.com/1255466c41bd7f/media/1555671238_956450103_extension_leftpanel.png"
}
],
"entities": {
"receiver": {
"entityType": "user",
"entity": {
"uid": "cometchat-uid-4",
"role": "default",
"name": "Susan Marie",
"avatar": "https://assets.cometchat.io/sampleapp/v2/users/cometchat-uid-4.webp",
"status": "offline"
}
},
"sender": {
"entityType": "user",
"entity": {
"uid": "cometchat-uid-3",
"role": "default",
"name": "Nancy Grace",
"avatar": "https://assets.cometchat.io/sampleapp/v2/users/cometchat-uid-3.webp",
"status": "offline"
}
}
},
"url": "https://s3-eu-west-1.amazonaws.com/data.cometchat.com/1255466c41bd7f/media/1555671238_956450103_extension_leftpanel.png"
},
"sender": "cometchat-uid-3",
"receiverType": "user",
"id": "145",
"sentAt": 1555671238,
"category": "message",
"type": "image"
}
}
```
## iOS FCM
Learn how to send out Push Notifications to your iOS using Firebase Cloud Messaging or FCM.
Don't want to use FCM?
You can refer to [our setup](#ios-apns) using the Apple Push Notifications service (APNs).
iOS Push notifications sample app
View on Github
## Firebase Project Setup
Visit [Firebase Console](https://console.firebase.google.com/) and login/signup using your Gmail ID.
### Step 1: Create a new Firebase Project
On your Firebase Console, create a new project.
This is a simple 3 step process where:
1. You give a name to your project
2. Add Google Analytics to your project (Optional)
3. Configure Google Analytics account (Optional)
Click on Create and you are ready to go.
### Step 2: Add Firebase to your iOS App
1. Click on the iOS icon as shown on the screen below.
2. Register your Android app by providing the following details: a. iOS bundle name b. App nickname (optional) c. App Store ID (optional)
3. Download the GoogleService-Info.plist file and place it in the mentioned location of your project. Move your config file into the root of your Xcode project. If prompted, select to add the config file to all targets as follows.
4. We will Add Firebase SDK and Initialisation code later. So, click on 'Next', 'Next', and 'Continue to the Console'.
### Step 3: Download the service account file
## Extension settings
### Step 1: Enable the extension
1. Login to [CometChat](https://app.cometchat.com/login) and select your app.
2. Go to the Extensions section and Enable the Push Notifications extension.
3. Open the settings for this extension and save the following settings.
### Step 2: Save your settings
On the Settings page you need to enter the following:
1. **Set extension version**
* If you are setting it for the first time, Select `V2` to start using the token-based version of the Push Notification extension.
* If you already have an app using `V1` and want to migrate your app to use `V2`, then Select `V1 & V2` option. This ensures that the users viewing the older version of your app also receive Push Notifications.
* Eventually, when all your users are on the latest version of your app, you can change this option to `V2`, thus turning off `V1` (Topic-based) Push Notifications completely.
2. **Select the platforms that you want to support**
* Select from Web, Android, Ionic (Deprecated), React Native, Flutter & iOS.
3. **Notification payload settings**
* You can control if the notification key should be in the Payload or not. Learn more about the FCM Messages [here](https://firebase.google.com/docs/cloud-messaging).
4. **Push payload message options**
The maximum payload size supported by FCM and APNs for push notifications is approximately 4 KB. Due to the inclusion of CometChat's message object, the payload size may exceed this limit, potentially leading to non-delivery of push notifications for certain messages. The options provided allow you to remove the sender's metadata, receiver's metadata, message metadata and trim the content of the text field.
* The message metadata includes the outputs of the Thumbnail Generation, Image Moderation, and Smart Replies extensions. You may want to retain this metadata if you need to customize the notification displayed to the end user based on these outputs.
5. **Notification Triggers**
* Select the triggers for sending Push Notifications. These triggers can be classified into 3 main categories:
1. Message Notifications
2. Call Notifications
3. Group Notifications
* These are pretty self-explanatory and you can toggle them as per your requirement.
## Get APNS Credentials
The following steps in this section are written on the assumption that you already have an app ID assigned to your client app.
### Step 1: Create a Certificate Signing Request
To obtain a signing certificate required to sign apps for installation on iOS devices, you should first create a certificate signing request (CSR) file through Keychain Access on your Mac.
1. Open the Keychain Access from the utility folder, go to Keychain Access > Certificate Assistant > Request a Certificate From a Certificate Authority, and then click.
2. The Certificate Information dialog box appears. Enter the email address that you use in your Apple Developer account, and enter a common name for your private key. Don't enter CA email address, choose Saved to disk, and then click the Continue button.
3. Specify the name of your CSR to save and choose the location to save the file on your local disk. Then your CSR file is created, which contains a public/private key pair.
### Step 2: Create an SSL certificate
1. Sign in to your account at the [Apple Developer Member Center](https://developer.apple.com/membercenter).
2. Go to Certificates, Identifiers & Profiles. In the Identifiers > App IDs and select the Push Notifications service under Application Services
3. Click the Edit button.
4. Under the Push Notifications service, choose which SSL certificate to create either Development or Production.
5. In the Generate your certificate pane that appears after the selection, under Upload CSR file., upload the CSR file you created through the Choose File... button. To complete the process, choose Continue. When the certificate is ready, choose Download to save it to your Mac.
6. In order to install the downloaded certificate to the KeyChain Access on your Mac, double-click it. You can find the certificate in the KeyChain Access > login > Certificates.
### Step 3: Export and update .p12 file to Firebase
1. Type a name for the .p12 file and save it to your Mac.
2. Browse to the location where you saved your key, select it, and click Open. Add the key ID for the key (available in Certificates, Identifiers & Profiles in the Apple Developer Member Center) and export it.
### Step 4: Upload your APNs Certificates
1. Go to Firebase console and open your project.
2. Inside your iOS project in the Firebase console, select settings and then select the `Cloud Messaging` tab.
3. Scroll down to iOS app configuration, click the Upload button for APNS certificate.
4. Browse to the location where you saved your APNs Certificates, select it, and click Open.
## iOS App Setup
### Step 1: Initial Firebase Cloud Messaging client setup
1. Add the Firebase SDK, Add the firebase pods that you want to install. You can include a Pod in your Podfile like this:
```swift theme={null}
pod 'Firebase_Core'
pod 'Firebase_Messaging'
```
2. Import the Firebase module in your `ApplicationDelegate:`
```swift theme={null}
import Firebase
```
```objc theme={null}
@import Firebase;
```
3. Configure a FirebaseApp shared instance, typically in your application's `application:didFinishLaunchingWithOptions: method:`
```swift theme={null}
FirebaseApp.configure()
```
```objc theme={null}
[FIRApp configure];
```
### Step 2: Register the FCM Token
1. Get the FCM Token for remote notifications, typically in your application's `application:didFinishLaunchingWithOptions: method:`
```swift theme={null}
Messaging.messaging().delegate = self
if #available(iOS 10.0, *) {
UNUserNotificationCenter.current().delegate = self
let authOptions: UNAuthorizationOptions = [.alert, .badge, .sound]
UNUserNotificationCenter.current().requestAuthorization(
options: authOptions,
completionHandler: {
_,
_ in
})
} else {
let settings: UIUserNotificationSettings =
UIUserNotificationSettings(types: [.alert, .badge, .sound], categories: nil)
application.registerUserNotificationSettings(settings)
}
application.registerForRemoteNotifications()
```
```objc theme={null}
[FIRMessaging messaging].delegate = self;
if ([UNUserNotificationCenter class] != nil) {
[UNUserNotificationCenter currentNotificationCenter].delegate = self;
UNAuthorizationOptions authOptions = UNAuthorizationOptionAlert | UNAuthorizationOptionSound | UNAuthorizationOptionBadge;
[[UNUserNotificationCenter currentNotificationCenter] requestAuthorizationWithOptions: authOptions completionHandler: ^ (BOOL granted, NSError * _Nullable error) {
// ...
}
];
} else {
UIUserNotificationType allNotificationTypes = (UIUserNotificationTypeSound | UIUserNotificationTypeAlert | UIUserNotificationTypeBadge);
UIUserNotificationSettings * settings = [UIUserNotificationSettings settingsForTypes: allNotificationTypes categories: nil];
[application registerUserNotificationSettings: settings];
}
[application registerForRemoteNotifications];
```
```swift theme={null}
func application(_ application: UIApplication, didFailToRegisterForRemoteNotificationsWithError error: Error) {
print("Unable to register for remote notifications: \\(error.localizedDescription)")
}
func application(_ application: UIApplication, didRegisterForRemoteNotificationsWithDeviceToken deviceToken: Data) {
print("APNs token retrieved: \\(deviceToken)")
Messaging.messaging().apnsToken = deviceToken
}
```
```objc theme={null}
-(void)application:(UIApplication *)application didFailToRegisterForRemoteNotificationsWithError:(NSError *)error
{
NSLog(@"Unable to register for remote notifications: %@", error);
}
-(void)application:(UIApplication *)application didRegisterForRemoteNotificationsWithDeviceToken:(NSData *)deviceToken
{
NSLog(@"APNs device token retrieved: %@", deviceToken);
[FIRMessaging messaging].APNSToken = deviceToken;
}
```
2. Register the FCM token with our Push Notifications extension on success of CometChat.login
```swift theme={null}
let authKey = "XXXX XXXX XXXXX"
CometChat.login(UID: UID, authKey: authKey, onSuccess: { (user) in
DispatchQueue.main.async {
if let token = UserDefaults.standard.value(forKey: "fcmToken") as? String {
CometChat.registerTokenForPushNotification(token: token, onSuccess: { (success) in
print("onSuccess to registerTokenForPushNotification: \\(success)")
}) { (error) in
print("error to registerTokenForPushNotification")
}
}
```
3. This also needs to be done when you refresh your FCM Token
```swift theme={null}
extension AppDelegate : MessagingDelegate {
// [START refresh_token]
func messaging(_ messaging: Messaging, didReceiveRegistrationToken fcmToken: String) {
print("Firebase registration token: \\(fcmToken)")
UserDefaults.standard.set(fcmToken, forKey: "fcmToken")
CometChat.registerTokenForPushNotification(token: fcmToken, onSuccess: { (sucess) in
print("token registered \\(sucess)")
}) { (error) in
print("token registered error \\(String(describing: error?.errorDescription))")
}
let dataDict:[String: String] = ["token": fcmToken]
NotificationCenter.default.post(name: Notification.Name("FCMToken"), object: nil, userInfo: dataDict)
}
}
```
### Step 3: Start receiving Push Notifications
1. Receive remote notification, typically in your application's `App Delegate:`
```swift theme={null}
func application(_ application: UIApplication, didReceiveRemoteNotification userInfo: [AnyHashable: Any]) {
// Print full message.
print(userInfo)
}
func application(_ application: UIApplication, didReceiveRemoteNotification userInfo: [AnyHashable: Any], fetchCompletionHandler completionHandler: @escaping(UIBackgroundFetchResult) -> Void) {
// Print full message.
print(userInfo)
completionHandler(UIBackgroundFetchResult.newData)
}
```
```objc theme={null}
- (void)application:(UIApplication *)application didReceiveRemoteNotification:(NSDictionary *)userInfo {
// Print full message.
NSLog(@"%@", userInfo);
}
- (void)application:(UIApplication *)application didReceiveRemoteNotification:(NSDictionary *)userInfo
fetchCompletionHandler:(void (^)(UIBackgroundFetchResult))completionHandler {
// Print full message.
NSLog(@"%@", userInfo);
completionHandler(UIBackgroundFetchResultNewData);
}
```
2. Receive Notification for `CustomMessage`:
To receive and display push notifications for a CustomMessage, the developer must set metadata.pushNotification while sending the message. The value of this field is used as the notification text displayed to the recipient. If metadata.pushNotification is not set (or is null), the push notification will not be triggered for that message.
```swift theme={null}
var receiverID = "cometchat-uid-1";
var message = [
"someRandomKey": "someRandomData"
];
var customMessage = CustomMessage(receiverUid: receiverID, receiverType: ReceiverTypeUser, customData: message);
// to display custom notification banner add this , "pushNotification" key is not to modify, although you can modify banner text as shown beow //
var customNotificationDisplayText = [
"pushNotification": "notification_banner_text_here";
];
// set it as metadata of `Custom message`
customMessage.metaData = customNotificationDisplayText;
CometChat.sendCustomMessage(withMessage: customMessage, onSuccess: { sentMessage in
print("sentMessage \\(sentMessage.stringValue)");
}, onError: { error in
if let error = error?.errorDescription() {
print("error sending custom message \\(error)");
}
});
```
```objc theme={null}
NSString * receiverID = @ "cometchat-uid-1";
NSDictionary * message = [NSDictionary dictionaryWithObjectsAndKeys: @ "someRandomData", @ "someRandomKey", nil];
CustomMessage * customMessage = [
[CustomMessage alloc] initWithReceiverUid: receiverID receiverType: ReceiverTypeUser customData: message
];
// to display custom notification banner add this //
NSDictionary * customNotificationDisplayText = [NSDictionary dictionaryWithObjectsAndKeys: @ "notification_banner_text_here", @ "pushNotification", nil];
[customMessage setMetaData: customNotificationDisplayText];
[CometChat sendCustomMessageWithMessage: customMessage onSuccess: ^ (CustomMessage * _Nonnull sentMessage) {
NSLog(@ "sentMessage %@", [sentMessage stringValue]);
}
onError: ^ (CometChatException * _Nullable error) {
NSLog(@ "error sending custom message %@", [error errorDescription]);
}
];
```
Push Notification Payload sample for text and media messages-
```json theme={null}
{
"alert": "Nancy Grace: Text Message",
"sound": "default",
"title": "CometChat",
"message": {
"receiver": "cometchat-uid-4",
"data": {
"entities": {
"receiver": {
"entityType": "user",
"entity": {
"uid": "cometchat-uid-4",
"role": "default",
"name": "Susan Marie",
"avatar": "https://assets.cometchat.io/sampleapp/v2/users/cometchat-uid-4.webp",
"status": "offline"
}
},
"sender": {
"entityType": "user",
"entity": {
"uid": "cometchat-uid-3",
"role": "default",
"name": "Nancy Grace",
"avatar": "https://assets.cometchat.io/sampleapp/v2/users/cometchat-uid-3.webp",
"status": "offline"
}
}
},
"text": "Text Message"
},
"sender": "cometchat-uid-3",
"receiverType": "user",
"id": "142",
"sentAt": 1555668711,
"category": "message",
"type": "text"
}
}
```
```json theme={null}
{
"alert": "Nancy Grace: has sent an image",
"sound": "default",
"title": "CometChat",
"message": {
"receiver": "cometchat-uid-4",
"data": {
"attachments": [
{
"extension": "png",
"size": 14327,
"name": "extension_leftpanel.png",
"mimeType": "image/png",
"url": "https://s3-eu-west-1.amazonaws.com/data.cometchat.com/1255466c41bd7f/media/1555671238_956450103_extension_leftpanel.png"
}
],
"entities": {
"receiver": {
"entityType": "user",
"entity": {
"uid": "cometchat-uid-4",
"role": "default",
"name": "Susan Marie",
"avatar": "https://assets.cometchat.io/sampleapp/v2/users/cometchat-uid-4.webp",
"status": "offline"
}
},
"sender": {
"entityType": "user",
"entity": {
"uid": "cometchat-uid-3",
"role": "default",
"name": "Nancy Grace",
"avatar": "https://assets.cometchat.io/sampleapp/v2/users/cometchat-uid-3.webp",
"status": "offline"
}
}
},
"url": "https://s3-eu-west-1.amazonaws.com/data.cometchat.com/1255466c41bd7f/media/1555671238_956450103_extension_leftpanel.png"
},
"sender": "cometchat-uid-3",
"receiverType": "user",
"id": "145",
"sentAt": 1555671238,
"category": "message",
"type": "image"
}
}
```
## Advanced
### Convert Push Notification payload to Message object
CometChat SDK provides a method `CometChat.CometChatHelper.processMessage()` which will take the JSON received in The push notification as input, and return the corresponding `TextMessage`, `MediaMessage`,`CustomMessage` or `Call` object in return. Once the message object is received, you can use the entity as per your requirements.
This code needs to be added to the `willPresent notification` method of the `UNUserNotificationCenterDelegate` delegate.
```swift theme={null}
func userNotificationCenter(_ center: UNUserNotificationCenter,
willPresent notification: UNNotification,
withCompletionHandler completionHandler: @escaping (UNNotificationPresentationOptions) -> Void) {
if let userInfo = notification.request.content.userInfo as? [String : Any], let messageObject = userInfo["message"], let str = messageObject as? String, let dict = str.stringTodictionary() {
if let baseMessage = CometChat.processMessage(dict).0 {
switch baseMessage.messageCategory {
case .message:
if let message = baseMessage as? BaseMessage {
switch message.messageType {
case .text:
print("text Messagge is: \\((message as?TextMessage)?.stringValue())")
case .image:
print("image Messagge is: \\((message as? MediaMessage)?.stringValue())")
case .video:
print("video Messagge is: \\((message as? MediaMessage)?.stringValue())")
case .audio:
print("audio Messagge is: \\((message as? MediaMessage)?.stringValue())")
case .file:
print("file Messagge is: \\((message as? MediaMessage)?.stringValue())")
case .custom:
print("custom Messagge is: \\((message as? MediaMessage)?.stringValue())")
case .groupMember: break
@unknown default:break}
}
case .action: break
case .call:
if let call = baseMessage as? Call {
print("call is: \\(call.stringValue())")
}
case .custom:
if let customMessage = baseMessage as? CustomMessage {
print("customMessage is: \\(customMessage.stringValue())")
}
@unknown default: break
}
}
}
completionHandler([.alert, .badge, .sound])
}
extension String {
func stringTodictionary() -> [String:Any]? {
var dictonary:[String:Any]?
if let data = self.data(using: .utf8) {
do {
dictonary = try JSONSerialization.jsonObject(with: data, options: []) as? [String : Any]
if let myDictionary = dictonary
{
return myDictionary;
}
} catch let error as NSError {
print(error)
}
}
return dictonary;
}
}
```
### Miscellaneous
1. [Increment App Icon Badge Count](/sdk/ios/increment-app-icon-badge-count)
2. [Launch chat window on tap of push notification](/sdk/ios/launch-chat-window-on-tap-of-push-notification)
## iOS APNs
Apple Push Notification service or APNs is used to send notifications to iOS devices. With this, you can also use Apple's CallKit for showing the call screen.
iOS Push notifications sample app
View on Github
## Get APNS Credentials
The following steps in this section are written on the assumption that you already have an app ID assigned to your client app.
### Step 1: Create a Certificate Signing Request
To obtain a signing certificate required to sign apps for installation on iOS devices, you should first create a certificate signing request (CSR) file through Keychain Access on your Mac.
1. Open the Keychain Access from the utility folder, go to Keychain Access > Certificate Assistant > Request a Certificate From a Certificate Authority, and then click.
2. The Certificate Information dialog box appears. Enter the email address that you use in your Apple Developer account, and enter a common name for your private key. Don't enter CA email address, choose Saved to disk, and then click the Continue button.
3. Specify the name of your CSR to save and choose the location to save the file on your local disk. Then your CSR file is created, which contains a public/private key pair.
### Step 2: Create an SSL certificate
1. Sign in to your account at the [Apple Developer Member Center](https://developer.apple.com/membercenter).
2. Go to Certificates, Identifiers & Profiles.
3. Create new Certificate by clicking on the + icon.
4. Under Services, select - Apple Push Notification services SSL (Sandbox & Production)
5. Select your App ID from the dropdown.
6. Upload CSR file., upload the CSR file you created through the **Choose File** button. To complete the process, choose Continue. When the certificate is ready, choose Download to save it to your Mac.
### Step 3: Export and update .p8 certificate
1. To generate a .p8 key file, go to [Apple Developer Account](https://developer.apple.com/account/), then select Certificates, IDs & Profiles.
2. Select Keys and click on the "+" button to add a new key.
3. In the new key page, type in your key name and check the Apple Push Notification service (APNs) box, then click "Continue" and click "Register".
4. Then proceed to download the key file by clicking Download.
5. Make note of the `Key ID`, `Team ID` and your `Bundle ID` for saving in the Extension's settings.
**If you wish to use the .p12 certificate instead, do the following:**
1. Type a name for the .p12 file and save it to your Mac.
2. Browse to the location where you saved your key, select it, and click Open. Add the key ID for the key (available in Certificates, Identifiers & Profiles in the Apple Developer Member Center) and export it.
3. DO NOT provide an export password when prompted.
4. The .p12 file will be required in the next step for uploading in the CometChat Dashboard.
## Extension settings
### Step 1: Enable the extension
1. Login to [CometChat](https://app.cometchat.com/login) and select your app.
2. Go to the Extensions section and Enable the Push Notifications extension.
3. Open the settings for this extension and save the following.
### Step 2: Save your settings
On the Settings page you need to enter the following:
1. **Set extension version**
1. The extension version has to be set to 'V2' or 'V1 & V2' in order to use APNs as the provider.
2. **Select Platforms**
1. You can select the platforms on which you wish to receive Push Notifications.
3. **APNs Settings**
1. You can turn off the Production mode when you create a development build of your application.
2. Upload the .p8 or .p12 certificate exported in the previous step.
4. **Push payload message options**
The maximum payload size supported by FCM and APNs for push notifications is approximately 4 KB. Due to the inclusion of CometChat's message object, the payload size may exceed this limit, potentially leading to non-delivery of push notifications for certain messages. The options provided allow you to remove the sender's metadata, receiver's metadata, message metadata and trim the content of the text field.
* The message metadata includes the outputs of the Thumbnail Generation, Image Moderation, and Smart Replies extensions. You may want to retain this metadata if you need to customize the notification displayed to the end user based on these outputs.
5. **Notification Triggers**
1. Select the triggers for sending Push Notifications. These triggers can be classified into 3 main categories:
1. Message Notifications
2. Call Notifications
3. Group Notifications
2. These are pretty self-explanatory and you can toggle them as per your requirement.
## iOS App Setup
### Initial Setup
1. Call `CometChat.init()` method to initialize CometChat in your application. This needs to be called only once.
2. The user has to be logged in using `CometChat.login()` method. On the success callback, register the token with the extension. Two tokens need to be registered, out of which one is APNs token and other is CallKit token: a. `CometChat.registerTokenForPushNotification(token: apnsToken, settings: ["voip":false])`\
b. `CometChat.registerTokenForPushNotification(token: voipToken, settings: ["voip":true])`
```swift theme={null}
let authKey = "XXXX XXXX XXXXX"
CometChat.login(UID: UID, authKey: authKey, onSuccess: { (current_user) in
DispatchQueue.main.async {
if let apnsToken = UserDefaults.standard.value(forKey: "apnsToken") as? String {
print("APNS token is: \(apnsToken)")
CometChat.registerTokenForPushNotification(token: apnsToken, settings: ["voip":false]) { (success) in
print("onSuccess to registerTokenForPushNotification: \(success)")
DispatchQueue.main.async {self.activityIndicator.stopAnimating()
print("login success with : \(current_user.stringValue())")
self.performSegue(withIdentifier: "presentPushNotification", sender: nil)
}
} onError: { (error) in
print("error to registerTokenForPushNotification")
}
}
if let voipToken = UserDefaults.standard.value(forKey: "voipToken") as? String {
print("VOIP token is: \(voipToken)")
CometChat.registerTokenForPushNotification(token: voipToken, settings: ["voip":true]) { (success) in
print("onSuccess to registerTokenForPushNotification: \(success)")
DispatchQueue.main.async {self.activityIndicator.stopAnimating()
print("login success with : \(current_user.stringValue())")
self.performSegue(withIdentifier: "presentPushNotification", sender: nil)
}
} onError: { (error) in
print("error to registerTokenForPushNotification")
}
}
}
}
}) { (error) in
print("error while login", error);
}
}
```
3. Import PushKit and CallKit in AppDelegate.Swift file.
```swift theme={null}
import PushKit
import CallKit
```
### Receive Push Notifications
1. Registering for the APNs notifications
```swift theme={null}
var window: UIWindow?
var uuid: UUID?
var activeCall: Call?
var cancelCall: Bool = true
var onCall = true
var callController = CXCallController()
let voipRegistry = PKPushRegistry(queue: DispatchQueue.main)
var provider: CXProvider? = nil
func application(_ application: UIApplication, didFinishLaunchingWithOptions launchOptions: [UIApplication.LaunchOptionsKey: Any]?) -> Bool {
self.voipRegistration()
// [START register_for_notifications]
if #available(iOS 10.0, *) {
UNUserNotificationCenter.current().delegate = self
let authOptions: UNAuthorizationOptions = [.alert, .badge, .sound]
UNUserNotificationCenter.current().requestAuthorization(
options: authOptions,
completionHandler: {_, _ in })
} else {
let settings: UIUserNotificationSettings =
UIUserNotificationSettings(types: [.alert, .badge, .sound], categories: nil)
application.registerUserNotificationSettings(settings)
}
application.registerForRemoteNotifications()
// [END register_for_notifications]
return true
}
// Register for VoIP notifications
func voipRegistration() {
// Create a push registry object
let mainQueue = DispatchQueue.main
let voipRegistry: PKPushRegistry = PKPushRegistry(queue: mainQueue)
voipRegistry.delegate = self
voipRegistry.desiredPushTypes = [PKPushType.voIP]
}
```
2. Add AppDelegate extension for receiving Push Notifications
```swift theme={null}
extension AppDelegate : UNUserNotificationCenterDelegate {
// Receive displayed notifications for iOS 10 devices.
func userNotificationCenter(_ center: UNUserNotificationCenter,
willPresent notification: UNNotification,
withCompletionHandler completionHandler: @escaping (UNNotificationPresentationOptions) -> Void) {
print("willPresent notification: \(notification.request.content.userInfo)")
if let userInfo = notification.request.content.userInfo as? [String : Any], let messageObject =
userInfo["message"], let str = messageObject as? String, let dict = str.stringTodictionary() {
if let baseMessage = CometChat.processMessage(dict).0 {
switch baseMessage.messageCategory {
case .message:
if let message = baseMessage as? BaseMessage {
switch message.messageType {
case .text:
print("text Messagge is: \((message as? TextMessage)?.stringValue())")
case .image:
print("image Messagge is: \((message as? MediaMessage)?.stringValue())")
case .video:
print("video Messagge is: \((message as? MediaMessage)?.stringValue())")
case .audio:
print("audio Messagge is: \((message as? MediaMessage)?.stringValue())")
case .file:
print("file Messagge is: \((message as? MediaMessage)?.stringValue())")
case .custom:
print("custom Messagge is: \((message as? MediaMessage)?.stringValue())")
case .groupMember:
break
@unknown default:
break
}
}
case .action: break
case .call:
if let call = baseMessage as? Call {
print("call is: \(call.stringValue())")
}
case .custom:
if let customMessage = baseMessage as? CustomMessage {
print("customMessage is: \(customMessage.stringValue())")
}
@unknown default: break
}
}
}
completionHandler([.alert, .badge, .sound])
}
func userNotificationCenter(_ center: UNUserNotificationCenter,
didReceive response: UNNotificationResponse,
withCompletionHandler completionHandler: @escaping () -> Void) {
let notification = response.notification.request.content.userInfo
print("notification is 11: \(notification)")
completionHandler()
}
func application(_ application: UIApplication, didRegisterForRemoteNotificationsWithDeviceToken deviceToken: Data) {
let token = deviceToken.reduce("", {$0 + String(format: "%02X", $1)})
print("Device Token : ",token)
let hexString = deviceToken.map { String(format: "%02.2hhx", $0) }.joined()
print("Device Token 11: ",hexString)
UserDefaults.standard.set(hexString, forKey: "apnsToken")
CometChat.registerTokenForPushNotification(token: hexString, settings: ["voip":false]) { (success) in
print("registerTokenForPushNotification voip: \(success)")
} onError: { (error) in
print("registerTokenForPushNotification error: \(error)")
}
}
}
```
3. Add AppDelegate extension for VOIP notifications. Launch CallKit screen when the VOIP notification is received. Once the CallKit screen is displayed, you can Accept or Reject the CometChat call accordingly.
```swift theme={null}
// MARK: CallKit & PushKit
extension AppDelegate: PKPushRegistryDelegate , CXProviderDelegate {
func pushRegistry(_ registry: PKPushRegistry, didUpdate pushCredentials: PKPushCredentials, for type: PKPushType) {
let deviceToken = pushCredentials.token.reduce("", {$0 + String(format: "%02X", $1) })
print("voip token is: \(deviceToken)")
UserDefaults.standard.set(deviceToken, forKey: "voipToken")
CometChat.registerTokenForPushNotification(token: deviceToken, settings: ["voip":true]) { (success) in
print("registerTokenForPushNotification voip: \(success)")
} onError: { (error) in
print("registerTokenForPushNotification error: \(error)")
}
}
func pushRegistry(_ registry: PKPushRegistry, didReceiveIncomingPushWith payload: PKPushPayload, for type: PKPushType, completion: @escaping () -> Void) {
if let userInfo = payload.dictionaryPayload as? [String : Any], let messageObject =
userInfo["message"], let dict = messageObject as? [String : Any] {
if let baseMessage = CometChat.processMessage(dict).0 {
switch baseMessage.messageCategory {
case .message: break
case .action: break
case .call:
if let call = baseMessage as? Call {
switch call.callStatus {
case .initiated:
self.activeCall = call
self.uuid = UUID()
if let name = (call.sender)?.name {
let config = CXProviderConfiguration(localizedName: "APNS + Callkit")
config.iconTemplateImageData = #imageLiteral(resourceName: "your_app_icon").pngData()
config.includesCallsInRecents = false
config.ringtoneSound = "ringtone.caf"
config.supportsVideo = true
provider = CXProvider(configuration: config)
provider?.setDelegate(self, queue: nil)
let update = CXCallUpdate()
update.remoteHandle = CXHandle(type: .generic, value: name.capitalized)
if call.callType == .video {
update.hasVideo = true
}else{
update.hasVideo = false
}
provider?.reportNewIncomingCall(with: self.uuid!, update: update, completion: { error in
if error == nil {
self.configureAudioSession()
}
})
}
case .ongoing, .unanswered, .rejected, .busy, .cancelled:
if self.activeCall != nil {
if self.cancelCall {
self.end(uuid: self.uuid!)
}
}
case .ended: break
@unknown default: break }
}
case .custom: break
@unknown default: break
}
}
}
}
internal func configureAudioSession() {
do {
try AVAudioSession.sharedInstance().setCategory(AVAudioSession.Category.playAndRecord, options: [.mixWithOthers, .allowBluetooth, .defaultToSpeaker])
try AVAudioSession.sharedInstance().setActive(true)
} catch let error as NSError {
print(error)
}
}
func providerDidReset(_ provider: CXProvider) {
if let uuid = self.uuid {
onCall = true
provider.reportCall(with: uuid, endedAt: Date(), reason: .unanswered)
}
}
func provider(_ provider: CXProvider, perform action: CXAnswerCallAction) {
if let activeCall = activeCall {
startCall()
}
action.fulfill()
}
func provider(_ provider: CXProvider, perform action: CXEndCallAction) {
NotificationCenter.default.post(name: NSNotification.Name(rawValue: "didRejectButtonPressed"), object: nil, userInfo: nil)
end(uuid: self.uuid!)
onCall = true
if let activeCall = activeCall {
CometChat.rejectCall(sessionID: activeCall.sessionID ?? "", status: .rejected, onSuccess: {(rejectedCall) in
DispatchQueue.main.async {
CometChatSnackBoard.display(message: "CALL_REJECTED".localized(), mode: .info, duration: .short)
}
}) { (error) in
DispatchQueue.main.async {
if let errorMessage = error?.errorDescription {
CometChatSnackBoard.display(message: "CALL_REJECTED".localized(), mode: .info, duration: .short)
}
}
}
provider.reportCall(with: self.uuid!, endedAt: Date(), reason: .remoteEnded)
}
action.fail()
}
func provider(_ provider: CXProvider, didDeactivate audioSession: AVAudioSession) {
print(#function)
}
func provider(_ provider: CXProvider, timedOutPerforming action: CXAction) {
action.fulfill()
print(#function)
}
func provider(_ provider: CXProvider, perform action: CXSetHeldCallAction) {
print(#function)
}
func provider(_ provider: CXProvider, perform action: CXSetMutedCallAction) {
print(#function)
}
func end(uuid: UUID) {
print("endUUID",uuid)
let endCallAction = CXEndCallAction(call: uuid)
let transaction = CXTransaction()
transaction.addAction(endCallAction)
requestTransaction(transaction, action: "")
}
func setHeld(uuid: UUID, onHold: Bool) {
print("setHeld",uuid)
let setHeldCallAction = CXSetHeldCallAction(call: uuid, onHold: onHold)
let transaction = CXTransaction()
transaction.addAction(setHeldCallAction)
requestTransaction(transaction, action: "")
}
internal func requestTransaction(_ transaction: CXTransaction, action: String = "") {
callController.request(transaction) { error in
if let error = error {
print("Error requesting transaction: \(error)")
} else {
print("Requested transaction successfully")
}
}
}
public func startCall(){
let activeCall = CometChatCall()
cancelCall = false
activeCall.modalPresentationStyle = .fullScreen
if let window = UIApplication.shared.windows.first , let rootViewController = window.rootViewController {
var currentController = rootViewController
while let presentedController = currentController.presentedViewController {
currentController = presentedController
}
currentController.present(activeCall, animated: true, completion: nil)
}
}
}
```
## Miscellaneous
### Create view controller for Calls
Create a viewController which will start the call when the user starts the call.
```swift theme={null}
import UIKit
import CometChatPro
import CallKit
class CometChatCall: UIViewController {
override func viewDidLoad() {
super.viewDidLoad()
if let appDelegate = UIApplication.shared.delegate as? AppDelegate {
if let call = appDelegate.activeCall {
if (call.callInitiator as? User)?.uid != CometChat.getLoggedInUser()?.uid {
CometChat.acceptCall(sessionID: call.sessionID ?? "") { acceptedCall in
DispatchQueue.main.async {
let callSettings = CallSettings.CallSettingsBuilder(callView: self.view, sessionId: acceptedCall?.sessionID ?? "").setMode(mode: .MODE_SINGLE).build()
CometChat.startCall(callSettings: callSettings) { userJoined in
appDelegate.onCall = true
} onUserLeft: { onUserLeft in
} onUserListUpdated: { onUserListUpdated in
} onAudioModesUpdated: { onAudioModesUpdated in
} onUserMuted: { onUserMuted in
} onCallSwitchedToVideo: { onCallSwitchedToVideo in
} onRecordingStarted: { onRecordingStarted in
} onRecordingStopped: { onRecordingStopped in
} onError: { error in
DispatchQueue.main.async {
self.dismiss(animated: true, completion: nil)
}
} onCallEnded: { ended in
DispatchQueue.main.async {
var str = ""
if let uuuid = appDelegate.uuid {
print("CometChatCalls", uuuid)
}
self.dismiss(animated: true, completion: nil)
self.dismiss(animated: true)
}
}
}
} onError: { error in
}
}else{
let callSettings = CallSettings.CallSettingsBuilder(callView: self.view, sessionId: call.sessionID ?? "").setMode(mode: .MODE_SINGLE).build()
CometChat.startCall(callSettings: callSettings) { userJoined in
} onUserLeft: { onUserLeft in
} onUserListUpdated: { onUserListUpdated in
} onAudioModesUpdated: { onAudioModesUpdated in
} onUserMuted: { onUserMuted in
} onCallSwitchedToVideo: { onCallSwitchedToVideo in
} onRecordingStarted: { onRecordingStarted in
} onRecordingStopped: { onRecordingStopped in
} onError: { error in
DispatchQueue.main.async {
self.dismiss(animated: true, completion: nil)
}
} onCallEnded: { ended in
DispatchQueue.main.async {
self.dismiss(animated: true, completion: nil)
}
}
}
}
}
}
}
```
### Convert Push Notification payload to Message object
CometChat SDK provides a method `CometChat.CometChatHelper.processMessage()` which will take the JSON received in The push notification as input, and return the corresponding `TextMessage`, `MediaMessage`,`CustomMessage` or `Call` object in return. Once the message object is received, you can use the entity as per your requirements.
This code needs to be added to the `willPresent notification` method of the `UNUserNotificationCenterDelegate` delegate.
```swift theme={null}
func userNotificationCenter(_ center: UNUserNotificationCenter,
willPresent notification: UNNotification,
withCompletionHandler completionHandler: @escaping (UNNotificationPresentationOptions) -> Void) {
if let userInfo = notification.request.content.userInfo as? [String : Any], let messageObject = userInfo["message"], let str = messageObject as? String, let dict = str.stringTodictionary() {
if let baseMessage = CometChat.processMessage(dict).0 {
switch baseMessage.messageCategory {
case .message:
if let message = baseMessage as? BaseMessage {
switch message.messageType {
case .text:
print("text Messagge is: \((message as?TextMessage)?.stringValue())")
case .image:
print("image Messagge is: \((message as? MediaMessage)?.stringValue())")
case .video:
print("video Messagge is: \((message as? MediaMessage)?.stringValue())")
case .audio:
print("audio Messagge is: \((message as? MediaMessage)?.stringValue())")
case .file:
print("file Messagge is: \((message as? MediaMessage)?.stringValue())")
case .custom:
print("custom Messagge is: \((message as? MediaMessage)?.stringValue())")
case .groupMember: break
@unknown default:break}
}
case .action: break
case .call:
if let call = baseMessage as? Call {
print("call is: \(call.stringValue())")
}
case .custom:
if let customMessage = baseMessage as? CustomMessage {
print("customMessage is: \(customMessage.stringValue())")
}
@unknown default: break
}
}
}
completionHandler([.alert, .badge, .sound])
}
extension String {
func stringTodictionary() -> [String:Any]? {
var dictonary:[String:Any]?
if let data = self.data(using: .utf8) {
do {
dictonary = try JSONSerialization.jsonObject(with: data, options: []) as? [String : Any]
if let myDictionary = dictonary
{
return myDictionary;
}
} catch let error as NSError {
print(error)
}
}
return dictonary;
}
}
```
## Flutter
Learn how to implement Push notifications for the Flutter platform using FCM as well as APNs. This document guides you to set up Flutter push notifications as follows:
1. Using FCM to implement push notifications for messaging on Android and iOS.
2. Using APN to implement push notifications for messaging on iOS.
Flutter Push notifications support
Push Notifications are supported in Flutter for CometChat SDK v3.0.9 and above.
## FCM: Push notifications for messaging on Android and iOS
For Push notifications from FCM to work on both Android and iOS, the push payload has to be of type `Notification message`.
A `Notification message` is a push payload that has the notification key in it. These push notifications are handled directly by the OS and as a developer, you cannot customize these notifications.
This simple setup can be used for apps that only implement messaging feature of CometChat.
Learn more about [FCM messages](https://firebase.google.com/docs/cloud-messaging/).
Flutter Push notifications sample app
Implementation using FCM for Android and iOS.
View on Github
### Step 1: Install packages
Add the following to your pubspec.yaml file under dependencies.
```yaml theme={null}
firebase_core: ^2.8.0
firebase_messaging: ^14.3.0
```
Install the packages.
```sh theme={null}
flutter pub get
```
### Step 2: Configure with flutterfire\_cli
Use the following command to install `flutterfire_cli`
```sh theme={null}
dart pub global activate flutterfire_cli
```
```sh theme={null}
flutterfire configure --project=
```
This will ask you for the platforms. Select `android` and `ios`.
The CLI tool will add the following files to your directory structure:
1. `google-services.json` to the android folder.
2. `GoogleService-Info.plist` to the ios folder.
3. `firebase_options.dart` to the `lib` folder.
In the build.gradle file, change:
```gradle theme={null}
// Change this:
classpath 'com.google.gms:google-services:4.3.10'
// to
classpath 'com.google.gms:google-services:4.3.14'
```
In your Firebase Console, go to project settings and upload the .p8 file obtained from the Apple Developer dashboard along with the Key ID and Team ID.
### Step 3: FCM setup in app
This requires you to first set up a global context. It will help you in opening your app once your notification is tapped. Using this global context, you can write a function to navigate to the screen of choice once the notification is tapped.
```dart theme={null}
import 'package:flutter/material.dart';
import 'package:flutter_pn/screens/chat_screen.dart';
class NavigationService {
static final GlobalKey navigatorKey =
GlobalKey();
static void navigateToChat(String text) {
navigatorKey.currentState?.push(
MaterialPageRoute(builder: (context) => ChatScreen(chatId: text)),
);
}
}
```
Once the user has logged in to CometChat, do the following to setup firebase:
1. Write a top-level function that is outside of any call. This function will handle the notifications when the app is not in the foreground.
2. Initialize firebase with the FirebaseOptions from the previous step.
3. Get an instance of firebase messaging
4. Request permissions
5. Set up listeners once the permission is granted:
1. Background notification listener
2. Refreshed token listener that records the FCM token with the extension.
3. Notification tap listeners for background and terminated states of the app.
6. Make a call to save the FCM token with the extension.
### Step 4: Setup for iOS
1. Open the project in XCode (`ios/Runner.xcworkspace` )
2. Add **Push notifications** capability.
3. Add **Background execution** capability with **Background fetch** & **Remote notification** enabled.
4. Inside the `ios` folder, execute `pod install` .
Fore more details refer to the [Firebase documentation](https://firebase.google.com/docs/cloud-messaging/flutter/client#ios).
### Step 5: Run your application
Running the app in profile mode for iOS enables you to see the working once the app is terminated.
```
flutter run
```
```
flutter run --profile
```
### Step 6: Extension setup (FCM)
1. Login to CometChat dashboard.
2. Go to the extensions section.
3. Enable the Push notifications extension.
4. Click on the settings icon to open the settings.
5. Upload the service account file that is available on the Firebase Console.
6. Make sure that you are including the `notification` key in the payload. Otherwise, this won't work.
7. Push payload message options
The maximum payload size supported by FCM and APNs for push notifications is approximately 4 KB. Due to the inclusion of CometChat's message object, the payload size may exceed this limit, potentially leading to non-delivery of push notifications for certain messages. The options provided allow you to remove the sender's metadata, receiver's metadata, message metadata and trim the content of the text field.
The message metadata includes the outputs of the Thumbnail Generation, Image Moderation, and Smart Replies extensions. You may want to retain this metadata if you need to customize the notification displayed to the end user based on these outputs.
## APN: Push notifications for messaging on iOS
Apple Push Notifications service or APNs is only available for Apple devices. This will not work on Android devices.
This setup ensures that the Push notifications for CometChat messages is sent using APNs `device token`.
Flutter Push notifications sample app
Implementation using APNs for iOS.
View on Github
### Step 1: Install dependencies
Add the following to your pubspec.yaml file under dependencies.
```yaml theme={null}
flutter_apns_only: 1.6.0
```
### Step 2: Add capabilities
1. Open the project in XCode (`ios/Runner.xcworkspace` )
2. Add **Push notifications** capability.
3. Add **Background modes** capability with:
1. Remote notifications
### Step 3: Update AppDelegate.swift
Add the below to your AppDeletegate.swift file.
```swift theme={null}
if #available(iOS 11.0, *) {
UNUserNotificationCenter.current().delegate = self as? UNUserNotificationCenterDelegate
}
```
### Step 4: APN setup in app
Setup a global context to be able to open your app to a specific screen if the notification is tapped. Using the global context, write a function to navigate to the screen of your choice:
```dart theme={null}
import 'package:flutter/material.dart';
import 'package:flutter_pn/screens/chat_screen.dart';
class NavigationService {
static final GlobalKey navigatorKey =
GlobalKey();
static void navigateToChat(String text) {
navigatorKey.currentState?.push(
MaterialPageRoute(builder: (context) => ChatScreen(chatId: text)),
);
}
}
```
Once the CometChat has been initialized and the user has logged in, do the required setup for the above packages that handle APNs and VoIP notifications.
### Step 5: Run on a device
Run your app on a real device as Push notifications don't work on emulators.
Use the profile mode to see the behavior when the app is in the background or terminated states.
```
flutter run --profile
```
### Step 6: Extension setup (APN)
1. Login to CometChat dashboard.
2. Go to the extensions section.
3. Enable the Push notifications extension.
4. Click on the settings icon to open the settings.
5. Save the Team ID, Key ID, Bundle ID and upload the p8 certificate obtained from Apple Developer console.
6. Push payload message options
The maximum payload size supported by FCM and APNs for push notifications is approximately 4 KB. Due to the inclusion of CometChat's message object, the payload size may exceed this limit, potentially leading to non-delivery of push notifications for certain messages. The options provided allow you to remove the sender's metadata, receiver's metadata, message metadata and trim the content of the text field.
* The message metadata includes the outputs of the Thumbnail Generation, Image Moderation, and Smart Replies extensions. You may want to retain this metadata if you need to customize the notification displayed to the end user based on these outputs.
7. Save the settings.
## React Native
Learn how to set up Push notifications for React Native using Firebase Cloud Messaging or FCM.
React Native Push notifications sample app
View on Github
## Firebase Project Setup
Visit [Firebase](https://console.firebase.google.com/) and login/signup using your Gmail ID.
### Step 1: Create a new Firebase Project
Head over to the [Firebase Console](https://console.firebase.google.com/) to create a new project.
This is a simple 3 step process where:
1. You give a name to your project
2. Add Google Analytics to your project (Optional)
3. Configure Google Analytics account (Optional)
Click on Create and you are ready to go.
### Step 2: Add Firebase to your App
React native setup will require 2 files for Android and iOS:
1. For Android, you need to download the google-services.json file from the Firebase console.
2. For iOS, you need to download the GoogleService-Info.plist file from the Firebase console.
### Step 3: Download the service account file
## Extension settings
### Step 1: Enable the extension
1. Login to [CometChat](https://app.cometchat.com/login) and select your app.
2. Go to the Extensions section and Enable the Push Notifications extension.
3. Open up the settings and save the following settings.
### Step 2: Save your settings
On the Settings page you need to enter the following:
1. **Set extension version**
* If you are setting it for the first time, Select `V2` to start using the token-based version of the Push Notification extension.
* If you already have an app using `V1` and want to migrate your app to use `V2`, then Select `V1 & V2` option. This ensures that the users viewing the older version of your app also receive Push Notifications.
* Eventually, when all your users are on the latest version of your app, you can change this option to `V2`, thus turning off `V1` (Topic-based) Push Notifications completely.
2. **Select the platforms that you want to support**
* Select from Web, Android, Ionic (Deprecated), React Native, Flutter & iOS.
3. **Notification payload settings**
* You can control if the notification key should be in the Payload or not. Learn more about the FCM Messages [here](https://firebase.google.com/docs/cloud-messaging/).
4. **Push payload message options**
The maximum payload size supported by FCM and APNs for push notifications is approximately 4 KB. Due to the inclusion of CometChat's message object, the payload size may exceed this limit, potentially leading to non-delivery of push notifications for certain messages. The options provided allow you to remove the sender's metadata, receiver's metadata, message metadata and trim the content of the text field.
* The message metadata includes the outputs of the Thumbnail Generation, Image Moderation, and Smart Replies extensions. You may want to retain this metadata if you need to customize the notification displayed to the end user based on these outputs.
5. **Notification Triggers**
* Select the triggers for sending Push Notifications. These triggers can be classified into 3 main categories:
1. Message Notifications
2. Call Notifications
3. Group Notifications
* These are pretty self-explanatory and you can toggle them as per your requirement.
## App Setup
### Step 1: Initial plugin setup
1. For React Native, there are numerous plugins available via NPM which can be used to set up push notifications for your apps. [react-native-firebase](https://www.npmjs.com/package/react-native-firebase) and [react-native-notifications](https://www.npmjs.com/package/react-native-notifications) are just the two out of many available.
2. To setup Push Notification, you need to follow the steps mentioned in the Plugin's Documentation.
At this point, you will have:
1. Two separate apps created on the Firebase console. (For Android and iOS).
2. Plugin setup completed as per the respective documentation and our reference.
### Step 2: Register FCM Token
1. This step assumes that you already have a React Native app setup with CometChat installed. Make sure that the CometChat object is initialized and user has been logged in.
2. On the success callback of user login, you can fetch the FCM Token and register it with the extension as shown below:
```js theme={null}
// Pseudo-code with async-await syntax
const APP_ID = 'APP_ID';
const REGION = 'REGION';
const AUTH_KEY = 'AUTH_KEY';
const UID = 'UID';
const APP_SETTINGS = new CometChat.AppSettingsBuilder()
.subscribePresenceForAllUsers()
.setRegion(REGION)
.build();
try {
// First initialize the app
await CometChat.init(APP_ID, APP_SETTINGS);
// Login the user
await CometChat.login(UID, AUTH_KEY);
// Get the FCM device token
// You should have imported the following in the file:
// import messaging from '@react-native-firebase/messaging';
const FCM_TOKEN = await messaging().getToken();
// Register the token with Push Notifications (Legacy)
await CometChat.registerTokenForPushNotification(FCM_TOKEN);
} catch (error) {
// Handle errors gracefully
}
```
3. Registration also needs to happen in case of token refresh as shown below:
```js theme={null}
// Pseudo-code
// You should have imported the following in the file:
// import messaging from '@react-native-firebase/messaging';
try {
// Listen to whether the token changes
return messaging().onTokenRefresh(FCM_TOKEN => {
await CometChat.registerTokenForPushNotification(FCM_TOKEN);
});
// ...
} catch(error) {
// Handle errors gracefully
}
```
For React Native Firebase reference, visit the link below:
### Step 3: Receive Notifications
```js theme={null}
// Pseudo-code
import messaging from '@react-native-firebase/messaging';
import { Alert } from 'react-native';
// Implementation can be done in a life-cycle method or hook
const unsubscribe = messaging().onMessage(async (remoteMessage) => {
Alert.alert('A new FCM message arrived!', JSON.stringify(remoteMessage));
});
```
We send Data Notifications and you need to handle displaying notifications at your end. For eg: Using Notifee
### Step 4: Stop receiving Notifications
1. Simply logout the CometChat user and you will stop receiving notifications.
2. As a good practice, you can also delete the FCM Token by calling `deleteToken` on the messaging object.
```js theme={null}
// Pseudo-code using async-await syntax
logout = async () => {
// User logs out of the app
await CometChat.logout();
// You should have imported the following in the file:
// import messaging from '@react-native-firebase/messaging';
// This is a good practice.
await messaging().deleteToken();
};
```
## Advanced
### Handle Custom Messages
To receive notification of `CustomMessage`, you need to set metadata while sending the `CustomMessage`.
```js theme={null}
var receiverID = 'UID';
var customData = {
latitude: '50.6192171633316',
longitude: '-72.68182268750002',
};
var customType = 'location';
var receiverType = CometChat.RECEIVER_TYPE.USER;
var metadata = {
pushNotification: 'Your Notification Message',
};
var customMessage = new CometChat.CustomMessage(
receiverID,
receiverType,
customType,
customData
);
customMessage.setMetadata(metadata);
CometChat.sendCustomMessage(customMessage).then(
(message) => {
// Message sent successfully.
console.log('custom message sent successfully', message);
},
(error) => {
console.log('custom message sending failed with error', error);
// Handle exception.
}
);
```
### Converting push notification payload to message object
CometChat SDK provides a method `CometChat.CometChatHelper.processMessage()` to convert the message JSON to the corresponding object of TextMessage, MediaMessage,CustomMessage, Action or Call.
```js theme={null}
var processedMessage = CometChat.CometChatHelper.processMessage(JSON_MESSAGE);
```
Type of Attachment can be of the following the type\
1.`CometChatConstants.MESSAGE_TYPE_IMAGE`\
2.`CometChatConstants.MESSAGE_TYPE_VIDEO`\
3.`CometChatConstants.MESSAGE_TYPE_AUDIO`\
4.`CometChatConstants.MESSAGE_TYPE_FILE`
Push Notification: Payload Sample for Text Message and Attachment/Media Message
```json theme={null}
{
"alert": "Nancy Grace: Text Message",
"sound": "default",
"title": "CometChat",
"message": {
"receiver": "cometchat-uid-4",
"data": {
"entities": {
"receiver": {
"entityType": "user",
"entity": {
"uid": "cometchat-uid-4",
"role": "default",
"name": "Susan Marie",
"avatar": "https://assets.cometchat.io/sampleapp/v2/users/cometchat-uid-4.webp",
"status": "offline"
}
},
"sender": {
"entityType": "user",
"entity": {
"uid": "cometchat-uid-3",
"role": "default",
"name": "Nancy Grace",
"avatar": "https://assets.cometchat.io/sampleapp/v2/users/cometchat-uid-3.webp",
"status": "offline"
}
}
},
"text": "Text Message"
},
"sender": "cometchat-uid-3",
"receiverType": "user",
"id": "142",
"sentAt": 1555668711,
"category": "message",
"type": "text"
}
}
```
```json theme={null}
{
"alert": "Nancy Grace: has sent an image",
"sound": "default",
"title": "CometChat",
"message": {
"receiver": "cometchat-uid-4",
"data": {
"attachments": [
{
"extension": "png",
"size": 14327,
"name": "extension_leftpanel.png",
"mimeType": "image/png",
"url": "https://s3-eu-west-1.amazonaws.com/data.cometchat.com/1255466c41bd7f/media/1555671238_956450103_extension_leftpanel.png"
}
],
"entities": {
"receiver": {
"entityType": "user",
"entity": {
"uid": "cometchat-uid-4",
"role": "default",
"name": "Susan Marie",
"avatar": "https://assets.cometchat.io/sampleapp/v2/users/cometchat-uid-4.webp",
"status": "offline"
}
},
"sender": {
"entityType": "user",
"entity": {
"uid": "cometchat-uid-3",
"role": "default",
"name": "Nancy Grace",
"avatar": "https://assets.cometchat.io/sampleapp/v2/users/cometchat-uid-3.webp",
"status": "offline"
}
}
},
"url": "https://s3-eu-west-1.amazonaws.com/data.cometchat.com/1255466c41bd7f/media/1555671238_956450103_extension_leftpanel.png"
},
"sender": "cometchat-uid-3",
"receiverType": "user",
"id": "145",
"sentAt": 1555671238,
"category": "message",
"type": "image"
}
}
```
### Integrating ConnectionService and CallKit Using CometChat Push Notification
* Currently we can only handle default calling notification
* Whenever the user answers the call we use RNCallKeep.backToForeground(); method to bring the app in to foreground but in some devices you might need to add few more permissions for this to work For example, In MIUI 11 you need to permission for Display pop-up windows while running in the background
* When the iOS app is in lock state we are not able to open the app so the call start on callkeep it self and you can hear the audio but if you want a video call then the user has to unlock the phone click on the app icon on call screen.
* If you want to use the callkit and connection service in foreground then you might consider turning the callNotifications settings in UI kit settings. For more information in UI kit settings check the [documentation](/ui-kit/react-native/getting-started#initialise-cometchatuikit).
#### Setup push notification
* Android
Kindly follow the instruction for setting Firebase Cloud Messaging explained [here](#react-native)
* iOS
For iOS we use Apple Push Notification service or APNs to send push notification and VOIP notification. To configure this we need to follow some additional steps
#### Step 1: Create a Certificate Signing Request
To obtain a signing certificate required to sign apps for installation on iOS devices, you should first create a certificate signing request (CSR) file through Keychain Access on your Mac.
1. Open the Keychain Access from the utility folder, go to Keychain Access > Certificate Assistant > Request a Certificate From a Certificate Authority, and then click.
2. The Certificate Information dialog box appears. Enter the email address that you use in your Apple Developer account, and enter a common name for your private key. Don't enter CA email address, choose Saved to disk, and then click the Continue button. \ \ \
3. Specify the name of your CSR to save and choose the location to save the file on your local disk. Then your CSR file is created, which contains a public/private key pair.
#### Step 2: Create an SSL certificate
1. Sign in to your account at the [Apple Developer Member Center](https://developer.apple.com/membercenter).
2. Go to Certificates, Identifiers & Profiles.
3. Create new Certificate by clicking on the + icon.
4. Under Services, select - Apple Push Notification services SSL (Sandbox & Production)
5. Select your App ID from the dropdown.
6. Upload CSR file., upload the CSR file you created through the **Choose File** button. To complete the process, choose Continue. When the certificate is ready, choose Download to save it to your Mac.
#### Step 3: Export and update .p8 certificate
1. To generate a .p8 key file, go to [Apple Developer Account](https://developer.apple.com/account/), then select Certificates, IDs & Profiles.
2. Select Keys and click on the "+" button to add a new key.
3. In the new key page, type in your key name and check the Apple Push Notification service (APNs) box, then click "Continue" and click "Register".
4. Then proceed to download the key file by clicking Download.
5. Make note of the `Key ID`, `Team ID` and your `Bundle ID` for saving in the Extension's settings.
**If you wish to use the .p12 certificate instead, do the following:**
1. Type a name for the .p12 file and save it to your Mac.
2. Browse to the location where you saved your key, select it, and click Open. Add the key ID for the key (available in Certificates, Identifiers & Profiles in the Apple Developer Member Center) and export it.
3. DO NOT provide an export password when prompted.
4. The .p12 file will be required in the next step for uploading in the CometChat Dashboard.
#### Extension settings
#### Step 1: Enable the extension
1. Login to [CometChat](https://app.cometchat.com/login) and select your app.
2. Go to the Extensions section and Enable the Push Notifications extension.
3. Open the settings for this extension and save the following.
#### Step 2: Save your settings
On the Settings page you need to enter the following:
1. **Set extension version**
The extension version has to be set to 'V2' or 'V1 & V2' in order to use APNs as the provider.
2. **Select Platforms**
You can select the platforms on which you wish to receive Push Notifications.
3. **Firebase Cloud Messaging Settings**
This includes the FCM Server key that you can fetch from the Firebase Dashboard.
4. **APNs Settings**
You can turn off the Production mode when you create a development build of your application. Upload the .p12 certificate exported in the previous step.
5. **Push Notifications Title**
This is usually the name of your app.
6. **Notification Triggers**
Select the triggers for sending Push Notifications. These triggers can be classified into 3 main categories:
1. Message Notifications
2. Call Notifications
3. Group Notifications
These are pretty self-explanatory and you can toggle them as per your requirement.
#### Installation
We need to add two packages for this
* React-native-CallKeep
This package also require some additional installation steps. Follow [this](https://github.com/react-native-webrtc/react-native-callkeep) link to install react-native-callkeep
```sh theme={null}
npm install react-native-callkeep
//or
yarn add react-native-callkeep
```
* React Native VoIP Push Notification
This package also require some additional installation steps. Follow [this](https://github.com/react-native-webrtc/react-native-voip-push-notification#readme) link to install react-native-voip-push-notification.
```sh theme={null}
npm install react-native-voip-push-notification
# --- if using pod
cd ios/ && pod install
```
#### App Setup
First you need to Setup CallKeep at the start of the app in Index.js
```js theme={null}
const options = {
ios: {
appName: 'My app name',
},
android: {
alertTitle: 'Permissions required',
alertDescription: 'This application needs to access your phone accounts',
cancelButton: 'Cancel',
okButton: 'ok',
imageName: 'phone_account_icon',
foregroundService: {
channelId: 'com.company.my',
channelName: 'Foreground service for my app',
notificationTitle: 'My app is running on background',
notificationIcon: 'Path to the resource icon of the notification',
},
},
};
RNCallKeep.setup(options);
RNCallKeep.setAvailable(true);
let callKeep = new CallKeepHelper();
```
In order to handle connectionService and CallKit we have made a helper call.
```js theme={null}
import { CometChat } from '@cometchat/chat-sdk-react-native';
import { Platform } from 'react-native';
import uuid from 'react-native-uuid';
import RNCallKeep, { AnswerCallPayload } from 'react-native-callkeep';
import { navigate } from '../StackNavigator';
import messaging from '@react-native-firebase/messaging';
import VoipPushNotification from 'react-native-voip-push-notification';
import invokeApp from 'react-native-invoke-app';
import KeepAwake from 'react-native-keep-awake';
import { AppState } from 'react-native';
import _BackgroundTimer from 'react-native-background-timer';
export default class CallKeepHelper {
constructor(msg) {
if (msg) {
CallKeepHelper.msg = msg;
}
this.setupEventListeners();
this.registerToken();
this.checkLoggedInUser();
this.addLoginListener();
CallKeepHelper.callEndedBySelf = false;
}
static FCMToken = null;
static voipToken = null;
static msg = null;
static callEndedBySelf = null;
static callerId = '';
static callerId1 = '';
static isLoggedIn = false;
checkLoggedInUser = async () => {
try {
let user = await CometChat.getLoggedinUser();
if (user) {
if (user) {
CallKeepHelper.isLoggedIn = true;
}
}
} catch (error) {
console.log('error checkLoggedInUser', error);
}
};
addLoginListener = () => {
var listenerID = 'UNIQUE_LISTENER_ID';
CometChat.addLoginListener(
listenerID,
new CometChat.LoginListener({
loginSuccess: (e) => {
CallKeepHelper.isLoggedIn = true;
this.registerTokenToCometChat();
},
})
);
};
registerTokenToCometChat = async () => {
if (!CallKeepHelper.isLoggedIn) {
return false;
}
try {
if (Platform.OS == 'android') {
if (CallKeepHelper.FCMToken) {
let response = await CometChat.registerTokenForPushNotification(
CallKeepHelper.FCMToken
);
}
} else {
if (CallKeepHelper.FCMToken) {
let response = await CometChat.registerTokenForPushNotification(
CallKeepHelper.FCMToken,
{ voip: false }
);
}
if (CallKeepHelper.voipToken) {
let response = await CometChat.registerTokenForPushNotification(
CallKeepHelper.voipToken,
{ voip: true }
);
}
}
} catch (error) {}
};
registerToken = async () => {
try {
const authStatus = await messaging().requestPermission();
const enabled =
authStatus === messaging.AuthorizationStatus.AUTHORIZED ||
authStatus === messaging.AuthorizationStatus.PROVISIONAL;
if (enabled) {
if (Platform.OS == 'android') {
let FCM = await messaging().getToken();
CallKeepHelper.FCMToken = FCM;
this.registerTokenToCometChat();
} else {
VoipPushNotification.registerVoipToken();
let FCM = await messaging().getAPNSToken();
CallKeepHelper.FCMToken = FCM;
this.registerTokenToCometChat();
}
}
} catch (error) {}
};
endCall = ({ callUUID }) => {
if (CallKeepHelper.callerId) RNCallKeep.endCall(CallKeepHelper.callerId);
_BackgroundTimer.start();
setTimeout(() => {
this.rejectCall();
}, 3000);
};
rejectCall = async () => {
if (
!CallKeepHelper.callEndedBySelf &&
CallKeepHelper.msg &&
CallKeepHelper.msg.call?.category !== 'custom'
) {
var sessionID = CallKeepHelper.msg.sessionId;
var status = CometChat.CALL_STATUS.REJECTED;
let call = await CometChat.rejectCall(sessionID, status);
_BackgroundTimer.stop();
} else {
_BackgroundTimer.stop();
}
};
static displayCallAndroid = () => {
this.IsRinging = true;
CallKeepHelper.callerId = CallKeepHelper.msg.conversationId;
RNCallKeep.displayIncomingCall(
CallKeepHelper.msg.conversationId,
CallKeepHelper.msg.sender.name,
CallKeepHelper.msg.sender.name,
'generic'
);
setTimeout(() => {
if (this.IsRinging) {
this.IsRinging = false;
RNCallKeep.reportEndCallWithUUID(CallKeepHelper.callerId, 6);
}
}, 15000);
};
// NOTE: YOU MIGHT HAVE TO MAKE SOME CHANGES OVER HERE AS YOU AS YOUR IMPLEMENTATION OF REACT-NATIVE-UI-KIT MIGHT BE DIFFERENT. YOU JUST NEED TO CALL THE ACCEPT CALL METHOD AND NAVIGATE TO CALL SCREEN.
answerCall = ({ callUUID }) => {
this.IsRinging = false;
CallKeepHelper.callEndedBySelf = true;
setTimeout(
() =>
navigate({
index: 0,
routes: [
{ name: 'Conversation', params: { call: CallKeepHelper.msg } },
],
}),
2000
);
// RNCallKeep.endAllCalls();
RNCallKeep.backToForeground();
if (Platform.OS == 'ios') {
if (AppState.currentState == 'active') {
RNCallKeep.endAllCalls();
_BackgroundTimer.stop();
} else {
this.addAppStateListener();
}
} else {
RNCallKeep.endAllCalls();
_BackgroundTimer.stop();
}
};
addAppStateListener = () => {
AppState.addEventListener('change', (newState) => {
if (newState == 'active') {
RNCallKeep.endAllCalls();
_BackgroundTimer.stop();
}
});
};
didDisplayIncomingCall = (DidDisplayIncomingCallArgs) => {
if (DidDisplayIncomingCallArgs.callUUID) {
if (Platform.OS == 'ios') {
CallKeepHelper.callerId = DidDisplayIncomingCallArgs.callUUID;
}
}
if (DidDisplayIncomingCallArgs.error) {
console.log({
message: `Callkeep didDisplayIncomingCall error: ${DidDisplayIncomingCallArgs.error}`,
});
}
this.IsRinging = true;
setTimeout(() => {
if (this.IsRinging) {
this.IsRinging = false;
// 6 = MissedCall
// https://github.com/react-native-webrtc/react-native-callkeep#constants
RNCallKeep.reportEndCallWithUUID(
DidDisplayIncomingCallArgs.callUUID,
6
);
}
}, 15000);
};
setupEventListeners() {
if (Platform.OS == 'ios') {
CometChat.addCallListener(
'this.callListenerId',
new CometChat.CallListener({
onIncomingCallCancelled: (call) => {
RNCallKeep.endAllCalls();
},
})
);
RNCallKeep.addEventListener('didLoadWithEvents', (event) => {
for (let i = 0; i < event.length; i++) {
if (event[i]?.name == 'RNCallKeepDidDisplayIncomingCall') {
CallKeepHelper.callerId = event[i]?.data?.callUUID;
}
}
});
VoipPushNotification.addEventListener('register', async (token) => {
CallKeepHelper.voipToken = token;
this.registerTokenToCometChat();
});
VoipPushNotification.addEventListener('notification', (notification) => {
let msg = CometChat.CometChatHelper.processMessage(
notification.message
);
CallKeepHelper.msg = msg;
});
VoipPushNotification.addEventListener(
'didLoadWithEvents',
async (events) => {
if (!events || !Array.isArray(events) || events.length < 1) {
return;
}
for (let voipPushEvent of events) {
let { name, data } = voipPushEvent;
if (
name ===
VoipPushNotification.RNVoipPushRemoteNotificationsRegisteredEvent
) {
CallKeepHelper.voipToken = data;
} else if (
name ===
VoipPushNotification.RNVoipPushRemoteNotificationReceivedEvent
) {
let msg = CometChat.CometChatHelper.processMessage(data.message);
CallKeepHelper.msg = msg;
}
}
}
);
}
RNCallKeep.addEventListener('endCall', this.endCall);
RNCallKeep.addEventListener('answerCall', this.answerCall);
}
removeEventListeners() {
RNCallKeep.removeEventListener('endCall');
RNCallKeep.removeEventListener('didDisplayIncomingCall');
RNCallKeep.removeEventListener('didLoadWithEvents');
VoipPushNotification.removeEventListener('didLoadWithEvents');
VoipPushNotification.removeEventListener('register');
VoipPushNotification.removeEventListener('notification');
}
}
```
#### Android
In android we are going to use Firebase push notification to display Call notification So basically when ever we receive a push notification for call we display call notification.
we need to add a listener to listen to notification when the app is background or foreground state.
```js theme={null}
messaging().setBackgroundMessageHandler(async (remoteMessage) => {
RNCallKeep.setup(options);
RNCallKeep.setAvailable(true);
try {
//Converting the message payload into CometChat Message.
let msg = CometChat.CometChatHelper.processMessage(
JSON.parse(remoteMessage.data.message)
);
if (msg.category == 'call') {
//need to check if the notification we received for Call initiated or ended
if (msg.action == 'initiated') {
CallKeepHelper.msg = msg; //setting the msg object in call keep helper class
CallKeepHelper.displayCallAndroid(); //this method is used to display incoming calls in android t
} else {
//if sender cancels the call before receiver accept or reject call then we also need to stop our notification
RNCallKeep.endCall(msg.conversationId);
}
}
} catch (e) {
console.log(e);
}
});
```
#### iOS
In iOS we use APNs push and voip push notification to display push notification and display call CallKit for calls. The notification are handled in Native iOS You need to add the code in AppDelegate.m file to display CallKit
```objc theme={null}
//add this import at the top or the file
#import "RNCallKeep.h"
#import "RNFBMessagingModule.h"
#import
#import "RNVoipPushNotificationManager.h"
_* <------ add this function *_
- (void)pushRegistry:(PKPushRegistry *)registry didUpdatePushCredentials:(PKPushCredentials *)credentials forType:(PKPushType)type {
// Register VoIP push token (a property of PKPushCredentials) with server
[RNVoipPushNotificationManager didUpdatePushCredentials:credentials forType:(NSString *)type];
}
- (void)pushRegistry:(PKPushRegistry *)registry didInvalidatePushTokenForType:(PKPushType)type
{
// --- The system calls this method when a previously provided push token is no longer valid for use. No action is necessary on your part to re-register the push type. Instead, use this method to notify your server not to send push notifications using the matching push token.
}
// --- Handle incoming pushes
- (void)pushRegistry:(PKPushRegistry *)registry didReceiveIncomingPushWithPayload:(PKPushPayload *)payload forType:(PKPushType)type withCompletionHandler:(void (^)(void))completion {
// --- NOTE: apple forced us to invoke callkit ASAP when we receive voip push
// --- see: react-native-callkeep
// --- Retrieve information from your voip push payload
NSDictionary *content = [payload.dictionaryPayload valueForKey:@"aps"];
NSDictionary *sender = [content valueForKey:@"alert"];
NSString *uuid =[[[NSUUID UUID] UUIDString] lowercaseString];
NSString *callerName=[sender valueForKey:@"title"];
NSString *handle = [sender valueForKey:@"title"];
// --- Process the received push
[RNVoipPushNotificationManager didReceiveIncomingPushWithPayload:payload forType:(NSString *)type];
[RNCallKeep reportNewIncomingCall: uuid
handle: handle
handleType: @"generic"
hasVideo: NO
localizedCallerName: callerName
supportsHolding: YES
supportsDTMF: YES
supportsGrouping: YES
supportsUngrouping: YES
fromPushKit: YES
payload: nil
withCompletionHandler: completion];
}
```
## Capacitor, Cordova & Ionic (Deprecated)
**Deprecated:** The Ionic Cordova SDK is deprecated. For new Ionic/Cordova applications, please use the [JavaScript SDK](/sdk/javascript/overview) which provides full compatibility.
Learn how to setup Push Notifications for Capacitor, Cordova and Ionic framework using Firebase Cloud Messaging or FCM.
Ionic/Cordova Push notifications sample app (Deprecated)
View on Github
## Firebase Project Setup
Visit [Firebase Console](https://console.firebase.google.com/) and login/signup using your Gmail ID.
### Step 1: Create a new Firebase Project
On your Firebase Console, create a new project.
This is a simple 3 step process where:
1. You give a name to your project
2. Add Google Analytics to your project (Optional)
3. Configure Google Analytics account (Optional)
Click on Create and you are ready to go.
### Step 2: Add Firebase to your App
React native setup will require 2 files for Android and iOS:
1. For Android, you need to download the `google-services.json` file. You can refer to the [Android Firebase Project Setup - Step 2](#firebase-project-setup-2) and resume here once done.
2. For iOS, you need to download the `GoogleService-Info.plist` file. You can refer to the [iOS Firebase Project Setup - Step 2](#firebase-project-setup-4) and resume here once done.
3. For web, you need to have the Firebase Config object. You can refer to the [Web Firebase Project Setup - Step 2](#firebase-project-setup) and resume here once done.
### Step 3: Download the service account file
## Extension settings
### Step 1: Enable the extension
1. Login to [CometChat](https://app.cometchat.com/login) and select your app.
2. Go to the Extensions section and Enable the Push Notifications extension.
3. Open the settings for this extension and save the following.
### Step 2: Save your settings
On the Settings page you need to enter the following:
1. **Set extension version**
* If you are setting it for the first time, Select `V2` to start using the token-based version of the Push Notification extension.
* If you already have an app using `V1` and want to migrate your app to use `V2`, then Select `V1 & V2` option. This ensures that the users viewing the older version of your app also receive Push Notifications.
* Eventually, when all your users are on the latest version of your app, you can change this option to `V2`, thus turning off `V1` (Topic-based) Push Notifications completely.
2. **Select the platforms that you want to support**
* Select from Web, Android, Ionic (Deprecated), React Native, Flutter & iOS.
3. **Notification payload settings**
* You can control if the notification key should be in the Payload or not. Learn more about the FCM Messages [here](https://firebase.google.com/docs/cloud-messaging/).
4. **Push payload message options**
The maximum payload size supported by FCM and APNs for push notifications is approximately 4 KB. Due to the inclusion of CometChat's message object, the payload size may exceed this limit, potentially leading to non-delivery of push notifications for certain messages. The options provided allow you to remove the sender's metadata, receiver's metadata, message metadata and trim the content of the text field.
* The message metadata includes the outputs of the Thumbnail Generation, Image Moderation, and Smart Replies extensions. You may want to retain this metadata if you need to customize the notification displayed to the end user based on these outputs.
5. **Notification Triggers**
* Select the triggers for sending Push Notifications. These triggers can be classified into 3 main categories:
1. Message Notifications
2. Call Notifications
3. Group Notifications
* These are pretty self-explanatory and you can toggle them as per your requirement.
## App Setup
### Step 1: Initial plugin setup
1. For Cordova & Ionic, there are numerous plugins available via NPM which can be used to set up push notifications for your apps like [FCM Plugin](https://ionicframework.com/docs/v3/native/fcm/) and [Push Plugin](https://ionicframework.com/docs/native/push).
2. To setup Push Notification, you need to follow the steps mentioned in the Plugin's Documentation.
At this point, you will have:
1. Separate apps created on the Firebase console. (For Web, Android and iOS).
2. Plugin setup completed as per the respective documentation.
### Step 2: Register FCM Token
1. This step assumes that you already have a React Native app setup with CometChat installed. Make sure that the CometChat object is initialized and user has been logged in.
2. On the success callback of user login, you can fetch the FCM Token and register it with the extension as shown below:
```js theme={null}
// Pseudo-code with async-await syntax
// Using the FCM Plugin
const APP_ID = 'APP_ID';
const REGION = 'REGION';
const AUTH_KEY = 'AUTH_KEY';
const UID = 'UID';
const APP_SETTINGS = new CometChat.AppSettingsBuilder()
.subscribePresenceForAllUsers()
.setRegion(REGION)
.build();
try {
// First initialize the app
await CometChat.init(APP_ID, APP_SETTINGS);
// Login the user
await CometChat.login(UID, AUTH_KEY);
// Login is successful so next step
// Get the FCM device token
// You should have imported the following in the file:
// import { FCM } from '@ionic-native_fcm';
const FCM_TOKEN = await fcm.getToken();
// Register the token for Push Notifications (legacy)
await CometChat.registerTokenForPushNotification(FCM_TOKEN);
} catch (error) {
// Handle errors gracefully
}
```
3. Registration also needs to happen in case of token refresh as shown below:
```js theme={null}
// Pseudo-code
// You should have imported the following in the file:
// import { FCM } from '@ionic-native_fcm';
try {
// Listen to whether the token changes
return fcm.onTokenRefresh(FCM_TOKEN => {
await CometChat.registerTokenForPushNotification(FCM_TOKEN);
});
// ...
} catch(error) {
// Handle errors gracefully
}
```
For more details, visit documentation.
### Step 3: Receive Notifications
```js theme={null}
// Pseudo-code
import messaging from '@react-native-firebase_messaging';
import { Alert } from 'react-native';
// Implementation can be done in a life-cycle method or hook
const unsubscribe = messaging().onMessage(async (remoteMessage) => {
Alert.alert('A new FCM message arrived!', JSON.stringify(remoteMessage));
});
```
### Step 4: Stop receiving Notifications
1. On CometChat.logout will stop receiving notifications.
2. As a good practice, you can also delete the FCM Token by calling `deleteToken` on the fcm object.
```js theme={null}
// Pseudo-code using async-await syntax
logout = async () => {
// User logs out of the app
await CometChat.logout();
};
```
## Advanced
### Handle Custom Messages
To receive notification of `CustomMessage`, you need to set metadata while sending the `CustomMessage`.
```js theme={null}
var receiverID = 'UID';
var customData = {
latitude: '50.6192171633316',
longitude: '-72.68182268750002',
};
var customType = 'location';
var receiverType = CometChat.RECEIVER_TYPE.USER;
var metadata = {
pushNotification: 'Your Notification Message',
};
var customMessage = new CometChat.CustomMessage(
receiverID,
receiverType,
customType,
customData
);
customMessage.setMetadata(metadata);
CometChat.sendCustomMessage(customMessage).then(
(message) => {
// Message sent successfully.
console.log('custom message sent successfully', message);
},
(error) => {
console.log('custom message sending failed with error', error);
// Handle exception.
}
);
```
### Converting push notification payload to message object
CometChat SDK provides a method `CometChat.CometChatHelper.processMessage()` to convert the message JSON to the corresponding object of TextMessage, MediaMessage,CustomMessage, Action or Call.
```js theme={null}
var processedMessage = CometChat.CometChatHelper.processMessage(JSON_MESSAGE);
```
Type of Attachment can be of the following the type:\
`CometChatConstants.MESSAGE_TYPE_IMAGE`\
`CometChatConstants.MESSAGE_TYPE_VIDEO`\
`CometChatConstants.MESSAGE_TYPE_AUDIO`\
`CometChatConstants.MESSAGE_TYPE_FILE`
Push Notification: Payload Sample for Text Message and Attachment/Media Message
```json theme={null}
{
"alert": "Nancy Grace: Text Message",
"sound": "default",
"title": "CometChat",
"message": {
"receiver": "cometchat-uid-4",
"data": {
"entities": {
"receiver": {
"entityType": "user",
"entity": {
"uid": "cometchat-uid-4",
"role": "default",
"name": "Susan Marie",
"avatar": "https://assets.cometchat.io/sampleapp/v2/users/cometchat-uid-4.webp",
"status": "offline"
}
},
"sender": {
"entityType": "user",
"entity": {
"uid": "cometchat-uid-3",
"role": "default",
"name": "Nancy Grace",
"avatar": "https://assets.cometchat.io/sampleapp/v2/users/cometchat-uid-3.webp",
"status": "offline"
}
}
},
"text": "Text Message"
},
"sender": "cometchat-uid-3",
"receiverType": "user",
"id": "142",
"sentAt": 1555668711,
"category": "message",
"type": "text"
}
}
```
```json theme={null}
{
"alert": "Nancy Grace: has sent an image",
"sound": "default",
"title": "CometChat",
"message": {
"receiver": "cometchat-uid-4",
"data": {
"attachments": [
{
"extension": "png",
"size": 14327,
"name": "extension_leftpanel.png",
"mimeType": "image/png",
"url": "https://s3-eu-west-1.amazonaws.com/data.cometchat.com/1255466c41bd7f/media/1555671238_956450103_extension_leftpanel.png"
}
],
"entities": {
"receiver": {
"entityType": "user",
"entity": {
"uid": "cometchat-uid-4",
"role": "default",
"name": "Susan Marie",
"avatar": "https://assets.cometchat.io/sampleapp/v2/users/cometchat-uid-4.webp",
"status": "offline"
}
},
"sender": {
"entityType": "user",
"entity": {
"uid": "cometchat-uid-3",
"role": "default",
"name": "Nancy Grace",
"avatar": "https://assets.cometchat.io/sampleapp/v2/users/cometchat-uid-3.webp",
"status": "offline"
}
}
},
"url": "https://s3-eu-west-1.amazonaws.com/data.cometchat.com/1255466c41bd7f/media/1555671238_956450103_extension_leftpanel.png"
},
"sender": "cometchat-uid-3",
"receiverType": "user",
"id": "145",
"sentAt": 1555671238,
"category": "message",
"type": "image"
}
}
```
## Mute Functionality
Learn how to enable your users to mute notifications for certain conversations
You can silence one-on-one and/or group conversations for a specific amount of time using the Mute functionality. Aside from that, you can include a Push Notifications section in your apps' settings. Your users can use this feature to turn off Push Notifications for certain chats or to opt-out of receiving Push Notifications altogether.
## Mute or Unmute Chats
Chat comprises anything related to messages like:
1. New Message (Text, media, or Custom messages like Polls)
2. Edited Message
3. Deleted Message
4. Response in threads
### Mute Chats
You can specify the UIDs and/or GUIDs to be muted. You can mute chats for these conversations for a specific amount of time.
| Parameters | Value | Description |
| ---------- | ----------------------------------- | ------------------------------------------------------------------------------------------------------------------------------------------------------------------------------------------- |
| uids | Array of UIDs | This parameter allows you to mute one-on-one chat for the mentioned UIDs. |
| guids | Array of GUIDs | This parameter allows you to mute group chat for the mentioned GUIDs. |
| timeInMS | String consisting of UNIX timestamp | This parameter allows you to mute chats for a specific amount of time for the required UIDs or GUIDs After the mentioned duration, the Push Notifications are received. Eg: "1628425767881" |
This functionality uses the `callExtension()` method provided by CometChat SDK.
```js theme={null}
CometChat.callExtension('push-notification', 'POST', 'v2/mute-chat', {
"uids": ["cometchat-uid-1"],
"guids": ["cometchat-guid-1"],
"timeInMS": "1628610749081"
}).then(response => {
// Success
})
.catch(error => {
// Error occured
});
```
```java theme={null}
import org.json.simple.JSONObject;
JSONObject body=new JSONObject();
JSONArray uids = new JSONArray();
JSONArray guids = new JSONArray();
uids.add("cometchat-uid-1");
guids.add("cometchat-guid-1");
body.put("uids", uids);
body.put("guids", guids);
body.put("timeInMS", "1628425767881");
CometChat.callExtension("push-notification", "POST", "/v2/mute-chat", body,
new CometChat.CallbackListener < JSONObject > () {
@Override
public void onSuccess(JSONObject jsonObject) {
//On Success
}
@Override
public void onError(CometChatException e) {
//On Failure
}
});
```
```swift theme={null}
CometChat.callExtension(slug: "push-notification", type: .post, endPoint: "v2/mute-chat", body: ["uids":["cometchat-uid-1"], "guids":["cometchat-guid-1"], "timeInMS":"1628610749081"] as [String : Any], onSuccess: { (response) in
// Success
}) { (error) in
// Error occured
}
```
### Unmute Chats
Used to unmute the chats for certain conversations before the mentioned time during muting.
| Parameters | Value | Description |
| ---------- | -------------- | --------------------------------------------------------------------------- |
| uids | Array of UIDs | This parameter allows you to unmute one-on-one chat for the mentioned UIDs. |
| guids | Array of GUIDs | This parameter allows you to unmute group chat for the mentioned GUIDs. |
This functionality uses the `callExtension()` method provided by CometChat SDK.
```js theme={null}
CometChat.callExtension('push-notification', 'POST', 'v2/unmute-chat', {
"uids": ["cometchat-uid-1"],
"guids": ["cometchat-guid-1"]
}).then(response => {
// Success
})
.catch(error => {
// Error occured
});
```
```java theme={null}
import org.json.simple.JSONObject;
JSONObject body=new JSONObject();
JSONArray uids = new JSONArray();
JSONArray guids = new JSONArray();
uids.add("cometchat-uid-1");
guids.add("cometchat-guid-1");
body.put("uids", uids);
body.put("guids", guids);
CometChat.callExtension("push-notification", "POST", "/v2/unmute-chat", body,
new CometChat.CallbackListener < JSONObject > () {
@Override
public void onSuccess(JSONObject jsonObject) {
//On Success
}
@Override
public void onError(CometChatException e) {
//On Failure
}
});
```
```swift theme={null}
CometChat.callExtension(slug: "push-notification", type: .post, endPoint: "v2/unmute-chat", body: ["uids":["cometchat-uid-1"], "guids":["cometchat-guid-1"]] as [String : Any], onSuccess: { (response) in
// Success
}) { (error) in
// Error occured
}
```
## Mute or Unmute Calls
You can mute the notifications for one-on-one or group calls. This works for Default calling (video or audio calls) offered by CometChat.
### Mute Calls
You can specify the UIDs and/or GUIDs to be muted. You can mute calls for these conversations for the said amount of time.
| Parameters | Value | Description |
| ---------- | ----------------------------------- | ------------------------------------------------------------------------------------------------------------------------------------------------------------------------------------------- |
| uids | Array of UIDs | This parameter allows you to mute one-on-one calls for the mentioned UIDs. |
| guids | Array of GUIDs | This parameter allows you to mute group calls for the mentioned GUIDs. |
| timeinMS | String consisting of UNIX timestamp | This parameter allows you to mute calls for a specific amount of time for the required UIDs or GUIDs After the mentioned duration, the Push Notifications are received. Eg: "1628425767881" |
This functionality uses the `callExtension()` method provided by CometChat SDK.
```js theme={null}
CometChat.callExtension('push-notification', 'POST', 'v2/mute-calls', {
"uids": ["cometchat-uid-1"],
"guids": ["cometchat-guid-1"],
"timeInMS": "1628610749081"
}).then(response => {
// Success
})
.catch(error => {
// Error occured
});
```
```java theme={null}
import org.json.simple.JSONObject;
JSONObject body=new JSONObject();
JSONArray uids = new JSONArray();
JSONArray guids = new JSONArray();
uids.add("cometchat-uid-1");
guids.add("cometchat-guid-1");
body.put("uids", uids);
body.put("guids", guids);
body.put("timeInMS", "1628425767881");
CometChat.callExtension("push-notification", "POST", "/v2/mute-calls", body,
new CometChat.CallbackListener < JSONObject > () {
@Override
public void onSuccess(JSONObject jsonObject) {
//On Success
}
@Override
public void onError(CometChatException e) {
//On Failure
}
});
```
```swift theme={null}
CometChat.callExtension(slug: "push-notification", type: .post, endPoint: "v2/mute-calls", body: ["uids":["cometchat-uid-1"], "guids":["cometchat-guid-1"], "timeInMS":"1628610749081"] as [String : Any], onSuccess: { (response) in
// Success
}) { (error) in
// Error occured
}
```
### Unmute Calls
Used to unmute calls for certain conversations before the mentioned time during muting.
| Parameters | Value | Description |
| ---------- | -------------- | ---------------------------------------------------------------------------- |
| uids | Array of UIDs | This parameter allows you to unmute one-on-one calls for the mentioned UIDs. |
| guids | Array of GUIDs | This parameter allows you to unmute group calls for the mentioned GUIDs. |
Used to unmute the calls for certain conversations before the mentioned time during muting.
```js theme={null}
CometChat.callExtension('push-notification', 'POST', 'v2/unmute-calls', {
"uids": ["cometchat-uid-1"],
"guids": ["cometchat-guid-1"]
}).then(response => {
// Success
})
.catch(error => {
// Error occured
});
```
```java theme={null}
import org.json.simple.JSONObject;
JSONObject body=new JSONObject();
JSONArray uids = new JSONArray();
JSONArray guids = new JSONArray();
uids.add("cometchat-uid-1");
guids.add("cometchat-guid-1");
body.put("uids", uids);
body.put("guids", guids);
CometChat.callExtension("push-notification", "POST", "/v2/unmute-calls", body,
new CometChat.CallbackListener < JSONObject > () {
@Override
public void onSuccess(JSONObject jsonObject) {
//On Success
}
@Override
public void onError(CometChatException e) {
//On Failure
}
});
```
```swift theme={null}
CometChat.callExtension(slug: "push-notification", type: .post, endPoint: "v2/unmute-calls", body: ["uids":["cometchat-uid-1"], "guids":["cometchat-guid-1"]] as [String : Any], onSuccess: { (response) in
// Success
}) { (error) in
// Error occured
}
```
## User Settings
Apart from the feature to mute/unmute a set of UIDs or GUIDs using the above APIs, apps can have push notifications according to the user settings.
The following user settings can be set:
| Settings | Description |
| ------------------------- | ----------------------------------------------------------------------------------------------------------------------------------------------------------------------------------------------------------------------------------------- |
| Do Not Disturb | When turned ON, the "Do Not Disturb" parameter disables the Push Notifications entirely for the user. The user stops receiving push notifications until this setting is explicitly turned OFF. This overrides all the following settings. |
| Allow only Mentions | Until turned OFF, the notifications are only sent for text messages for the mentioned receiver of the message |
| Mute all one-on-one chat | This parameter can be used to mute chat notifications for all one-on-one conversations. The user will not receive push notifications until this is turned OFF. |
| Mute all group chat | This parameter can be used to mute chat notifications for all group conversations. The user will not receive push notifications until the parameter is turned OFF. |
| Mute all one-on-one calls | This preference can be used to mute call notifications for all one-on-one conversations. The user will not receive push notifications until the parameter is turned OFF. |
| Mute all group calls | This parameter can be used to mute call notifications for all group conversations. The user will not receive push notifications until this is turned OFF. |
### Save User Settings
The User settings object needs to be submitted as follows. All the fields are mandatory:
```json theme={null}
{
"user-settings": {
"dnd": "",
"chat": {
"allow_only_mentions": "",
"mute_group_actions": "",
"mute_all_guids": "",
"mute_all_uids": ""
},
"call": {
"mute_all_guids": "",
"mute_all_uids": ""
}
}
}
```
This functionality uses the `callExtension()` method provided by CometChat SDK.
```js theme={null}
const userSettings = {
"user-settings": {
"dnd": false,
"chat": {
"allow_only_mentions": true,
"mute_group_actions": false,
"mute_all_guids": false,
"mute_all_uids": false
},
"call": {
"mute_all_guids": false,
"mute_all_uids":false
}
}
};
CometChat.callExtension('push-notification', 'POST', 'v2/user-settings', userSettings).then(response => {
// Success
})
.catch(error => {
// Error occured
});
```
```java theme={null}
JSONObject chatSettings = new JSONObject();
chatSettings.put('allow_only_mentions', false);
chatSettings.put('mute_group_actions', false);
chatSettings.put('mute_all_guids', false);
chatSettings.put('mute_all_uids', false);
JSONObject callSettings = new JSONObject();
callSettings.put('mute_all_guids', false);
callSettings.put('mute_all_uids', false);
JSONObject userSettings = new JSONObject();
userSettings.put('dnd', true);
userSettings.put('chat', chatSettings);
userSettings.put('call', callSettings);
CometChat.callExtension("push-notification", "GET", "/v2/user-settings", null,
new CometChat.CallbackListener < JSONObject > () {
@Override
public void onSuccess(JSONObject jsonObject) {
//On Success
}
@Override
public void onError(CometChatException e) {
//On Failure
}
});
```
```swift theme={null}
CometChat.callExtension(slug: "push-notification", type: .get, endPoint: "v2/user-settings", body: {
"user-settings": {
"dnd": true_false,
"chat": {
"allow_only_mentions": true_false,
"mute_group_actions": true_false,
"mute_all_guids": true_false,
"mute_all_uids": true_false
},
"call": {
"mute_all_guids": true_false,
"mute_all_uids":true_false
}
}
}, onSuccess: { (response) in
// Success
}) { (error) in
// Error occured
}
```
### Fetch User Settings
Fetches all the user settings that are saved by the user. This also returns the list of muted UIDs and GUIDs along with the said time for muting.
This functionality uses the `callExtension()` method provided by CometChat SDK.
```js theme={null}
CometChat.callExtension('push-notification', 'GET', 'v2/user-settings', null).then(response => {
// Success
})
.catch(error => {
// Error occured
});
```
```java theme={null}
CometChat.callExtension("push-notification", "GET", "/v2/user-settings", null,
new CometChat.CallbackListener < JSONObject > () {
@Override
public void onSuccess(JSONObject jsonObject) {
//On Success
}
@Override
public void onError(CometChatException e) {
//On Failure
}
});
```
```swift theme={null}
CometChat.callExtension(slug: "push-notification", type: .get, endPoint: "v2/user-settings", body: nil, onSuccess: { (response) in
// Success
}) { (error) in
// Error occured
}
```
## Token Management
## Register tokens
Token registration can now be done using the callExtension method provided by the CometChat SDK. The token can be FCM token or APNs token and VoIP token.
This can be achieved using the code snippet below:
**For FCM token:**
```js theme={null}
// For FCM Token
CometChat.callExtension('push-notification', 'POST', 'v2/tokens', {
fcmToken: "fcm_token"
})
.then(response => {
// Success response
})
.catch(error => {
// Error occured
})
```
```java theme={null}
import org.json.simple.JSONObject;
JSONObject body=new JSONObject();
body.put("fcmToken", "fcm_token");
CometChat.callExtension("push-notification", "POST", "/v2/tokens", body,
new CometChat.CallbackListener < JSONObject > () {
@Override
public void onSuccess(JSONObject jsonObject) {
//On Success
}
@Override
public void onError(CometChatException e) {
//On Failure
}
});
```
```swift theme={null}
CometChat.callExtension(slug: "push-notification", type: .post, endPoint: "v2/tokens", body: ["fcmToken": "fcm_token"] as [String : Any], onSuccess: { (response) in
// success response
}) { (error) in
// Error occured
}
```
**For APNs tokens:**
```js theme={null}
// For APNs tokens
CometChat.callExtension('push-notification', 'POST', 'v2/tokens', {
apnsToken: "apns_token",
voipToken: "voip_token"
})
.then(response => {
// Success response
})
.catch(error => {
// Error occured
})
```
```java theme={null}
import org.json.simple.JSONObject;
JSONObject body=new JSONObject();
body.put("apnsToken", "apns_token");
body.put("voipToken", "voip_token");
CometChat.callExtension("push-notification", "POST", "/v2/tokens", body,
new CometChat.CallbackListener < JSONObject > () {
@Override
public void onSuccess(JSONObject jsonObject) {
//On Success
}
@Override
public void onError(CometChatException e) {
//On Failure
}
});
```
```swift theme={null}
CometChat.callExtension(slug: "push-notification", type: .post, endPoint: "v2/tokens", body: ["apnsToken": "apns_token", "voipToken": "voip_token"] as [String : Any], onSuccess: { (response) in
// Success response
}) { (error) in
// Error occured
}
```
## Get tokens
This provides a list of all the Push Notifications tokens that have been registered for the current user. The tokens are segregated based on the platform.
```js theme={null}
CometChat.callExtension('push-notification', 'GET', 'v2/tokens', null)
.then(response => {
// Success response
})
.catch(error => {
// Error occured
})
```
```java theme={null}
CometChat.callExtension("push-notification", "GET", "/v2/tokens", null,
new CometChat.CallbackListener < JSONObject > () {
@Override
public void onSuccess(JSONObject jsonObject) {
//On Success
}
@Override
public void onError(CometChatException e) {
//On Failure
}
});
```
```swift theme={null}
CometChat.callExtension(slug: "push-notification", type: .get, endPoint: "v2/tokens", body: nil, onSuccess: { (response) in
// Success response
}) { (error) in
// Error occured
}
```
The response will be as follows:
```json theme={null}
{
"ios": [
"cLztQGbuPA91bG3rkRcgcQYvlKuTlWGmHC1RnCwrTrbyT0VF"
],
"web": [
"cLztQGbuPA91bG3rkRcgcQYvlKuTlWGmHC1RnxyzTrbyT0VF"
],
"android": [
"dLztQGbuPA91bG3rkRckcQYvlKuTlWGmHC1RnxyzTrbyT0VF"
]
}
```
## Delete tokens
Token deletion is handled implicitly by the `CometChat.logout()` method. That is, once the user is logged out of the current CometChat session, his/her registered Push Notification token automatically gets deleted.
The same can be achieved explicitly by making a call to the extension using `callExtension` method as shown below. However, the token that is deleted belongs to the current session of the end-user by passing `all=false` as a parameter.
```js theme={null}
CometChat.callExtension('push-notification', 'DELETE', 'v2/tokens', {
all: false, // true when ALL the registered tokens for the logged-in user need to be deleted
})
.then((response) => {
// Success response
})
.catch((error) => {
// Error occured
});
```
```java theme={null}
import org.json.simple.JSONObject;
JSONObject body=new JSONObject();
body.put("all", false); // true when ALL the registered tokens for the logged-in user need to be deleted
CometChat.callExtension("push-notification", "DELETE", "/v2/tokens", body,
new CometChat.CallbackListener < JSONObject > () {
@Override
public void onSuccess(JSONObject jsonObject) {
//On Success
}
@Override
public void onError(CometChatException e) {
//On Failure
}
});
```
```swift theme={null}
CometChat.callExtension(slug: "push-notification", type: .delete, endPoint: "v2/tokens", body: ["all": false] as [String : Any], onSuccess: { (response) in // true when ALL the registered tokens for the logged-in user need to be deleted
// Details about the created poll
}) { (error) in
// Error occured
}
```
All the tokens for the current user will be deleted if you pass `all=true`. This needs to be used with care as the other logins of the current user will stop receiving Push Notifications.
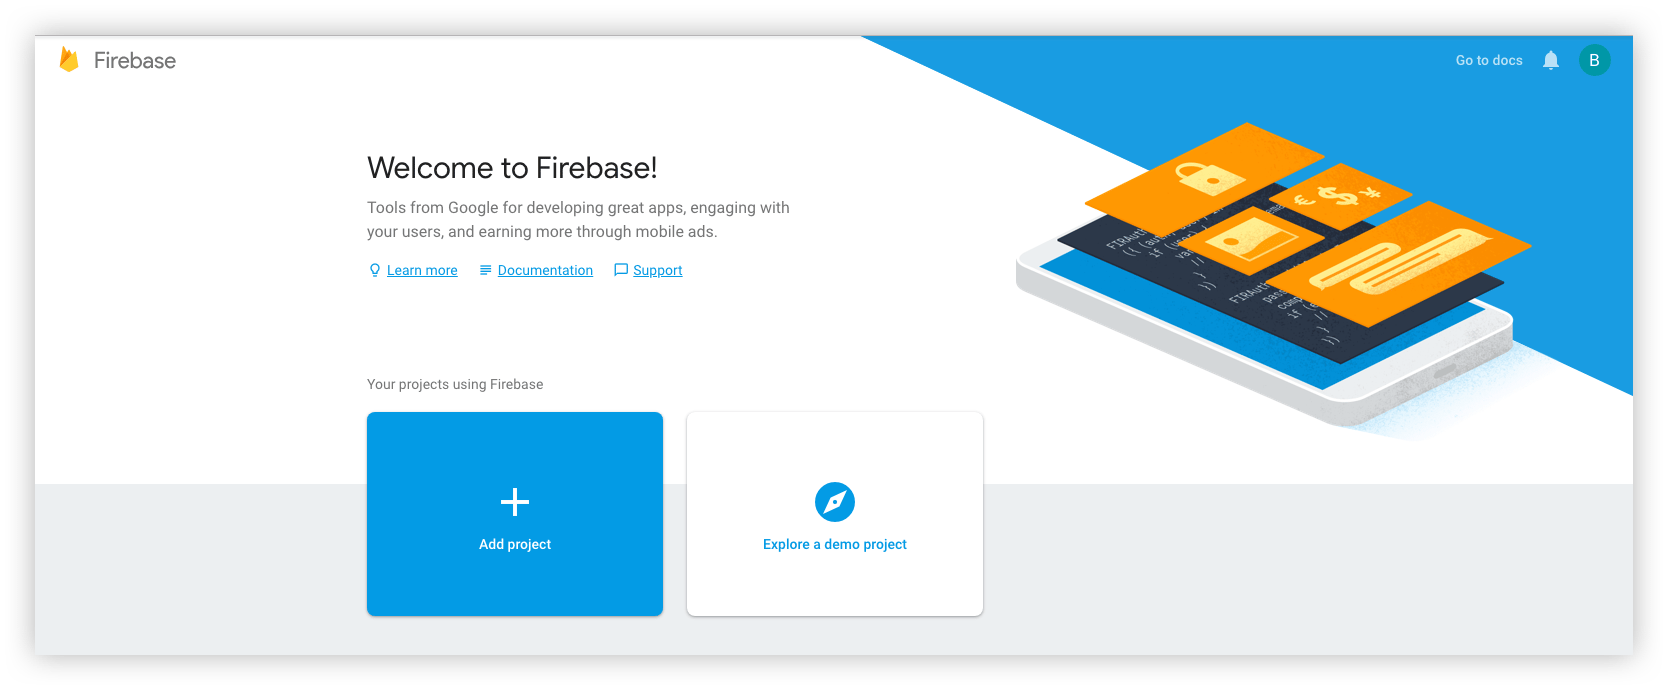 This is a simple 3 step process where:
1. You give a name to your project
2. Add Google Analytics to your project (Optional)
3. Configure Google Analytics account (Optional)
Click on Create and you are ready to go.
### Step 2: Add Firebase to your Web App
1. Click on the Web icon on the below screen and Register your app with a nickname.
2. Once done, click on Continue to Console.
This is a simple 3 step process where:
1. You give a name to your project
2. Add Google Analytics to your project (Optional)
3. Configure Google Analytics account (Optional)
Click on Create and you are ready to go.
### Step 2: Add Firebase to your Web App
1. Click on the Web icon on the below screen and Register your app with a nickname.
2. Once done, click on Continue to Console.
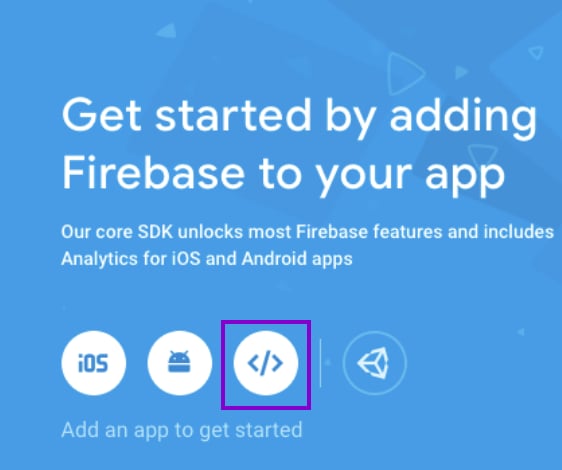 ### Step 3: Download the service account file
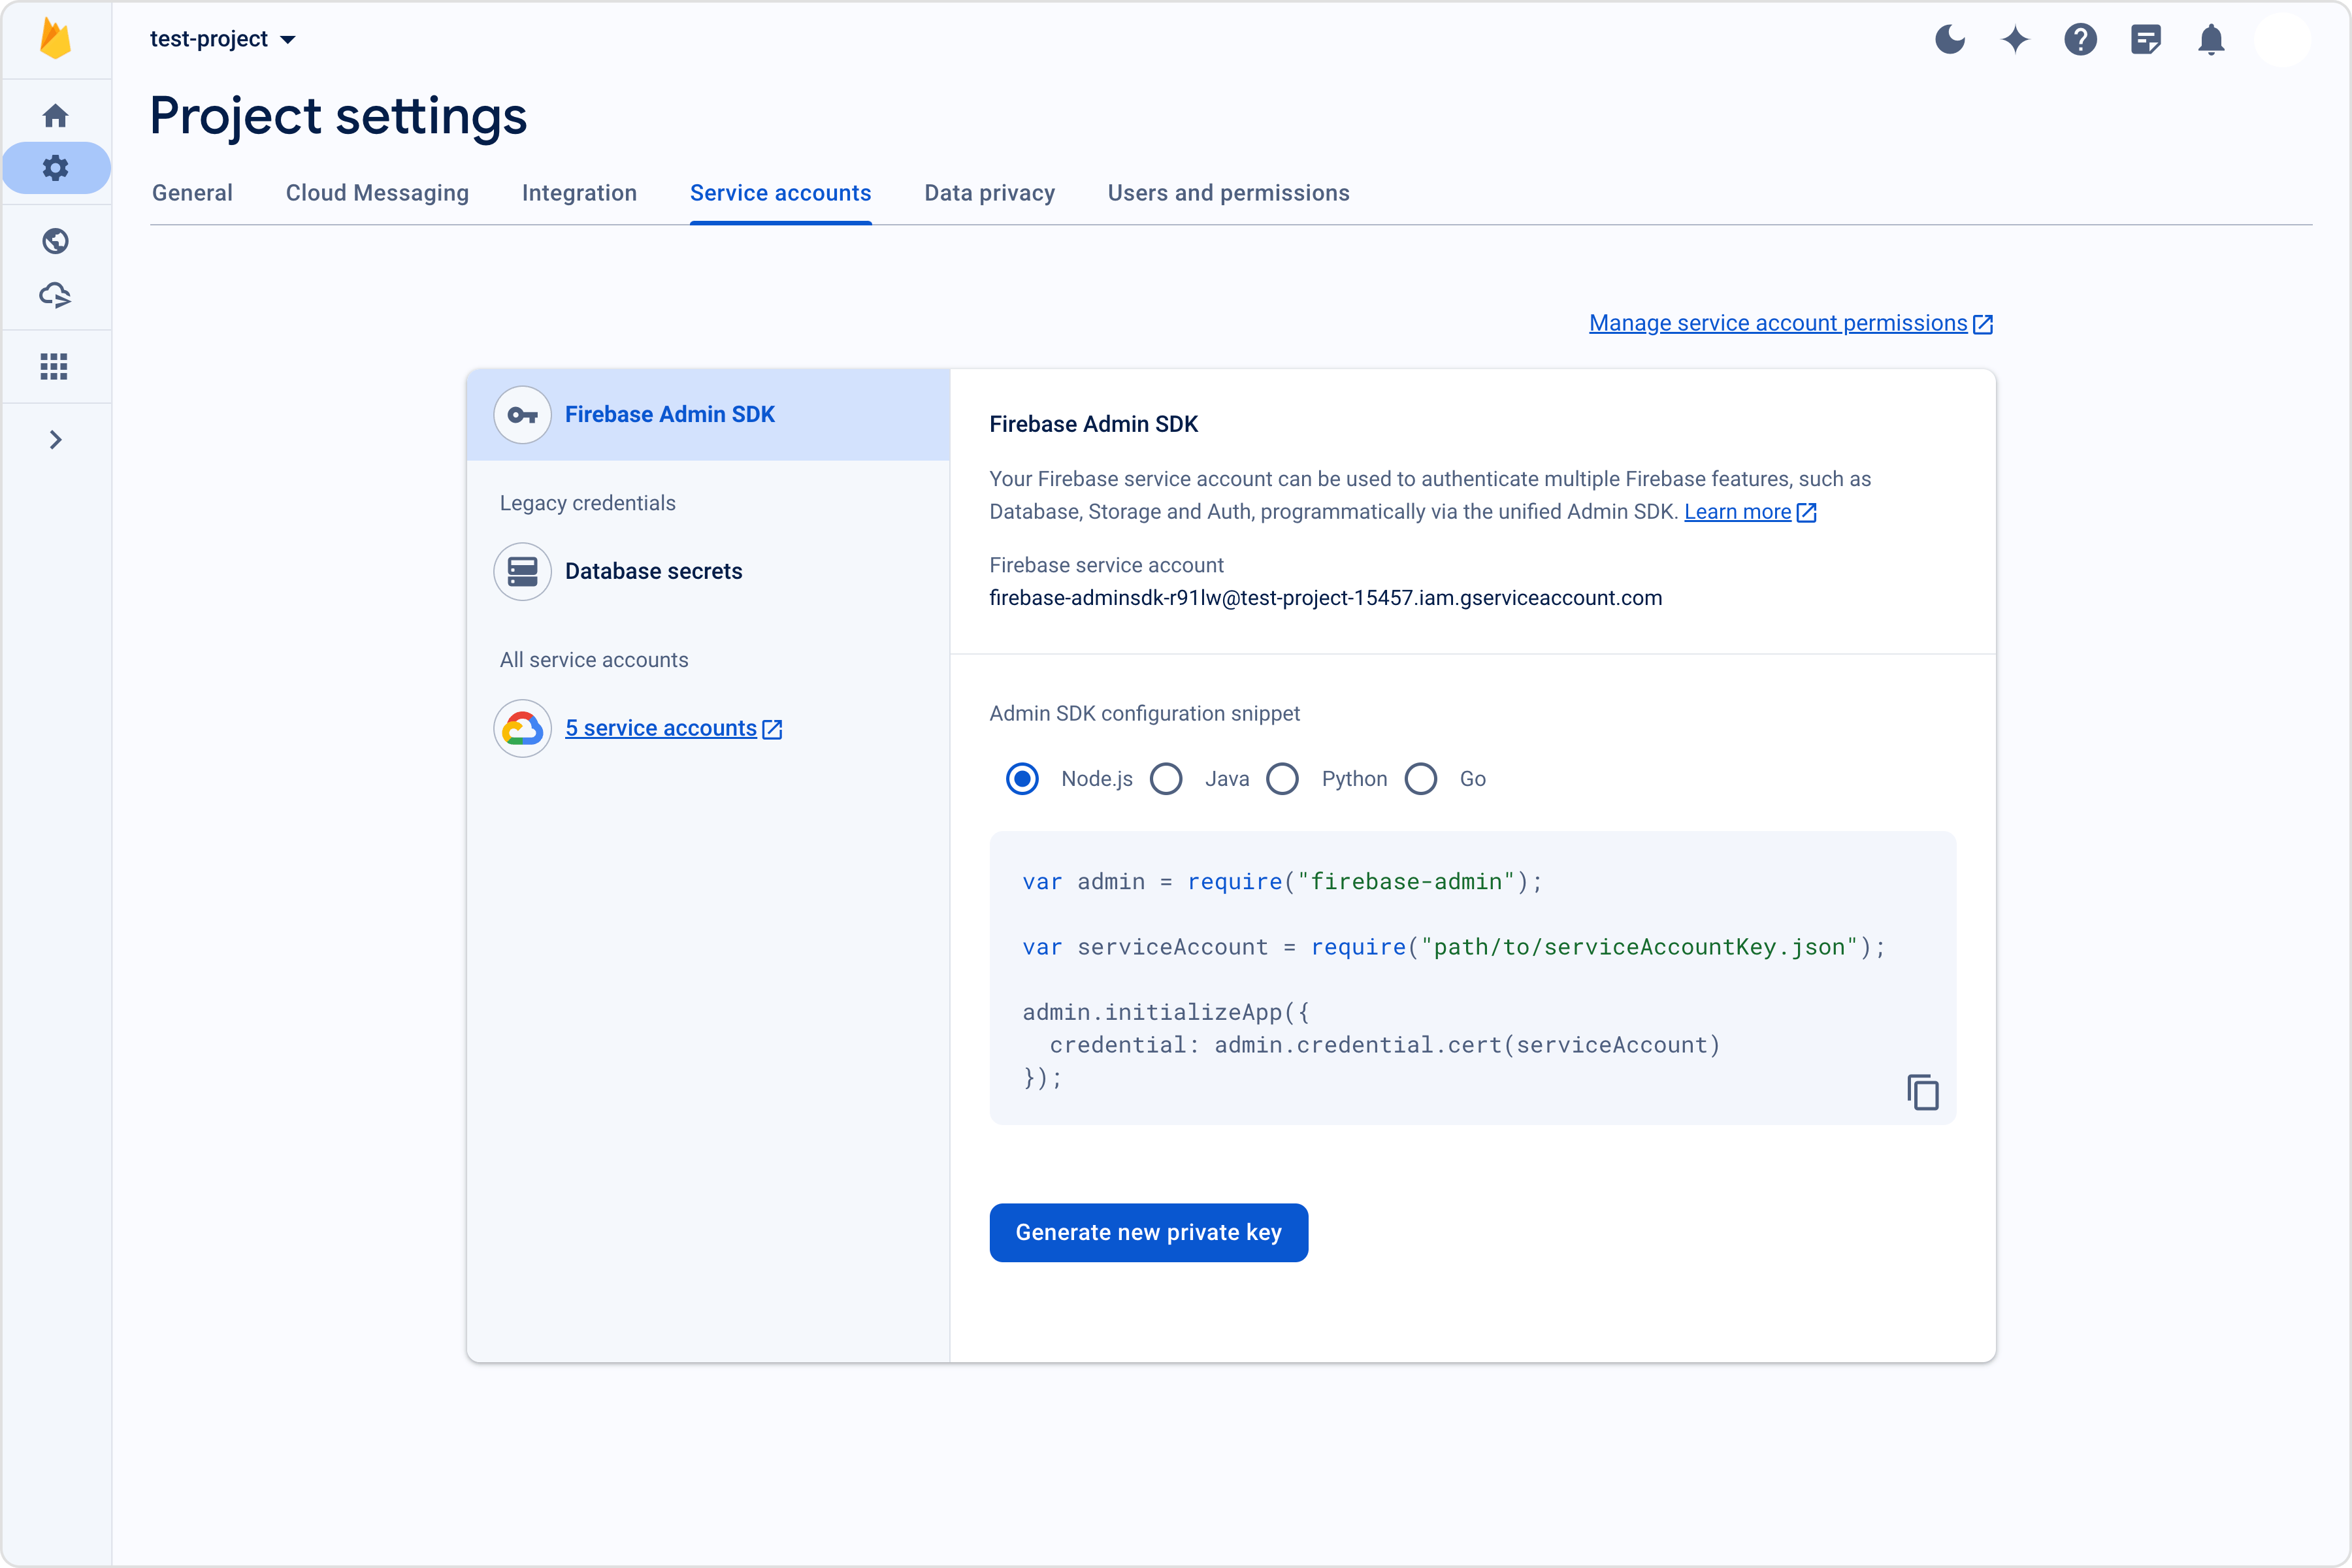 ## Extension settings
### Step 1: Enable the extension
1. Login to [CometChat](https://app.cometchat.com/login) and select your app.
2. Go to the Extensions section and Enable the Push Notifications.
3. Open the settings for the extension and add all the mentioned settings and hit save.
## Extension settings
### Step 1: Enable the extension
1. Login to [CometChat](https://app.cometchat.com/login) and select your app.
2. Go to the Extensions section and Enable the Push Notifications.
3. Open the settings for the extension and add all the mentioned settings and hit save.
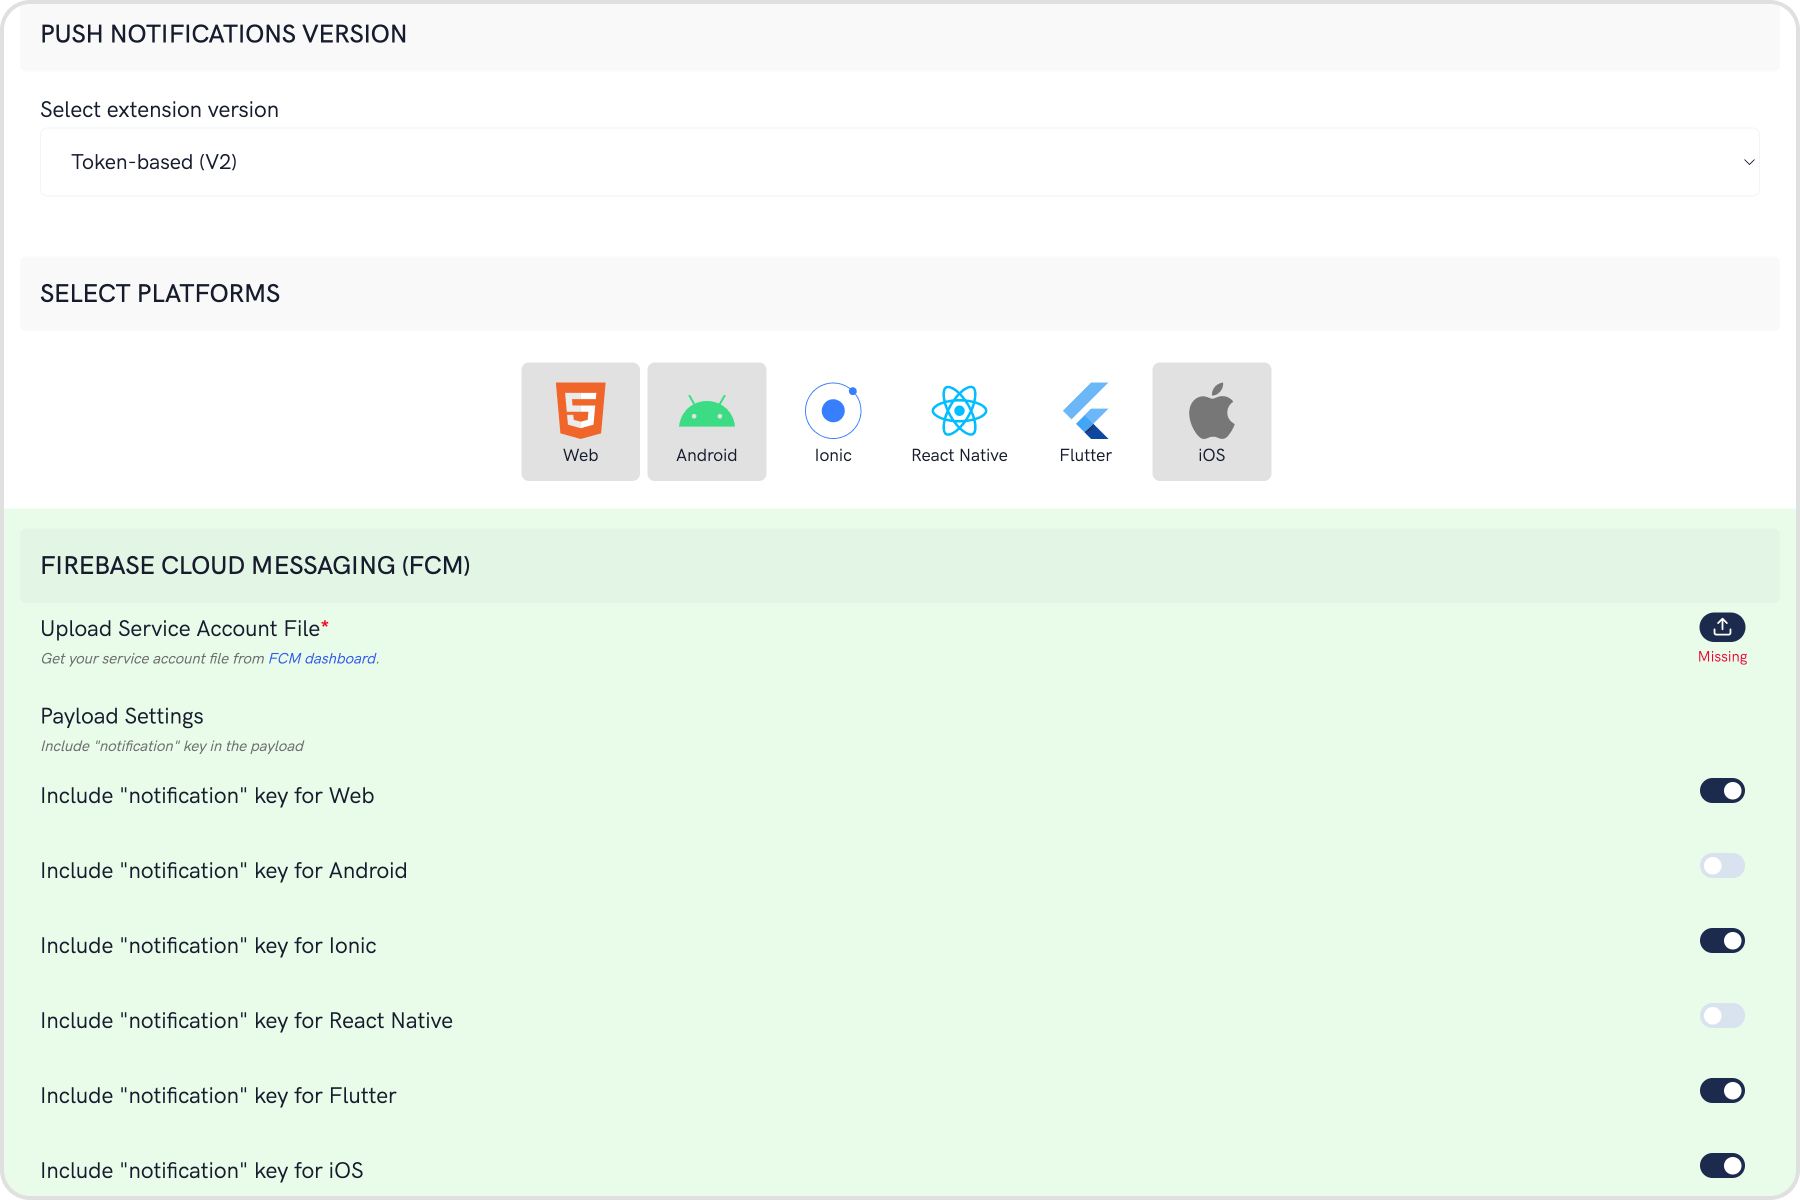 ### Step 2: Save your settings
On the Settings page you need to enter the following:
1. **Set extension version**
* If you are setting it for the first time, Select `V2` to start using the token-based version of the Push Notification extension.
* If you already have an app using `V1` and want to migrate your app to use `V2`, then Select `V1 & V2` option. This ensures that the users viewing the older version of your app also receive Push Notifications.
* Eventually, when all your users are on the latest version of your app, you can change this option to `V2`, thus turning off `V1` (Topic-based) Push Notifications completely.
2. **Select the platforms that you want to support**
* Select from Web, Android, Ionic (Deprecated), React Native, Flutter & iOS.
3. **Notification payload settings**
* You can control if the notification key should be in the Payload or not. Learn more about the FCM Messages [here](https://firebase.google.com/docs/cloud-messaging/).
4. **Push payload message options**
### Step 2: Save your settings
On the Settings page you need to enter the following:
1. **Set extension version**
* If you are setting it for the first time, Select `V2` to start using the token-based version of the Push Notification extension.
* If you already have an app using `V1` and want to migrate your app to use `V2`, then Select `V1 & V2` option. This ensures that the users viewing the older version of your app also receive Push Notifications.
* Eventually, when all your users are on the latest version of your app, you can change this option to `V2`, thus turning off `V1` (Topic-based) Push Notifications completely.
2. **Select the platforms that you want to support**
* Select from Web, Android, Ionic (Deprecated), React Native, Flutter & iOS.
3. **Notification payload settings**
* You can control if the notification key should be in the Payload or not. Learn more about the FCM Messages [here](https://firebase.google.com/docs/cloud-messaging/).
4. **Push payload message options**
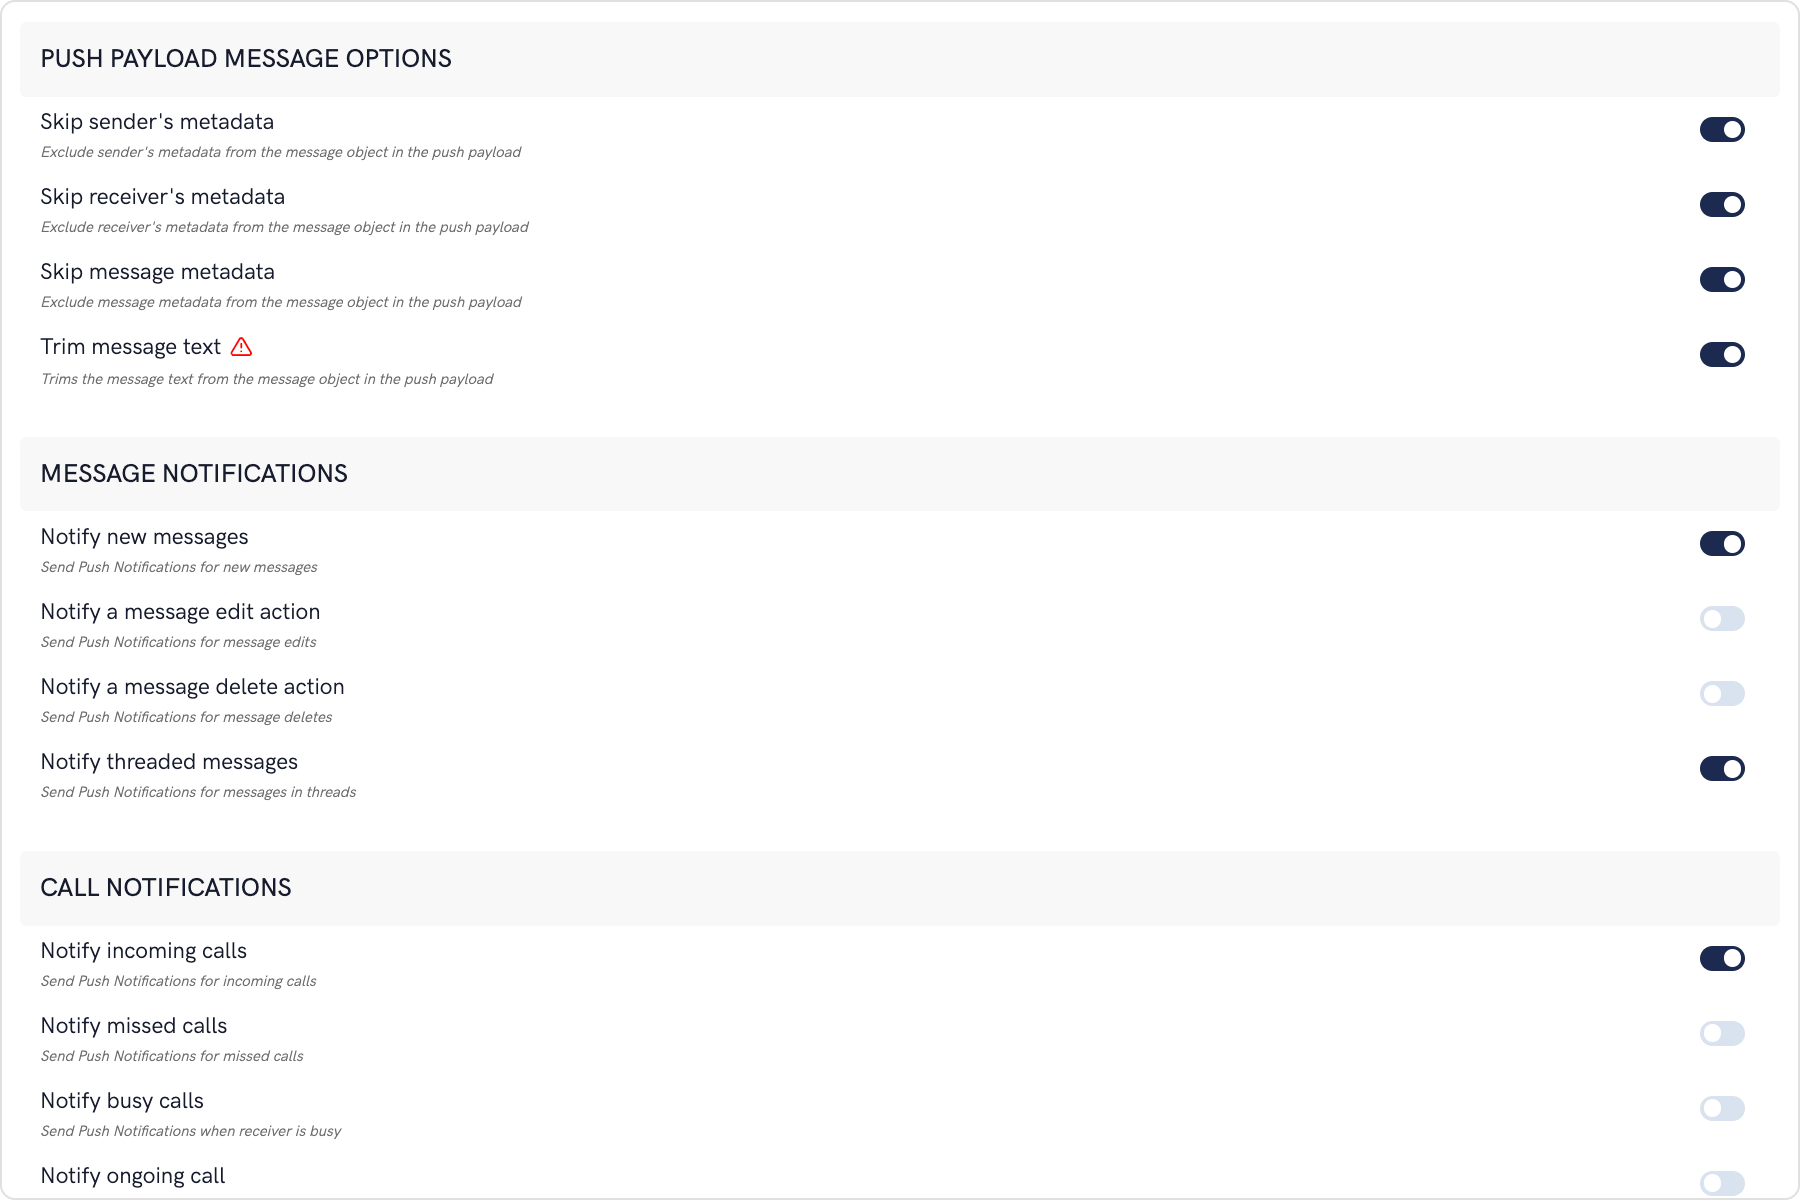 * The maximum payload size supported by FCM and APNs for push notifications is approximately 4 KB. Due to the inclusion of CometChat's message object, the payload size may exceed this limit, potentially leading to non-delivery of push notifications for certain messages. The options provided allow you to remove the sender's metadata, receiver's metadata, message metadata and trim the content of the text field.
* The message metadata includes the outputs of the Thumbnail Generation, Image Moderation, and Smart Replies extensions. You may want to retain this metadata if you need to customize the notification displayed to the end user based on these outputs.
5. **Notification Triggers**
* The maximum payload size supported by FCM and APNs for push notifications is approximately 4 KB. Due to the inclusion of CometChat's message object, the payload size may exceed this limit, potentially leading to non-delivery of push notifications for certain messages. The options provided allow you to remove the sender's metadata, receiver's metadata, message metadata and trim the content of the text field.
* The message metadata includes the outputs of the Thumbnail Generation, Image Moderation, and Smart Replies extensions. You may want to retain this metadata if you need to customize the notification displayed to the end user based on these outputs.
5. **Notification Triggers**
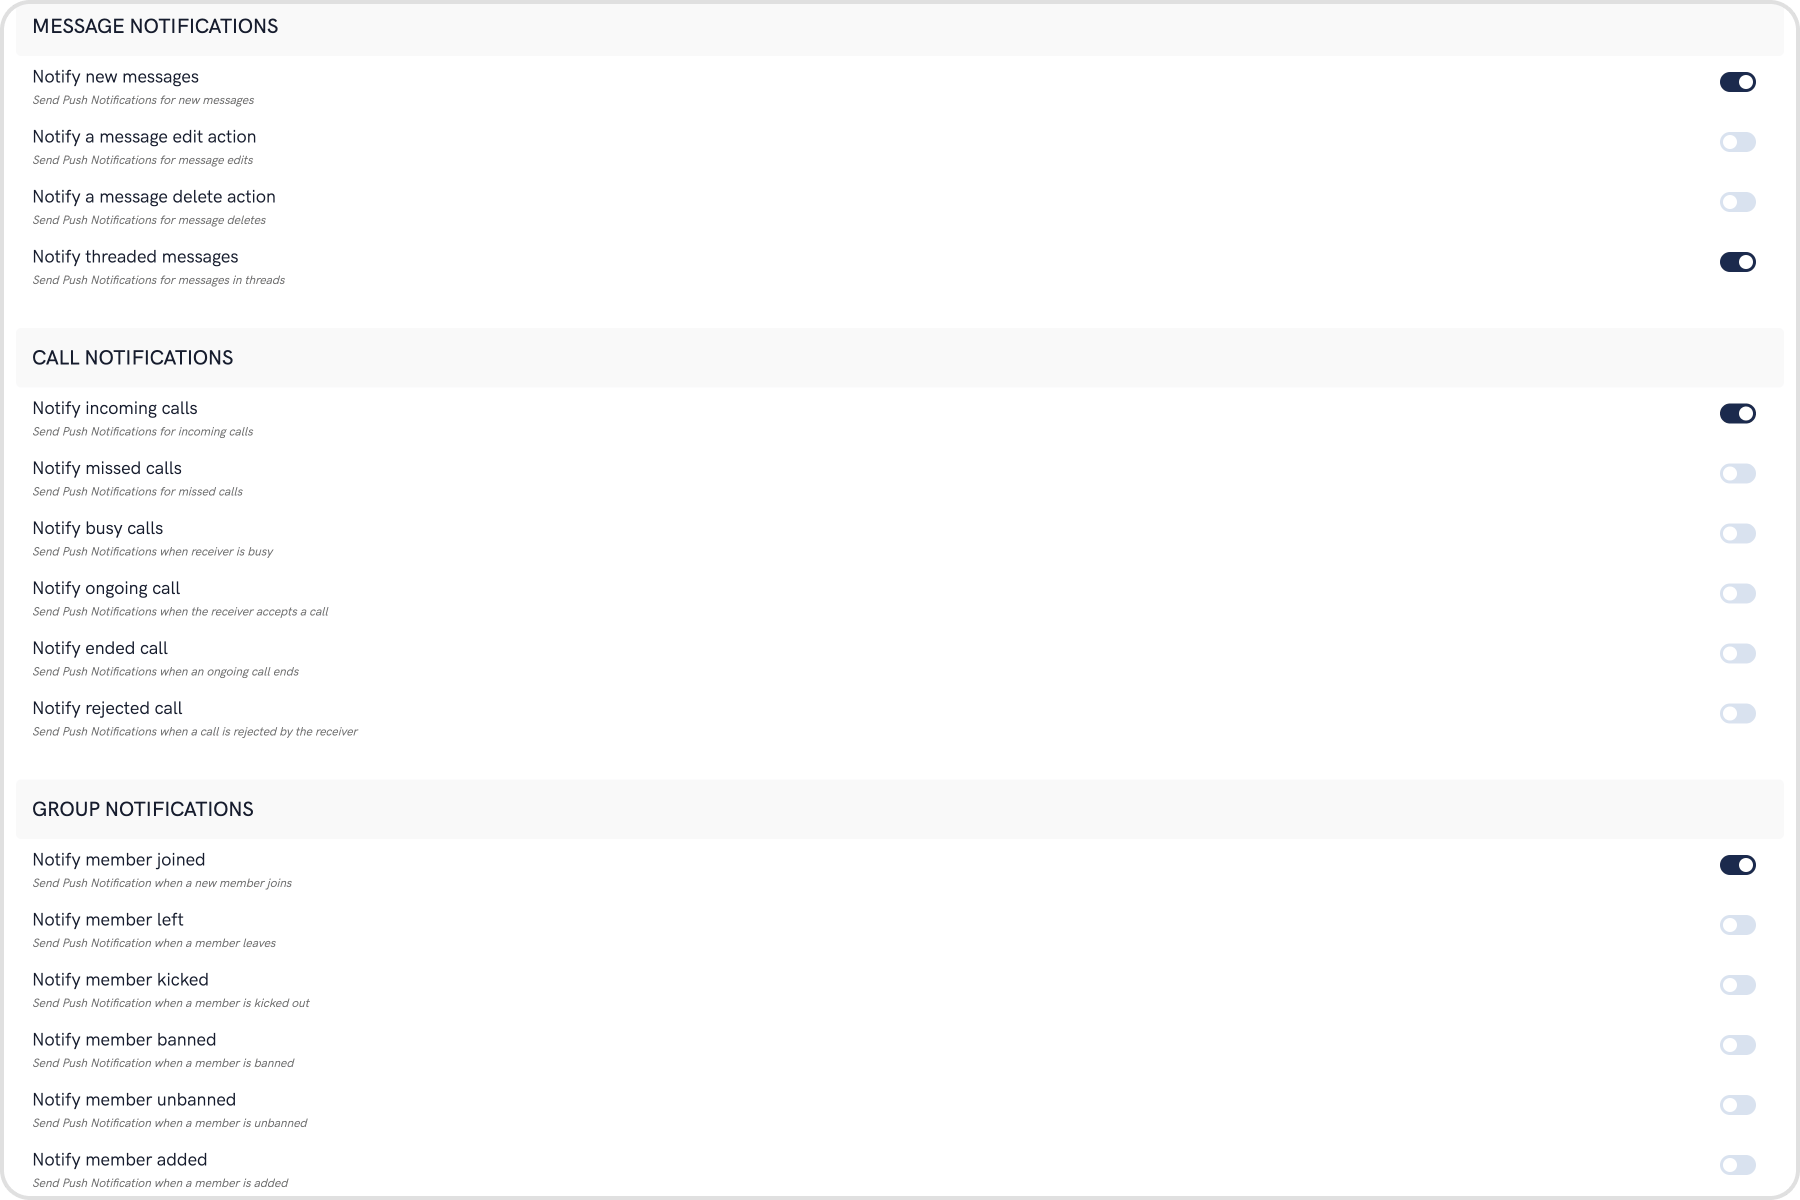 * Select the triggers for sending Push Notifications. These triggers can be classified into 3 main categories:
1. Message Notifications
2. Call Notifications
3. Group Notifications
* These are pretty self-explanatory and you can toggle them as per your requirement.
## Web App Setup
### Step 1: Folder and files setup
Create a folder with the following three files:
| Files | Description |
| ------------------------- | ------------------------------------------------------------------------------------------- |
| index.html | Displays a simple User Login Form. |
| PushNotification.js | File with the logic to initialize CometChat and Firebase. |
| firebase-messaging-sw\.js | Service worker shows Push Notifications when the tab is either in the background or closed. |
### Step 2: Add the Firebase Config to the HTML File
1. Go to the Firebase Console and click on the Web app and open up the Settings page.
2. Go to the "General" tab on the Settings page.
3. Scroll down and copy the Firebase SDK snippet and paste in the \ tag of your index.html file.
* Select the triggers for sending Push Notifications. These triggers can be classified into 3 main categories:
1. Message Notifications
2. Call Notifications
3. Group Notifications
* These are pretty self-explanatory and you can toggle them as per your requirement.
## Web App Setup
### Step 1: Folder and files setup
Create a folder with the following three files:
| Files | Description |
| ------------------------- | ------------------------------------------------------------------------------------------- |
| index.html | Displays a simple User Login Form. |
| PushNotification.js | File with the logic to initialize CometChat and Firebase. |
| firebase-messaging-sw\.js | Service worker shows Push Notifications when the tab is either in the background or closed. |
### Step 2: Add the Firebase Config to the HTML File
1. Go to the Firebase Console and click on the Web app and open up the Settings page.
2. Go to the "General" tab on the Settings page.
3. Scroll down and copy the Firebase SDK snippet and paste in the \ tag of your index.html file.
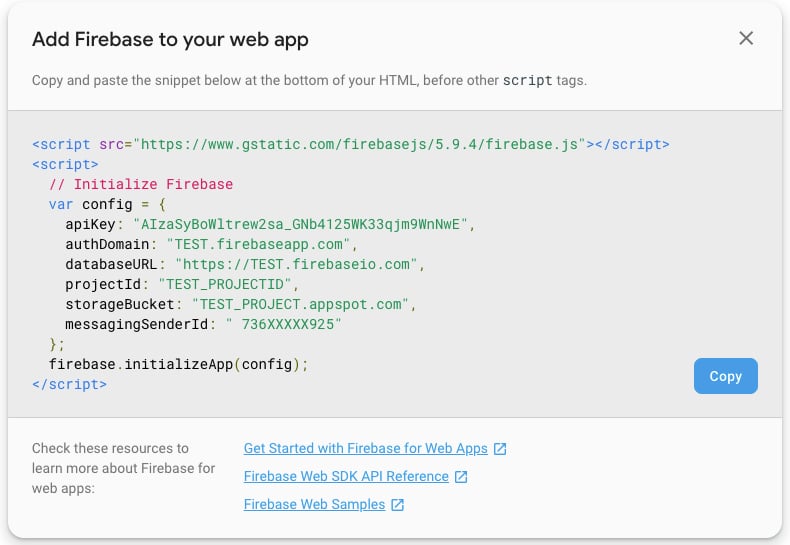 ### Step 3: Setup index.html file
1. Include the latest CometChat library using CDN.
2. Register the service worker file.
3. Also, include the `PushNotification.js`.
4. The \ has a simple form:
1. Text input for UID.
2. Login button.
3. Logout button.
Once done, your `index.html` file should look like this:
### Step 3: Setup index.html file
1. Include the latest CometChat library using CDN.
2. Register the service worker file.
3. Also, include the `PushNotification.js`.
4. The \ has a simple form:
1. Text input for UID.
2. Login button.
3. Logout button.
Once done, your `index.html` file should look like this:
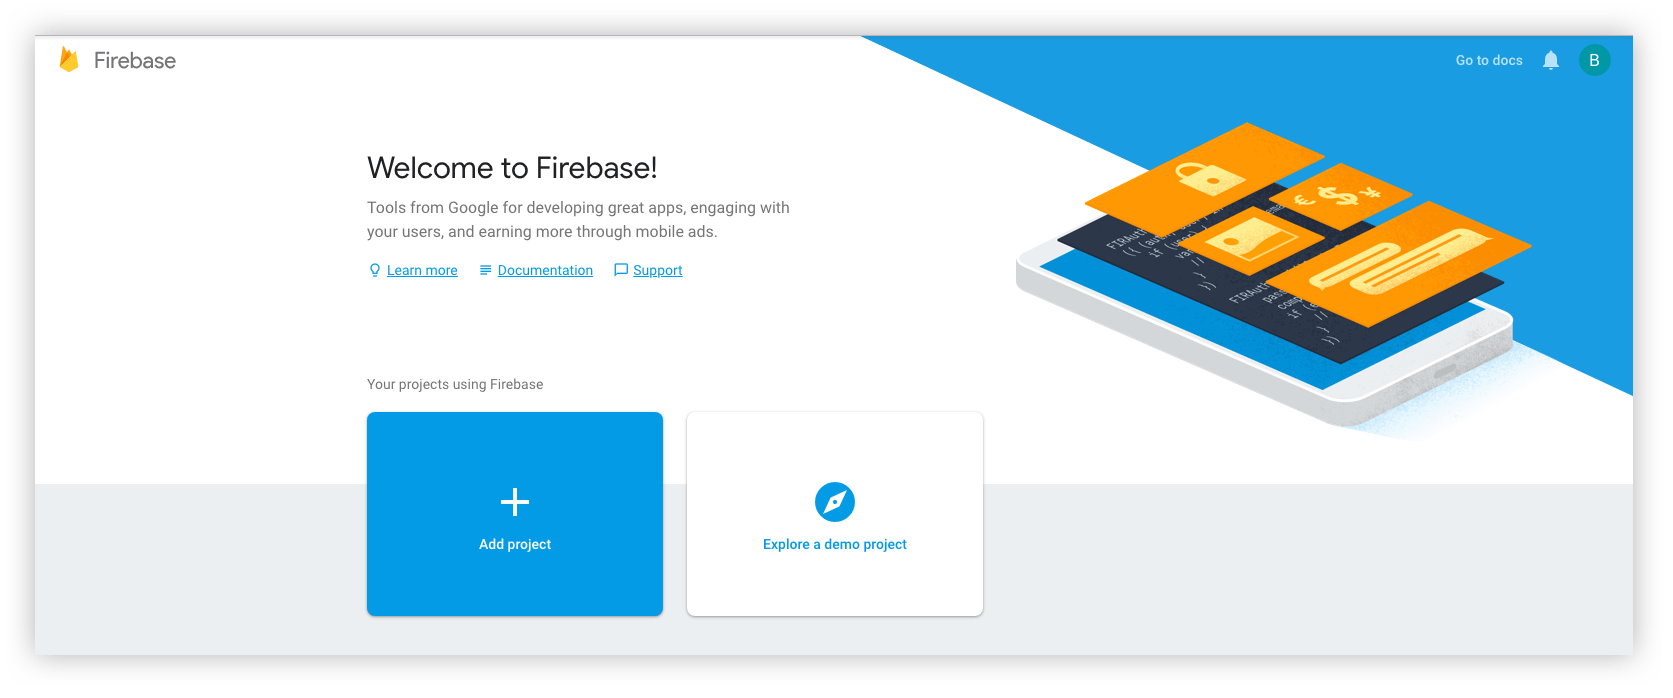 This is a simple 3 step process where:
1. You give a name to your project
2. Add Google Analytics to your project (Optional)
3. Configure Google Analytics account (Optional)
Click on Create and you are ready to go.
### Step 2: Add Firebase to your Android App
1. Click on the Android icon as shown on the screen below.
This is a simple 3 step process where:
1. You give a name to your project
2. Add Google Analytics to your project (Optional)
3. Configure Google Analytics account (Optional)
Click on Create and you are ready to go.
### Step 2: Add Firebase to your Android App
1. Click on the Android icon as shown on the screen below.
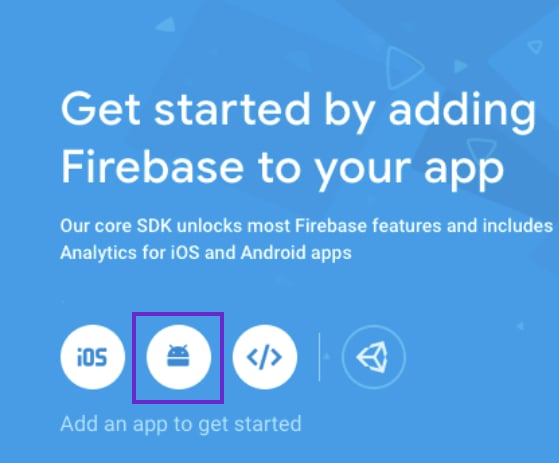 2. Register your Android app by providing the following details:
1. Android Package name
2. App nickname (optional)
3. Debug signing certificate SHA-1 (optional)
2. Register your Android app by providing the following details:
1. Android Package name
2. App nickname (optional)
3. Debug signing certificate SHA-1 (optional)
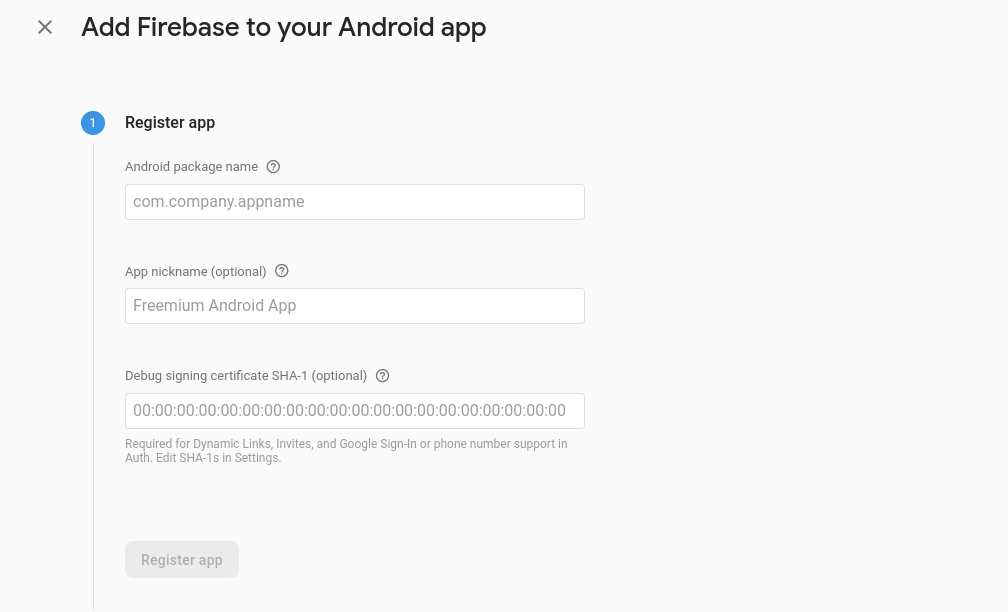 3. Download the `google-services.json` file and place it in the required location in your project.
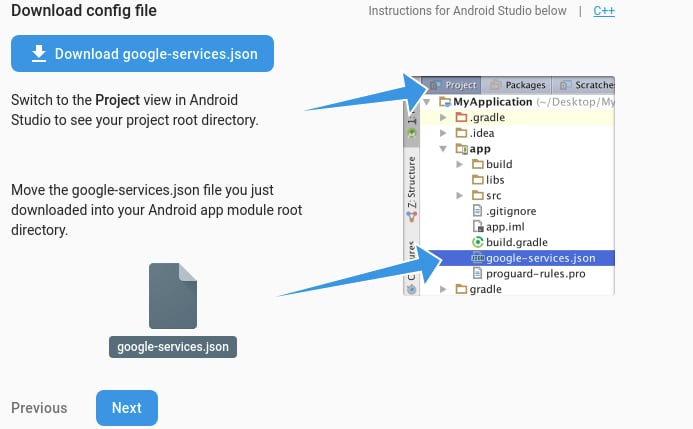 4. Add Firebase SDK by copying and pasting the snippets in the Project-level `build.gradle` file.
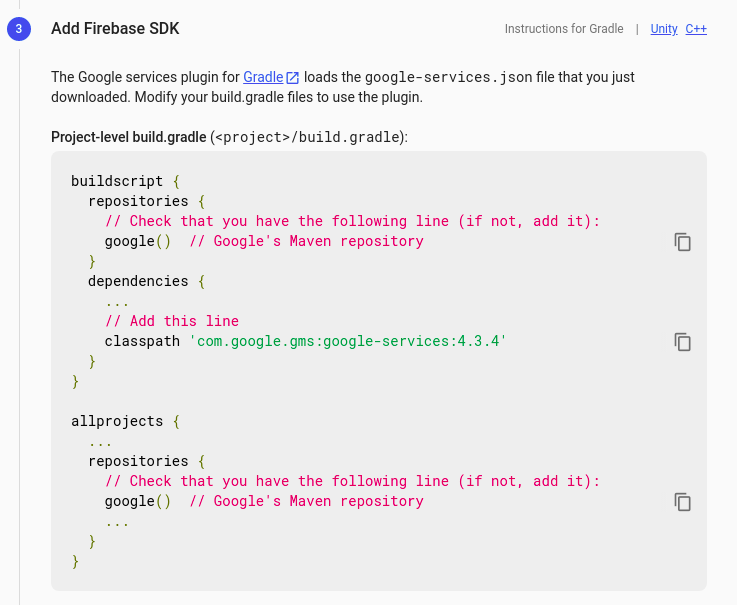 5. Add Firebase SDK by copying and pasting the snippets in the App-level `build.gradle` file.
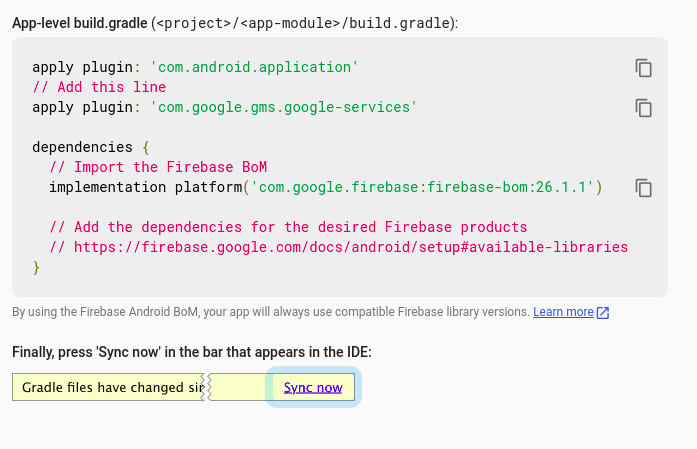 6. Click on 'Continue to Console' to finish the setup.
### Step 3: Download the service account file
6. Click on 'Continue to Console' to finish the setup.
### Step 3: Download the service account file
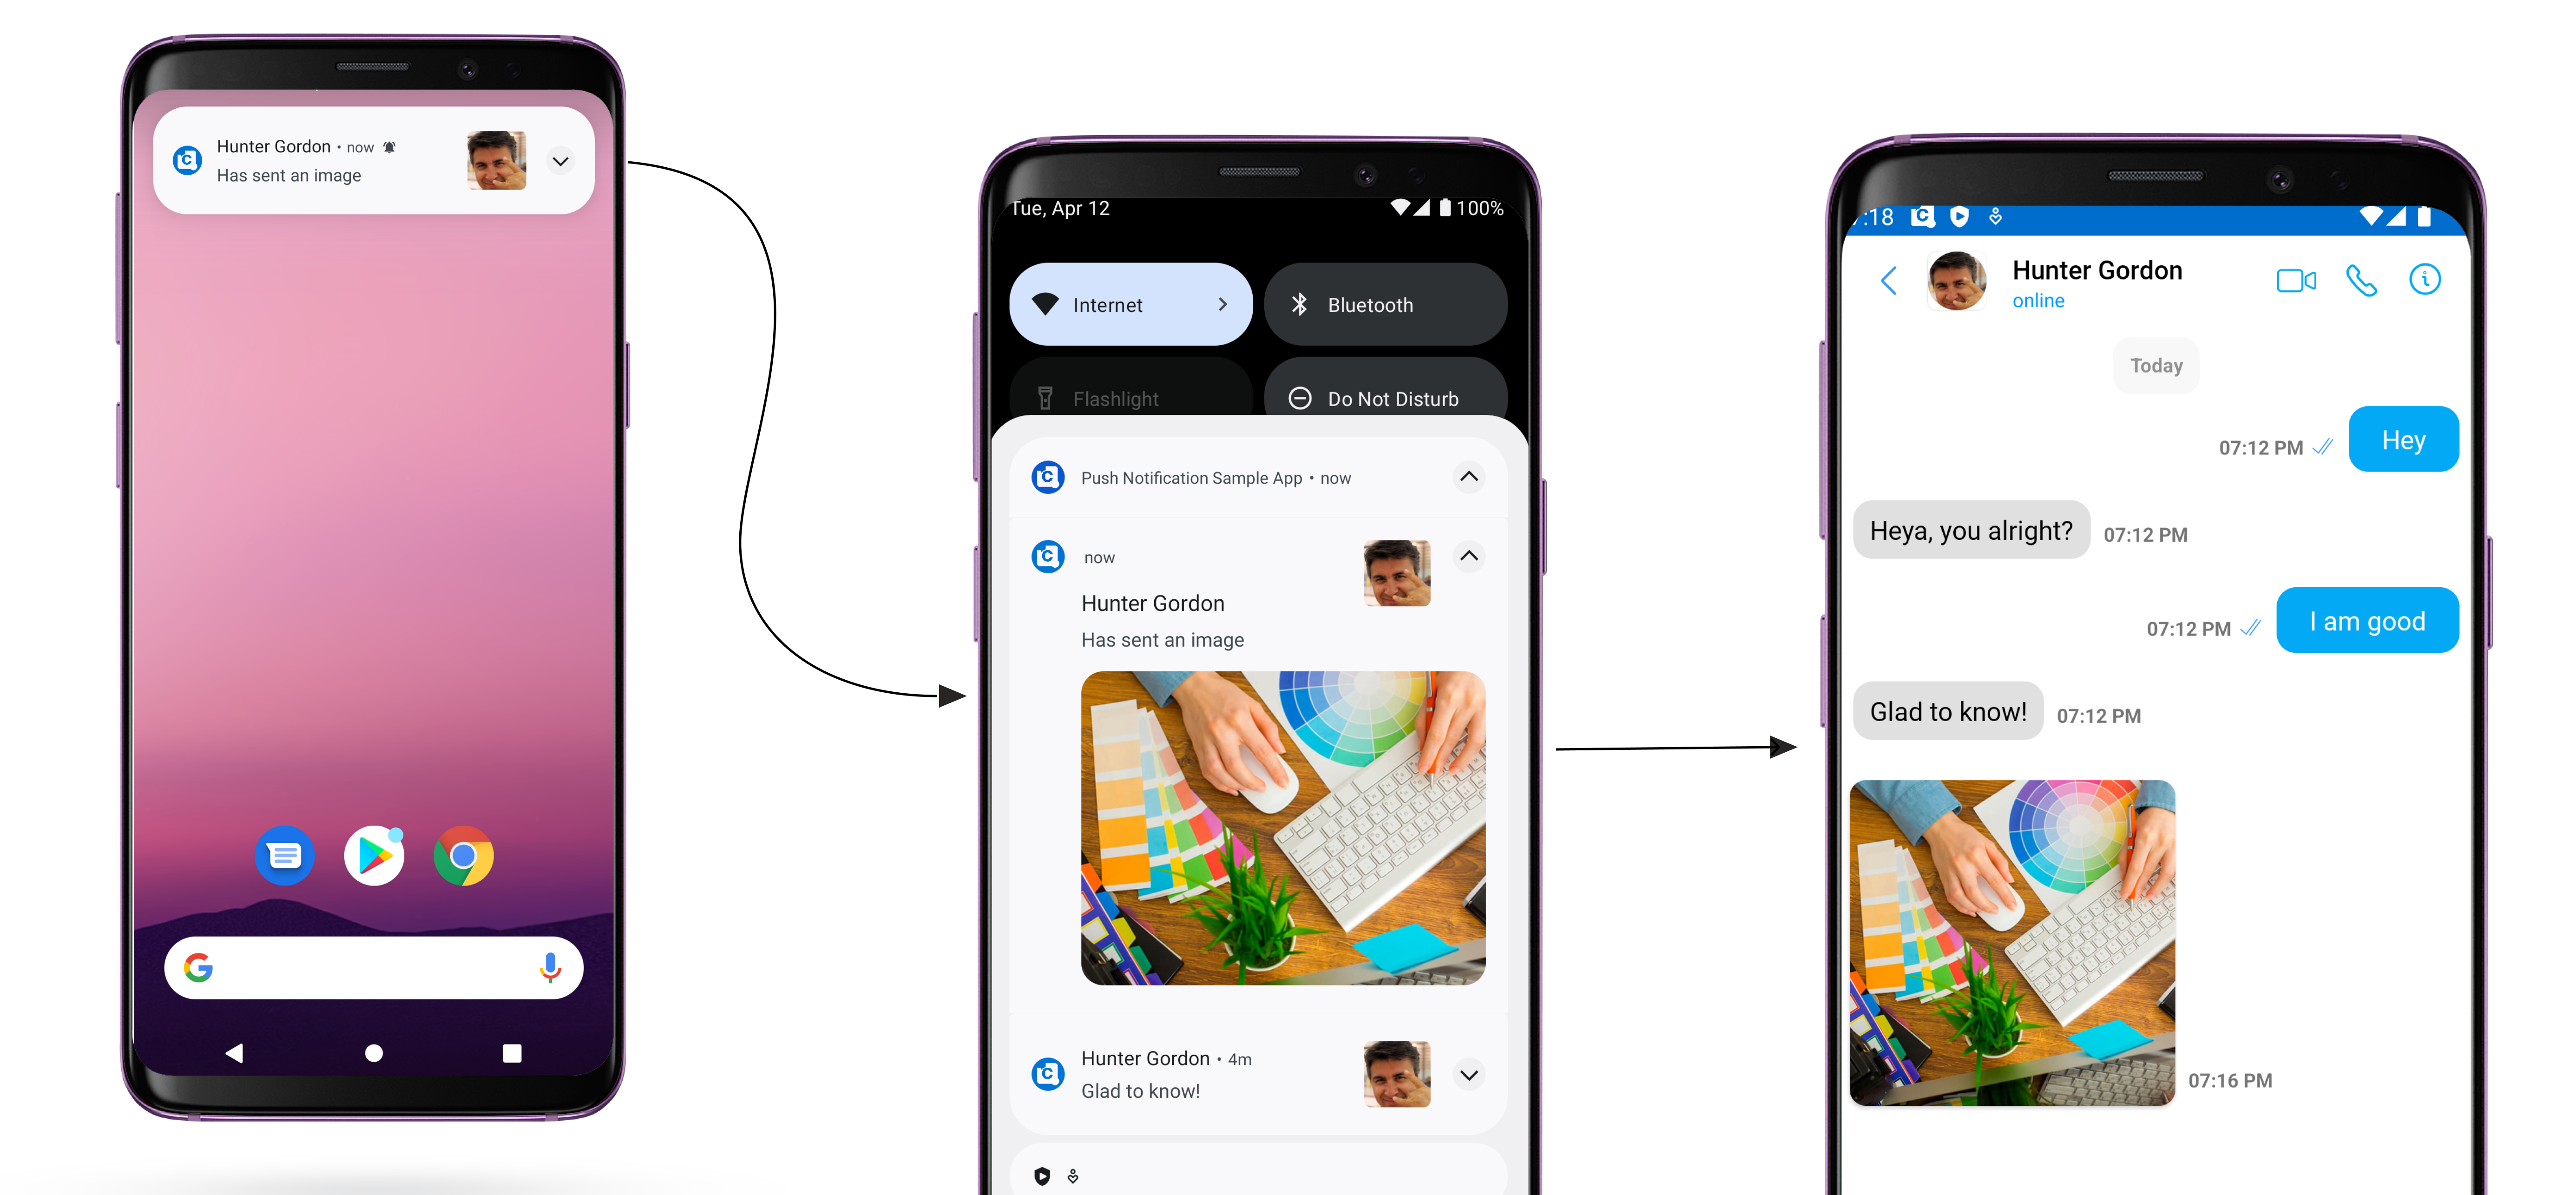 **Step 1. Process push notification payload and grab BaseMessage object**
To open a chat view, firstly you will need a BaseMessage object. You can grab this from the push notification payload received in `onMessageReceived(RemoteMessage message)`. You need to call `CometChat.processMessage()` method to process push notification payload.
**Step 1. Process push notification payload and grab BaseMessage object**
To open a chat view, firstly you will need a BaseMessage object. You can grab this from the push notification payload received in `onMessageReceived(RemoteMessage message)`. You need to call `CometChat.processMessage()` method to process push notification payload.
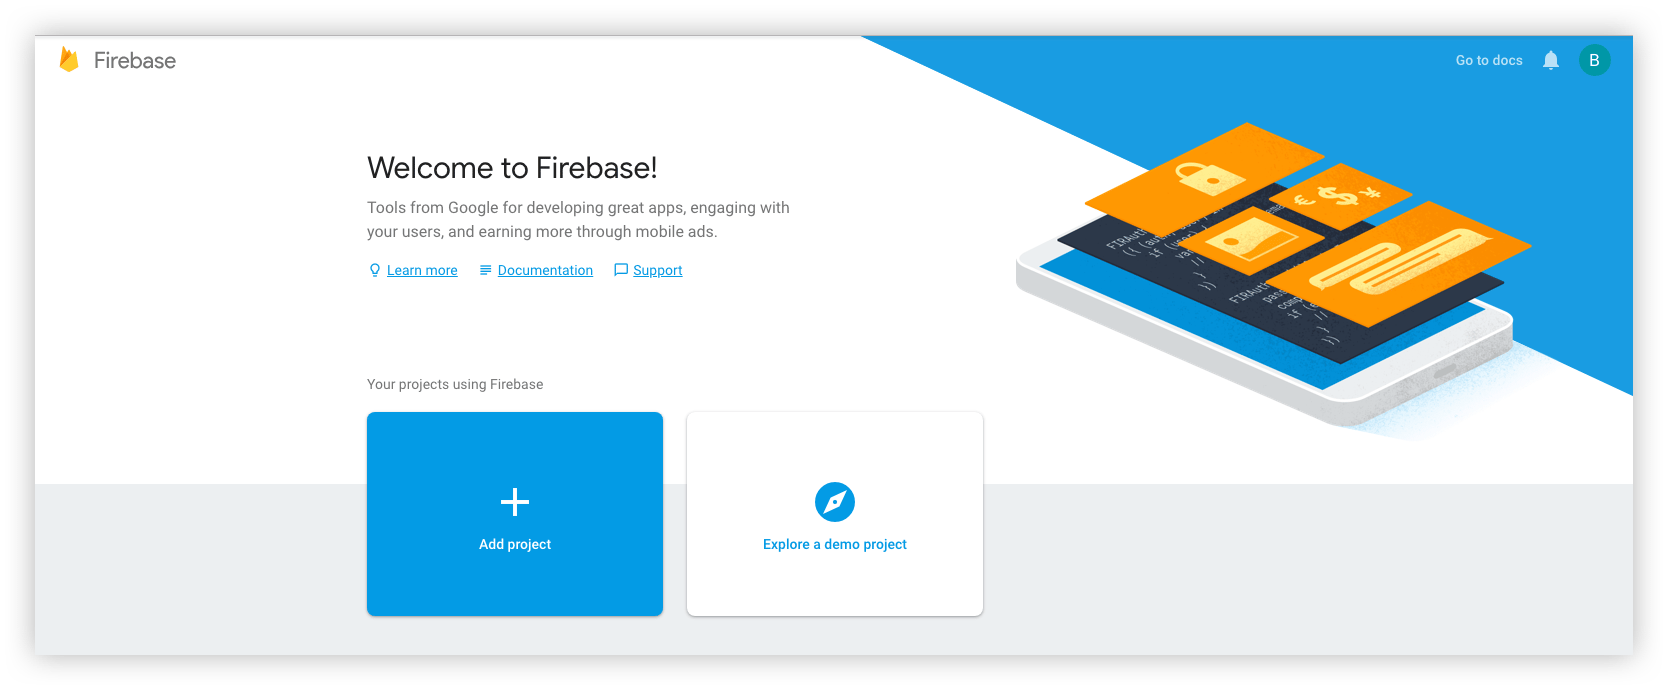 This is a simple 3 step process where:
1. You give a name to your project
2. Add Google Analytics to your project (Optional)
3. Configure Google Analytics account (Optional)
Click on Create and you are ready to go.
### Step 2: Add Firebase to your Android App
1. Click on the Android icon as shown on the screen below.
This is a simple 3 step process where:
1. You give a name to your project
2. Add Google Analytics to your project (Optional)
3. Configure Google Analytics account (Optional)
Click on Create and you are ready to go.
### Step 2: Add Firebase to your Android App
1. Click on the Android icon as shown on the screen below.
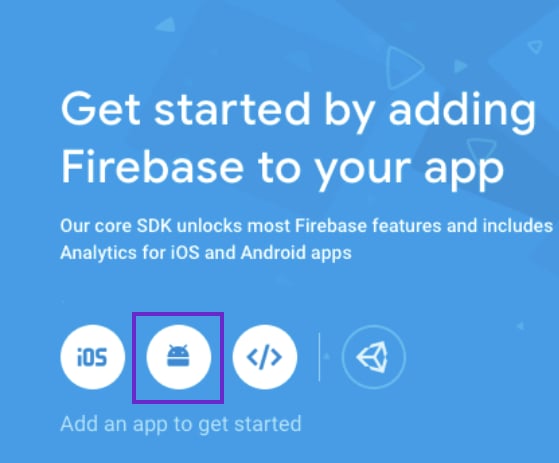 2. Register your Android app by providing the following details:
1. Android Package name
2. App nickname (optional)
3. Debug signing certificate SHA-1 (optional)
2. Register your Android app by providing the following details:
1. Android Package name
2. App nickname (optional)
3. Debug signing certificate SHA-1 (optional)
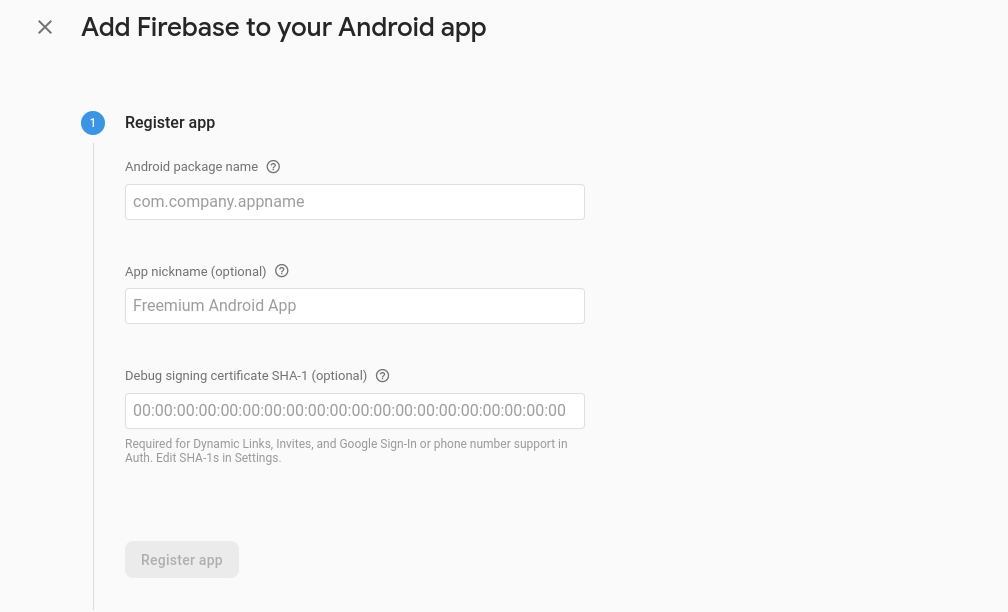 3. Download the google-services.json file and place it in the required location in your project.
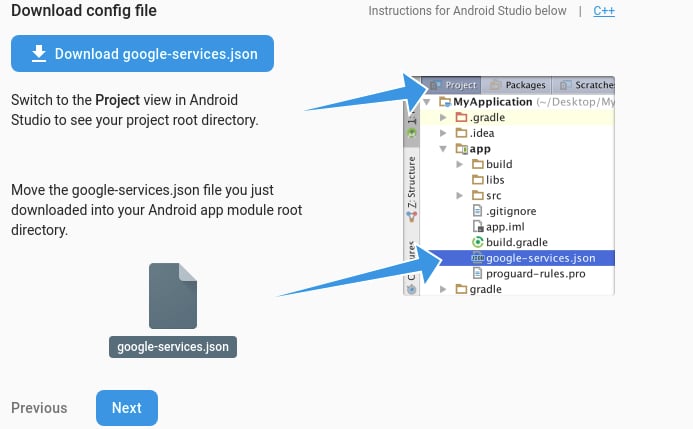 4. Add Firebase SDK by copying and pasting the snippets in the Project-level build.gradle file.
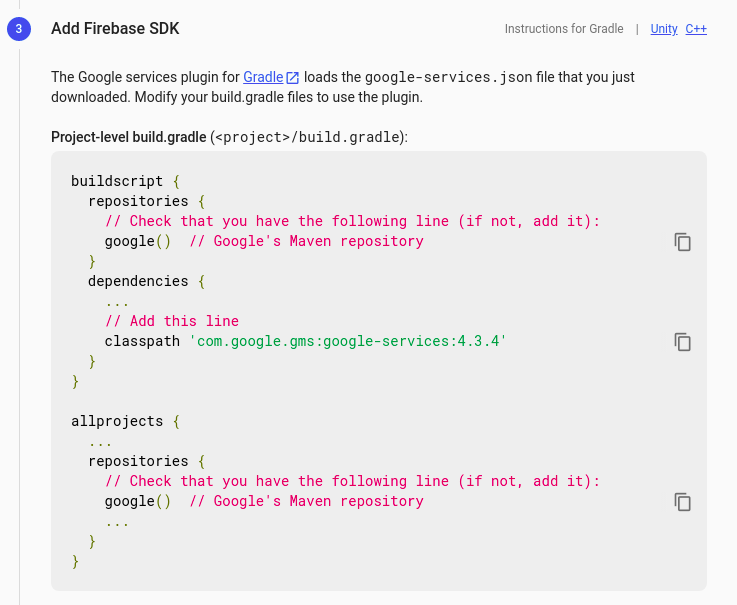 5. Add Firebase SDK by copying and pasting the snippets in the App-level build.gradle file.
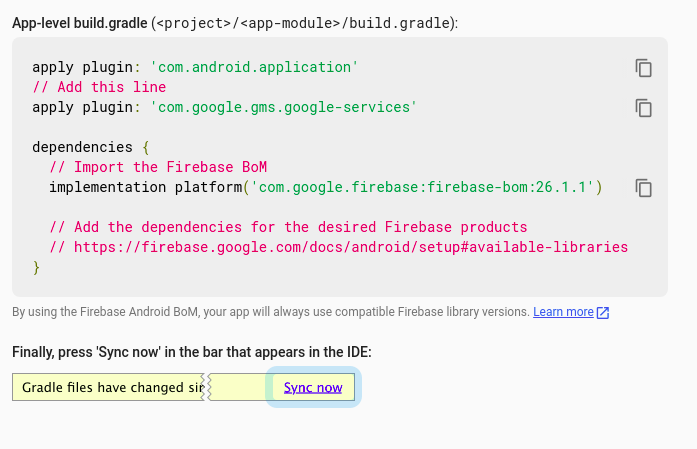 6. Click on 'Continue to Console' to finish the setup.
### Step 3: Download the service account file
6. Click on 'Continue to Console' to finish the setup.
### Step 3: Download the service account file
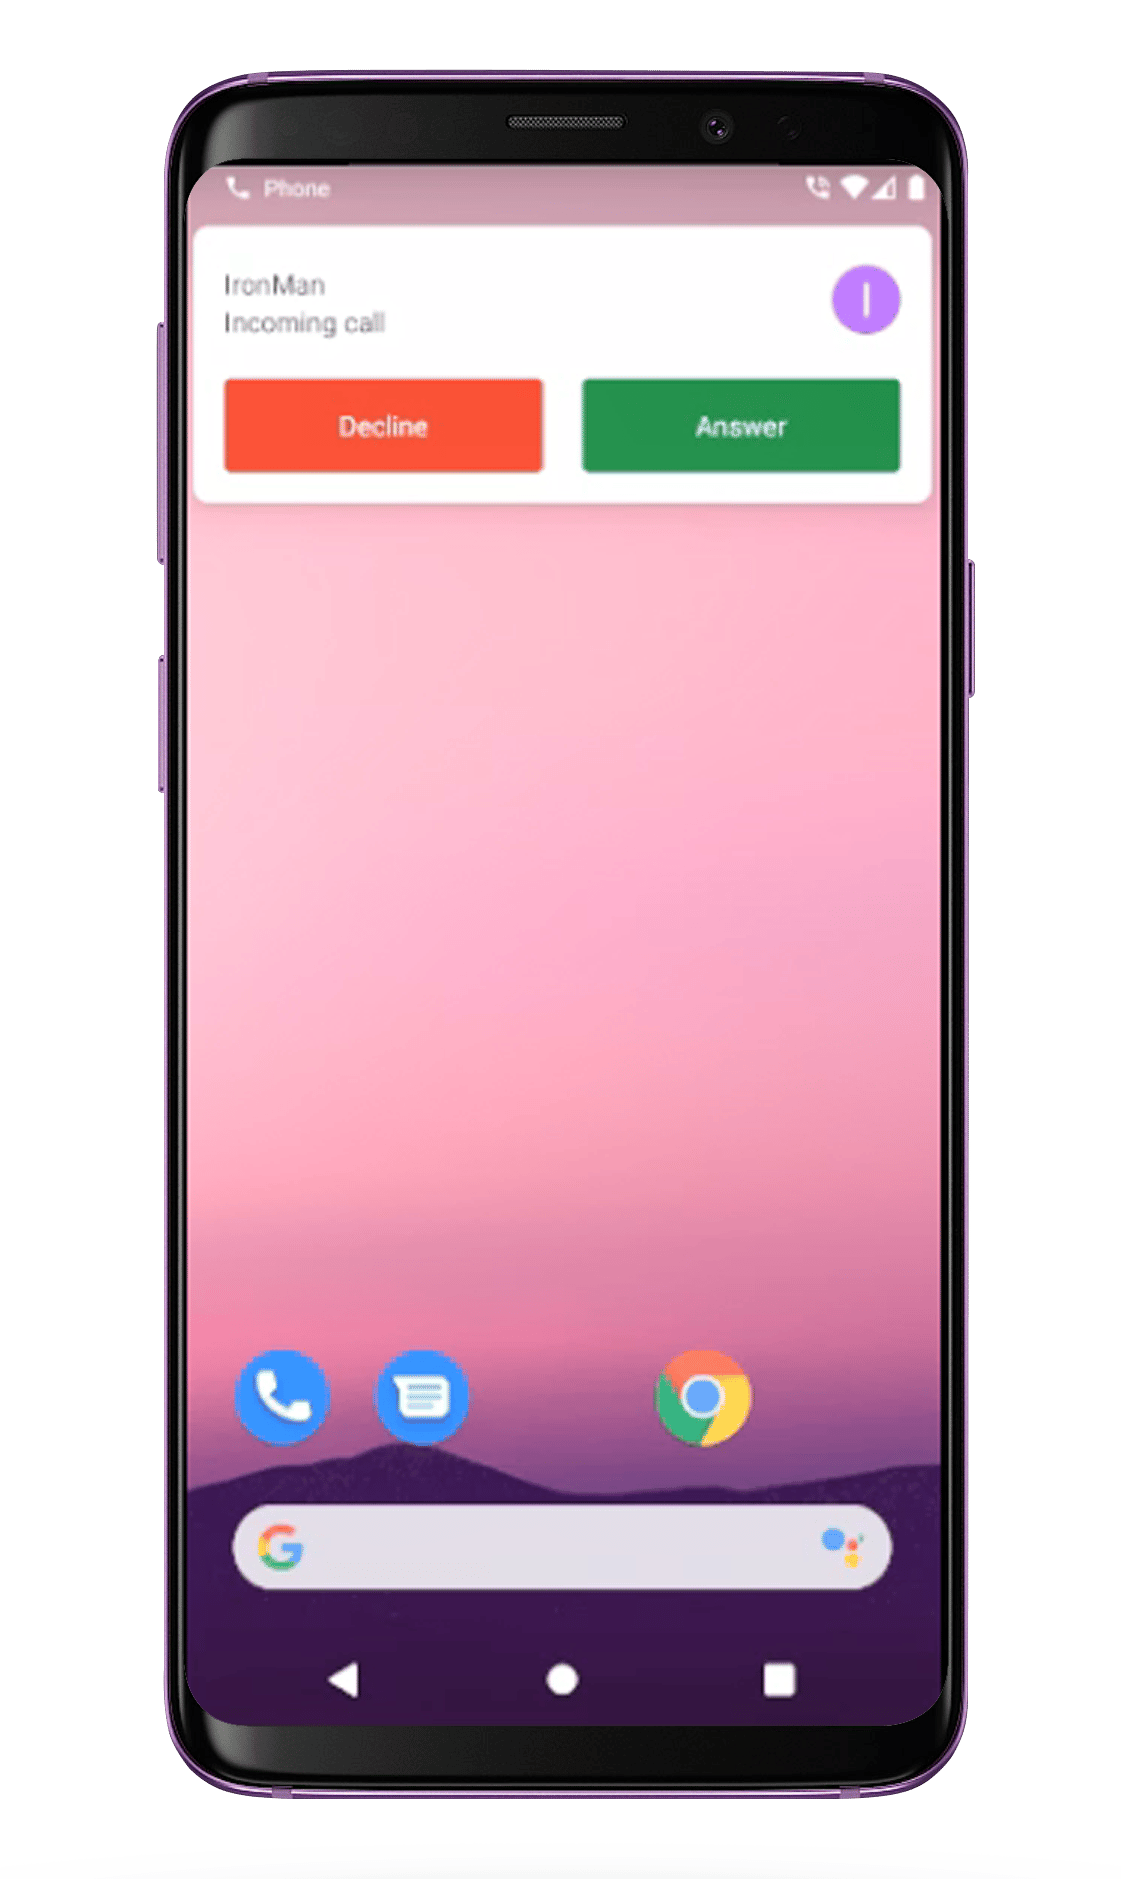 **ConnectionService** is an abstract service used to handle VoIP & other calls. It is part of android.telecom package which helps to handle telecom services. ConnectionService can be used either as System-Managed Service where System defined UI is shown to handle the calls. It can also be used as Self-Managed Service where users can show their own calling UI to handle the calls.
*Note - Currently the sample app uses system-managed connection service, So the System UI will be displayed to handle incoming calls.*
Learn more about [ConnectionService](https://developer.android.com/reference/android/telecom/ConnectionService).
| Files | Description |
| ------------------------------------------------------------------------------------------------------------------------------------------------------------------------------------------------------------------------- | ------------------------------------------------------------------------------------------------------------------------------------------------------------------------------------------------------------ |
| [CallConnectionService.java](https://github.com/cometchat/cometchat-push-notification-app-android/blob/v4-push-notifications-extension/app/src/main/java/com/cometchat/pushnotificationsample/CallConnectionService.java) | Custom ConnectionService file which is used to handle incoming & outgoing calls. It is used to manages the ConnectionService with your app. It also handles PhoneAccounts and bind it's services to Telecom. |
| [CallConnection.java](https://github.com/cometchat/cometchat-push-notification-app-android/blob/v4-push-notifications-extension/app/src/main/java/com/cometchat/pushnotificationsample/CallConnection.java) | Custom Connection class which is used to handle the callbacks of ConnectionService. Call backs such as onAnswer(), onReject(), onHold(), etc. |
| [CallManager.java](https://github.com/cometchat/cometchat-push-notification-app-android/blob/v4-push-notifications-extension/app/src/main/java/com/cometchat/pushnotificationsample/CallConnectionService.java) | It is used to manages the ConnectionService with your app. It also handles PhoneAccounts and bind it's services to Telecom. |
### Step 3: Receive notifications
1. The FCM Token can be received by overriding the `onNewToken()` method. This token is stored as a String variable. You can choose to store it in SharedPreferences as well.
2. To receive messages, you need to override the onMessageReceived(RemoteMessage remoteMessage).
3. [PushNotificationService.java](https://github.com/cometchat/cometchat-push-notification-app-android/blob/v4-push-notifications-extension/app/src/main/java/com/cometchat/pushnotificationsample/PushNotificationService.java) has the code that provides a way you can handle messages received from CometChat users and groups.
4. Since Android O, there have been certain restrictions added for background tasks and users cannot launch intent directly from the service. More details [here](https://developer.android.com/guide/components/activities/background-starts).
5. You also need to add the above-mentioned MyFirebasMessagingService.java fil in your AndroidManifest.xml to make Push notification work in the background as well.
**ConnectionService** is an abstract service used to handle VoIP & other calls. It is part of android.telecom package which helps to handle telecom services. ConnectionService can be used either as System-Managed Service where System defined UI is shown to handle the calls. It can also be used as Self-Managed Service where users can show their own calling UI to handle the calls.
*Note - Currently the sample app uses system-managed connection service, So the System UI will be displayed to handle incoming calls.*
Learn more about [ConnectionService](https://developer.android.com/reference/android/telecom/ConnectionService).
| Files | Description |
| ------------------------------------------------------------------------------------------------------------------------------------------------------------------------------------------------------------------------- | ------------------------------------------------------------------------------------------------------------------------------------------------------------------------------------------------------------ |
| [CallConnectionService.java](https://github.com/cometchat/cometchat-push-notification-app-android/blob/v4-push-notifications-extension/app/src/main/java/com/cometchat/pushnotificationsample/CallConnectionService.java) | Custom ConnectionService file which is used to handle incoming & outgoing calls. It is used to manages the ConnectionService with your app. It also handles PhoneAccounts and bind it's services to Telecom. |
| [CallConnection.java](https://github.com/cometchat/cometchat-push-notification-app-android/blob/v4-push-notifications-extension/app/src/main/java/com/cometchat/pushnotificationsample/CallConnection.java) | Custom Connection class which is used to handle the callbacks of ConnectionService. Call backs such as onAnswer(), onReject(), onHold(), etc. |
| [CallManager.java](https://github.com/cometchat/cometchat-push-notification-app-android/blob/v4-push-notifications-extension/app/src/main/java/com/cometchat/pushnotificationsample/CallConnectionService.java) | It is used to manages the ConnectionService with your app. It also handles PhoneAccounts and bind it's services to Telecom. |
### Step 3: Receive notifications
1. The FCM Token can be received by overriding the `onNewToken()` method. This token is stored as a String variable. You can choose to store it in SharedPreferences as well.
2. To receive messages, you need to override the onMessageReceived(RemoteMessage remoteMessage).
3. [PushNotificationService.java](https://github.com/cometchat/cometchat-push-notification-app-android/blob/v4-push-notifications-extension/app/src/main/java/com/cometchat/pushnotificationsample/PushNotificationService.java) has the code that provides a way you can handle messages received from CometChat users and groups.
4. Since Android O, there have been certain restrictions added for background tasks and users cannot launch intent directly from the service. More details [here](https://developer.android.com/guide/components/activities/background-starts).
5. You also need to add the above-mentioned MyFirebasMessagingService.java fil in your AndroidManifest.xml to make Push notification work in the background as well.
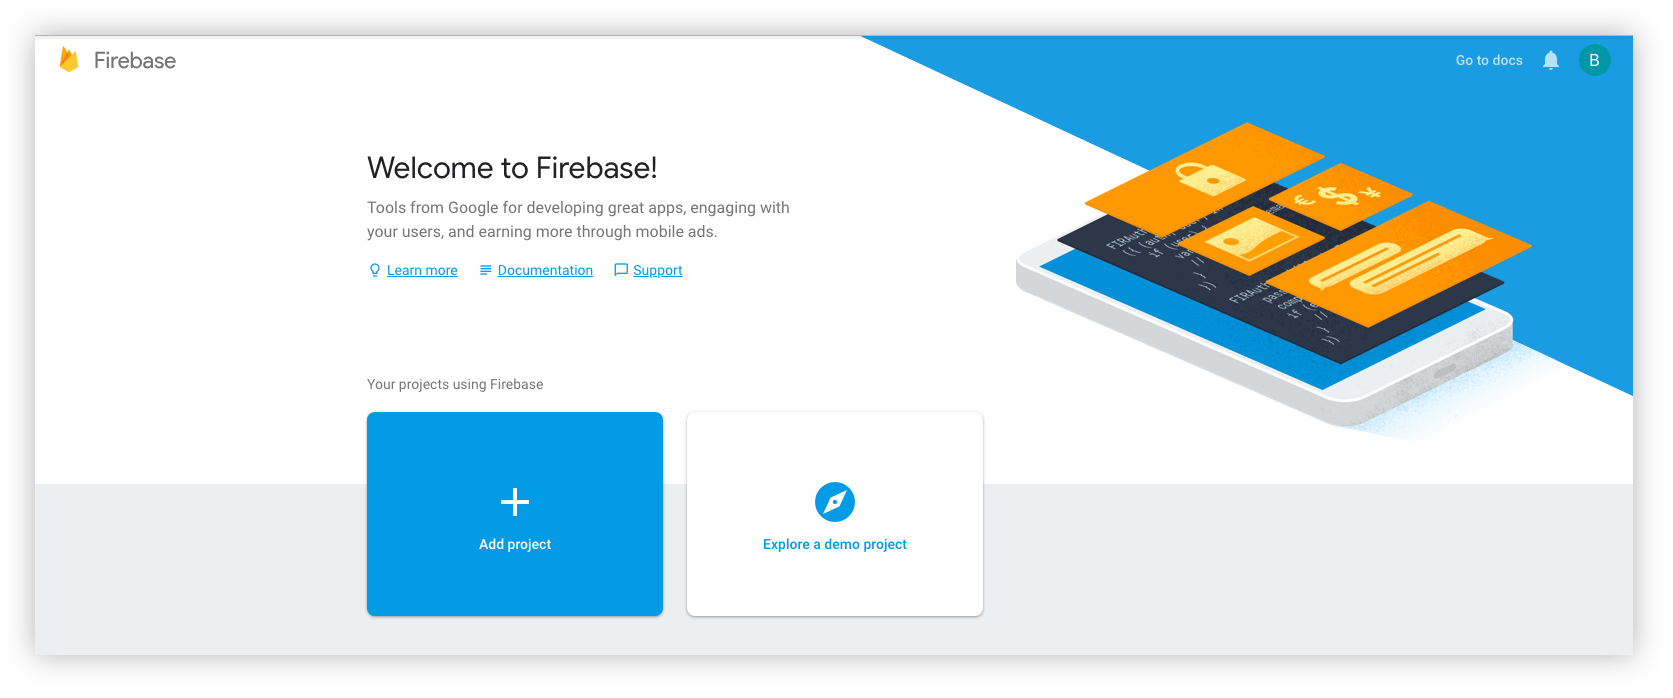 This is a simple 3 step process where:
1. You give a name to your project
2. Add Google Analytics to your project (Optional)
3. Configure Google Analytics account (Optional)
Click on Create and you are ready to go.
### Step 2: Add Firebase to your iOS App
1. Click on the iOS icon as shown on the screen below.
This is a simple 3 step process where:
1. You give a name to your project
2. Add Google Analytics to your project (Optional)
3. Configure Google Analytics account (Optional)
Click on Create and you are ready to go.
### Step 2: Add Firebase to your iOS App
1. Click on the iOS icon as shown on the screen below.
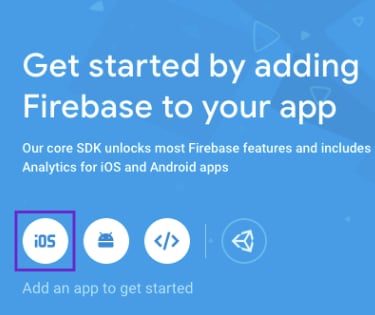 2. Register your Android app by providing the following details: a. iOS bundle name b. App nickname (optional) c. App Store ID (optional)
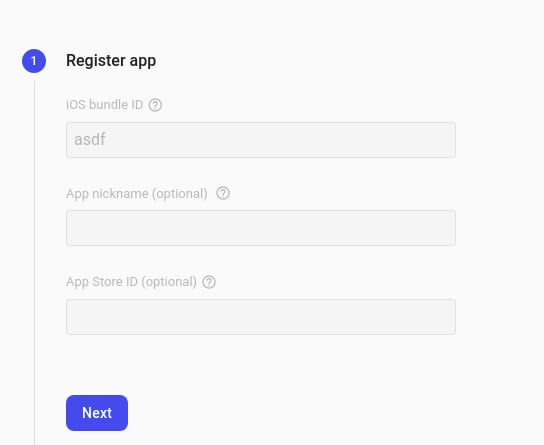 3. Download the GoogleService-Info.plist file and place it in the mentioned location of your project. Move your config file into the root of your Xcode project. If prompted, select to add the config file to all targets as follows.
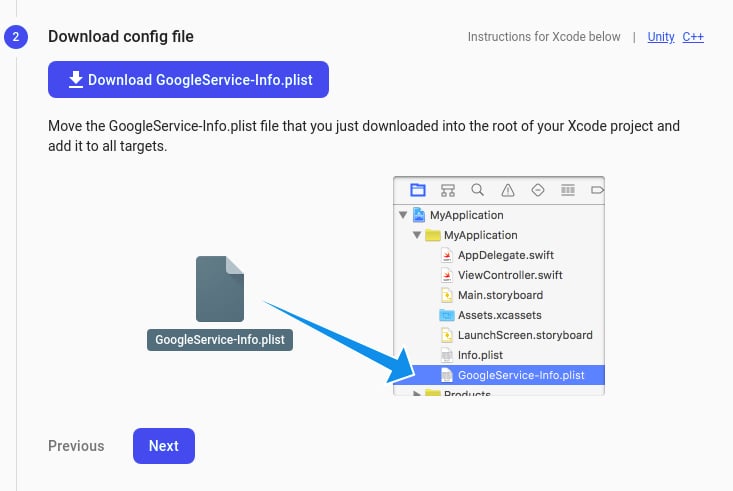
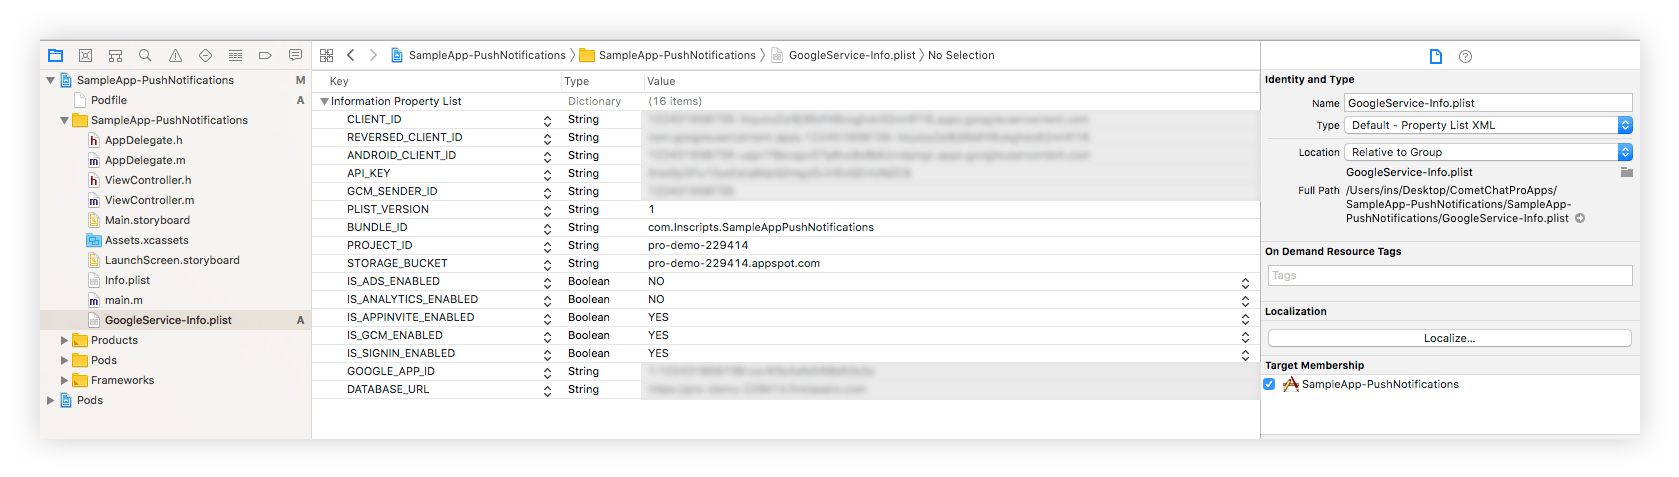 4. We will Add Firebase SDK and Initialisation code later. So, click on 'Next', 'Next', and 'Continue to the Console'.
### Step 3: Download the service account file
4. We will Add Firebase SDK and Initialisation code later. So, click on 'Next', 'Next', and 'Continue to the Console'.
### Step 3: Download the service account file
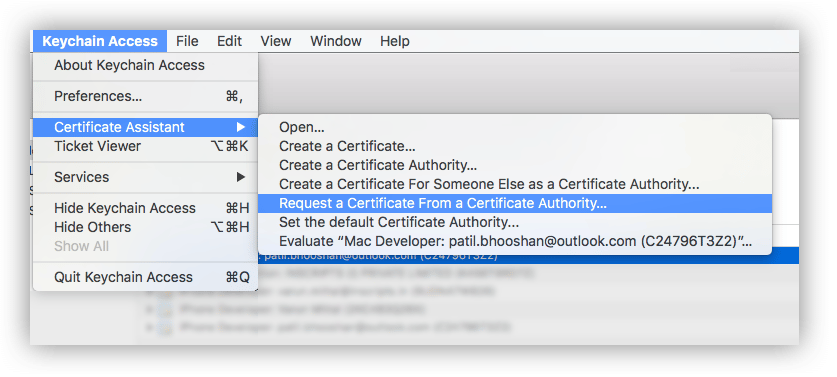 2. The Certificate Information dialog box appears. Enter the email address that you use in your Apple Developer account, and enter a common name for your private key. Don't enter CA email address, choose Saved to disk, and then click the Continue button.
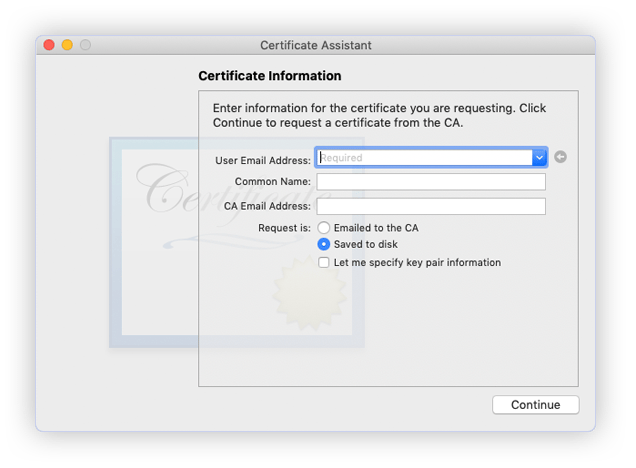 3. Specify the name of your CSR to save and choose the location to save the file on your local disk. Then your CSR file is created, which contains a public/private key pair.
### Step 2: Create an SSL certificate
1. Sign in to your account at the [Apple Developer Member Center](https://developer.apple.com/membercenter).
2. Go to Certificates, Identifiers & Profiles. In the Identifiers > App IDs and select the Push Notifications service under Application Services
3. Click the Edit button.
3. Specify the name of your CSR to save and choose the location to save the file on your local disk. Then your CSR file is created, which contains a public/private key pair.
### Step 2: Create an SSL certificate
1. Sign in to your account at the [Apple Developer Member Center](https://developer.apple.com/membercenter).
2. Go to Certificates, Identifiers & Profiles. In the Identifiers > App IDs and select the Push Notifications service under Application Services
3. Click the Edit button.
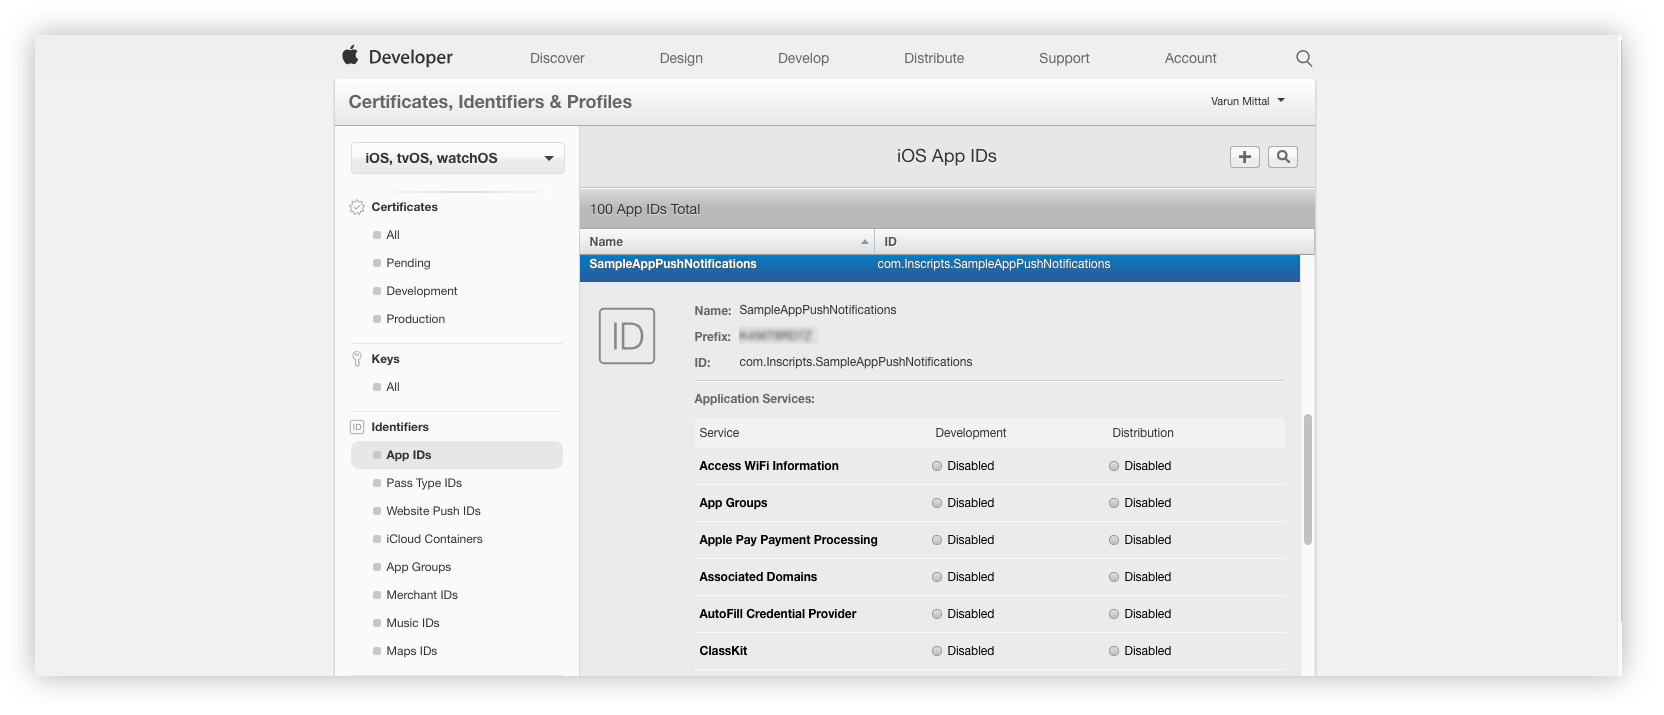 4. Under the Push Notifications service, choose which SSL certificate to create either Development or Production.
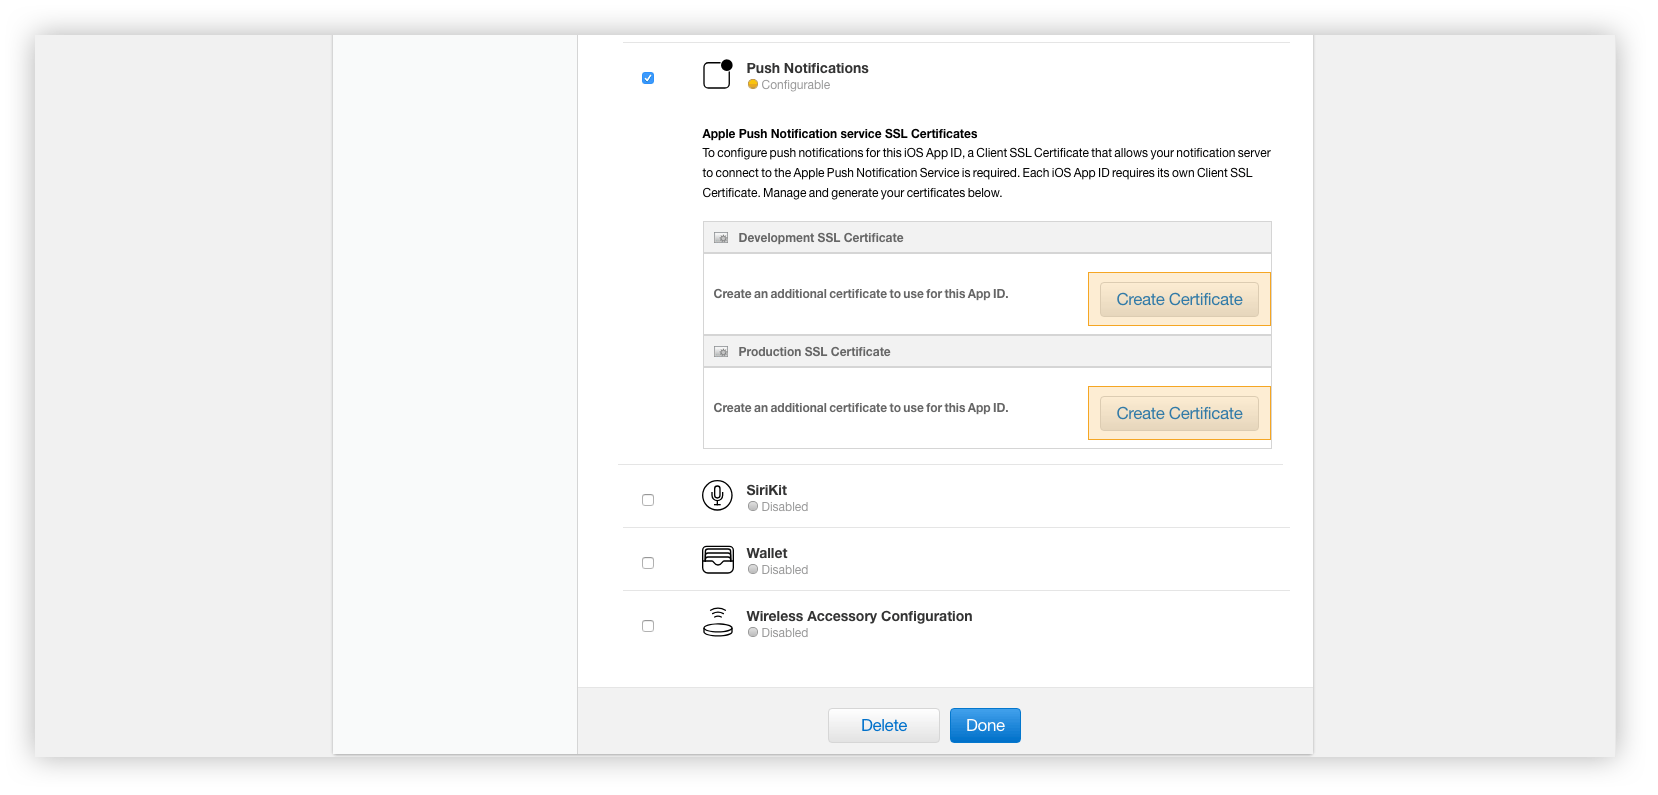 5. In the Generate your certificate pane that appears after the selection, under Upload CSR file., upload the CSR file you created through the Choose File... button. To complete the process, choose Continue. When the certificate is ready, choose Download to save it to your Mac.
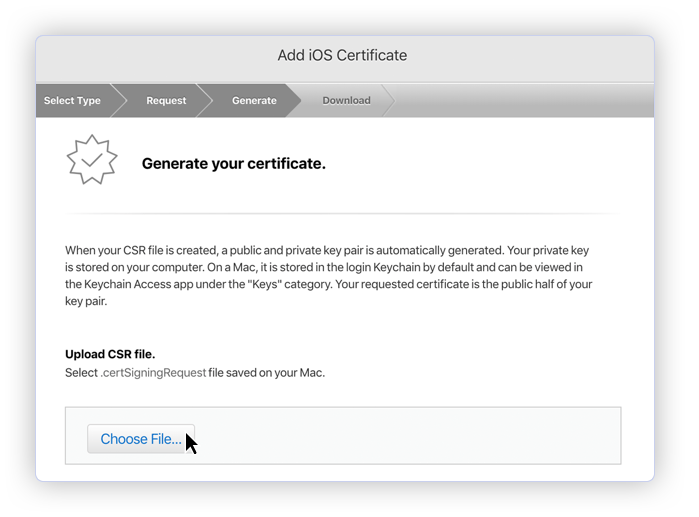 6. In order to install the downloaded certificate to the KeyChain Access on your Mac, double-click it. You can find the certificate in the KeyChain Access > login > Certificates.
### Step 3: Export and update .p12 file to Firebase
1. Type a name for the .p12 file and save it to your Mac.
2. Browse to the location where you saved your key, select it, and click Open. Add the key ID for the key (available in Certificates, Identifiers & Profiles in the Apple Developer Member Center) and export it.
6. In order to install the downloaded certificate to the KeyChain Access on your Mac, double-click it. You can find the certificate in the KeyChain Access > login > Certificates.
### Step 3: Export and update .p12 file to Firebase
1. Type a name for the .p12 file and save it to your Mac.
2. Browse to the location where you saved your key, select it, and click Open. Add the key ID for the key (available in Certificates, Identifiers & Profiles in the Apple Developer Member Center) and export it.
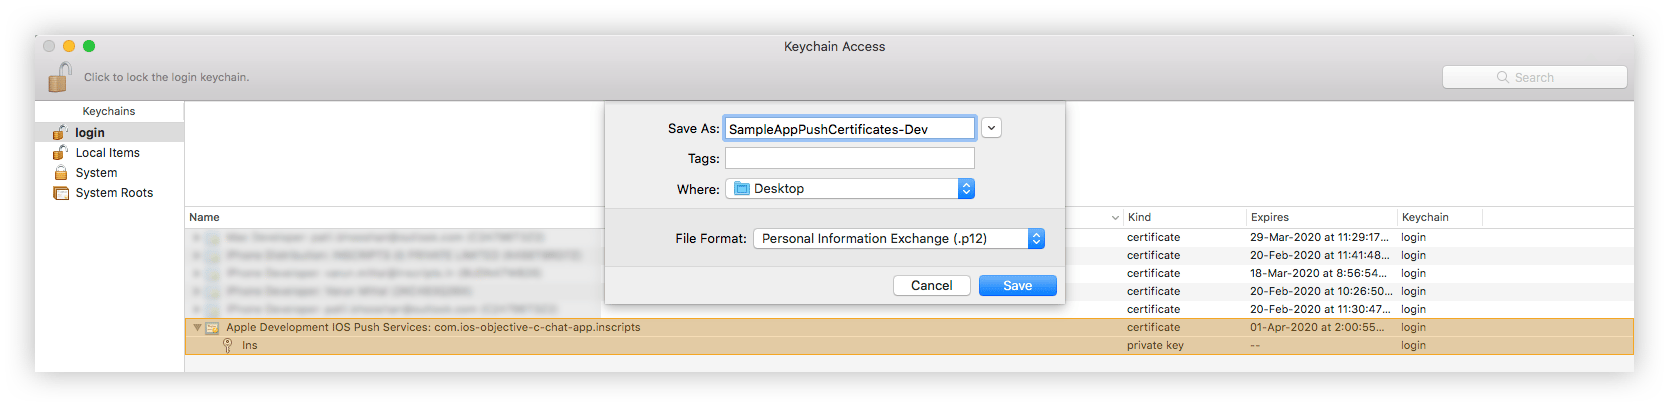 ### Step 4: Upload your APNs Certificates
1. Go to Firebase console and open your project.
2. Inside your iOS project in the Firebase console, select settings and then select the `Cloud Messaging` tab.
3. Scroll down to iOS app configuration, click the Upload button for APNS certificate.
4. Browse to the location where you saved your APNs Certificates, select it, and click Open.
### Step 4: Upload your APNs Certificates
1. Go to Firebase console and open your project.
2. Inside your iOS project in the Firebase console, select settings and then select the `Cloud Messaging` tab.
3. Scroll down to iOS app configuration, click the Upload button for APNS certificate.
4. Browse to the location where you saved your APNs Certificates, select it, and click Open.
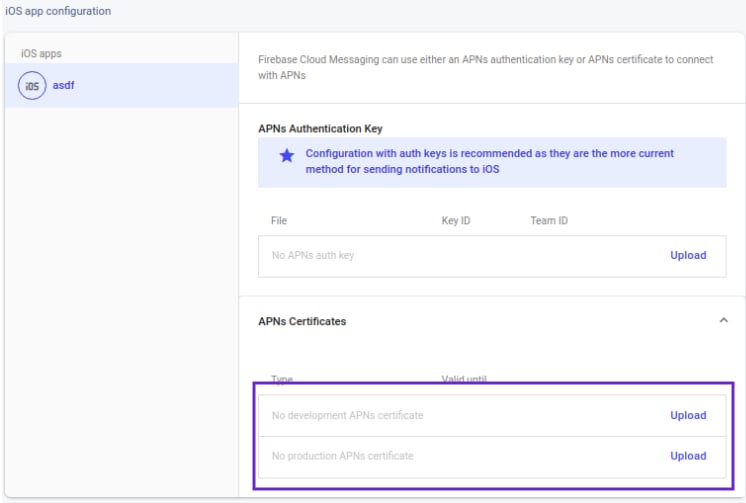 ## iOS App Setup
### Step 1: Initial Firebase Cloud Messaging client setup
1. Add the Firebase SDK, Add the firebase pods that you want to install. You can include a Pod in your Podfile like this:
## iOS App Setup
### Step 1: Initial Firebase Cloud Messaging client setup
1. Add the Firebase SDK, Add the firebase pods that you want to install. You can include a Pod in your Podfile like this:
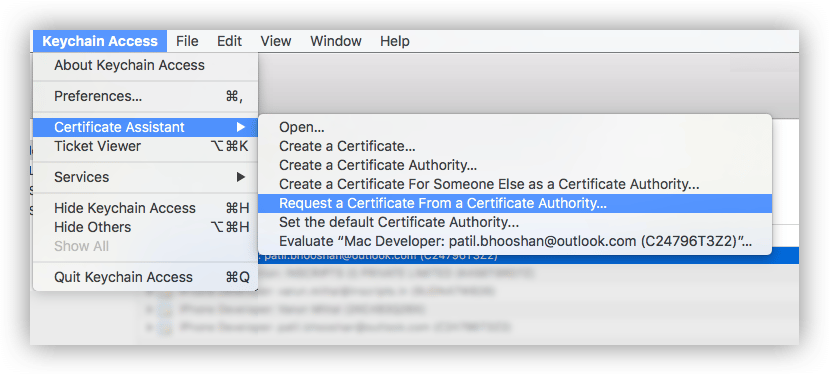 2. The Certificate Information dialog box appears. Enter the email address that you use in your Apple Developer account, and enter a common name for your private key. Don't enter CA email address, choose Saved to disk, and then click the Continue button.
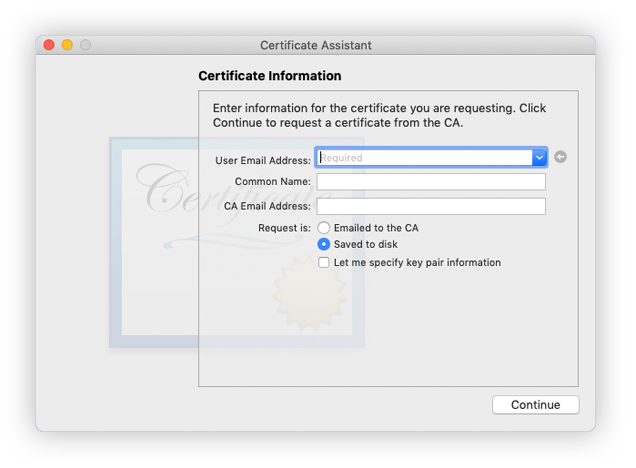 3. Specify the name of your CSR to save and choose the location to save the file on your local disk. Then your CSR file is created, which contains a public/private key pair.
### Step 2: Create an SSL certificate
1. Sign in to your account at the [Apple Developer Member Center](https://developer.apple.com/membercenter).
2. Go to Certificates, Identifiers & Profiles.
3. Specify the name of your CSR to save and choose the location to save the file on your local disk. Then your CSR file is created, which contains a public/private key pair.
### Step 2: Create an SSL certificate
1. Sign in to your account at the [Apple Developer Member Center](https://developer.apple.com/membercenter).
2. Go to Certificates, Identifiers & Profiles.
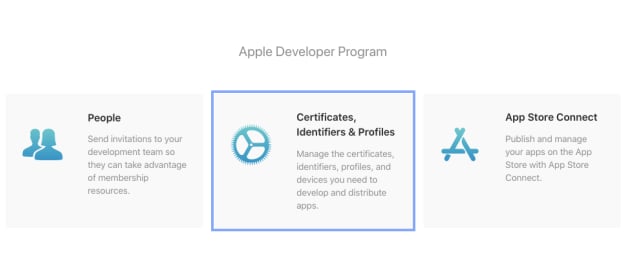 3. Create new Certificate by clicking on the + icon.
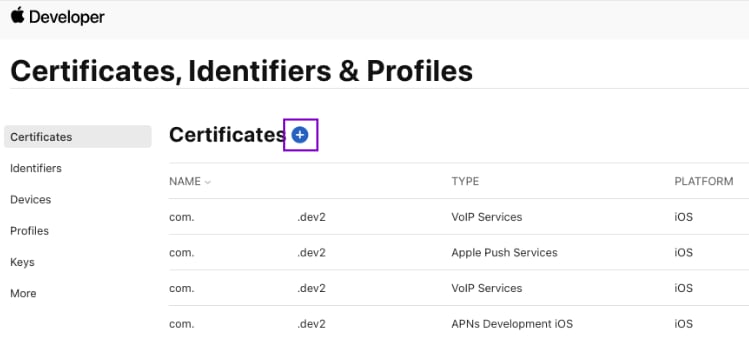 4. Under Services, select - Apple Push Notification services SSL (Sandbox & Production)
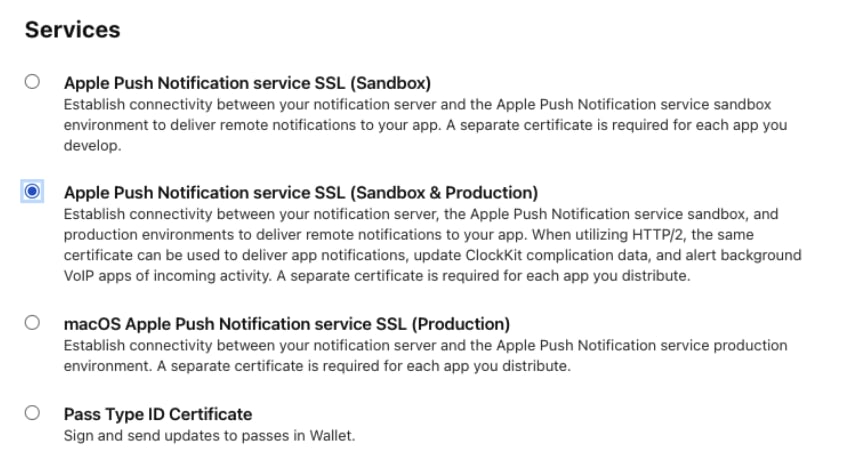 5. Select your App ID from the dropdown.
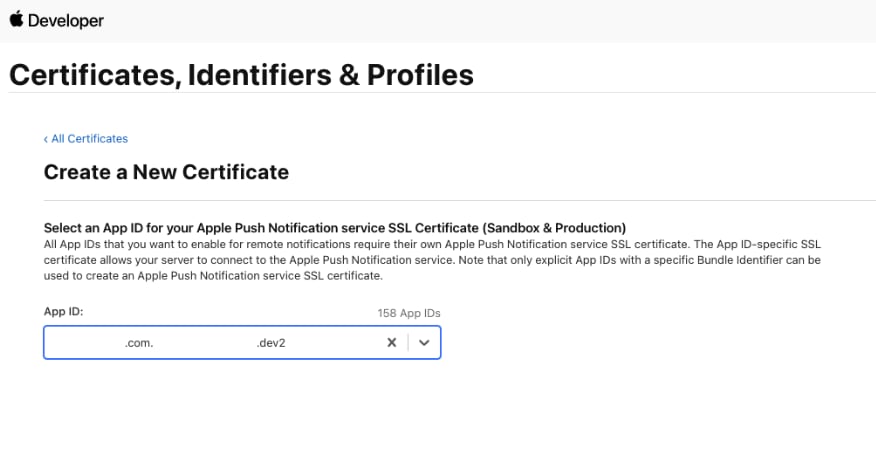 6. Upload CSR file., upload the CSR file you created through the **Choose File** button. To complete the process, choose Continue. When the certificate is ready, choose Download to save it to your Mac.
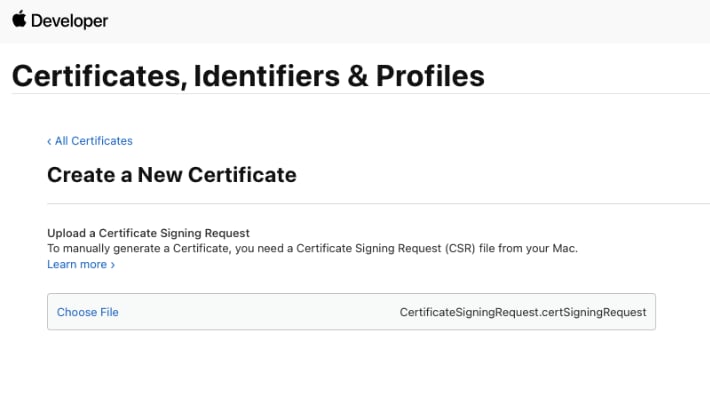
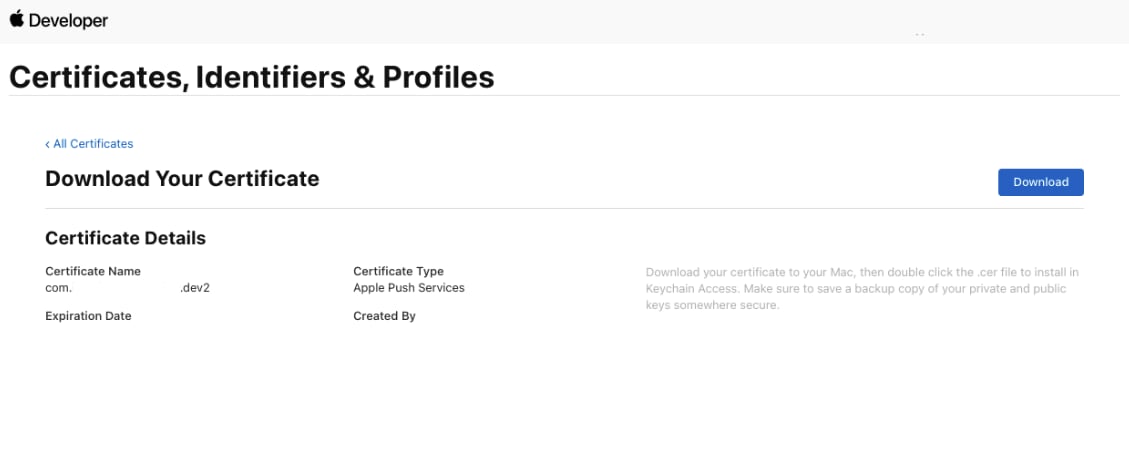 ### Step 3: Export and update .p8 certificate
1. To generate a .p8 key file, go to [Apple Developer Account](https://developer.apple.com/account/), then select Certificates, IDs & Profiles.
2. Select Keys and click on the "+" button to add a new key.
3. In the new key page, type in your key name and check the Apple Push Notification service (APNs) box, then click "Continue" and click "Register".
4. Then proceed to download the key file by clicking Download.
5. Make note of the `Key ID`, `Team ID` and your `Bundle ID` for saving in the Extension's settings.
**If you wish to use the .p12 certificate instead, do the following:**
1. Type a name for the .p12 file and save it to your Mac.
2. Browse to the location where you saved your key, select it, and click Open. Add the key ID for the key (available in Certificates, Identifiers & Profiles in the Apple Developer Member Center) and export it.
3. DO NOT provide an export password when prompted.
4. The .p12 file will be required in the next step for uploading in the CometChat Dashboard.
## Extension settings
### Step 1: Enable the extension
1. Login to [CometChat](https://app.cometchat.com/login) and select your app.
2. Go to the Extensions section and Enable the Push Notifications extension.
3. Open the settings for this extension and save the following.
### Step 2: Save your settings
### Step 3: Export and update .p8 certificate
1. To generate a .p8 key file, go to [Apple Developer Account](https://developer.apple.com/account/), then select Certificates, IDs & Profiles.
2. Select Keys and click on the "+" button to add a new key.
3. In the new key page, type in your key name and check the Apple Push Notification service (APNs) box, then click "Continue" and click "Register".
4. Then proceed to download the key file by clicking Download.
5. Make note of the `Key ID`, `Team ID` and your `Bundle ID` for saving in the Extension's settings.
**If you wish to use the .p12 certificate instead, do the following:**
1. Type a name for the .p12 file and save it to your Mac.
2. Browse to the location where you saved your key, select it, and click Open. Add the key ID for the key (available in Certificates, Identifiers & Profiles in the Apple Developer Member Center) and export it.
3. DO NOT provide an export password when prompted.
4. The .p12 file will be required in the next step for uploading in the CometChat Dashboard.
## Extension settings
### Step 1: Enable the extension
1. Login to [CometChat](https://app.cometchat.com/login) and select your app.
2. Go to the Extensions section and Enable the Push Notifications extension.
3. Open the settings for this extension and save the following.
### Step 2: Save your settings
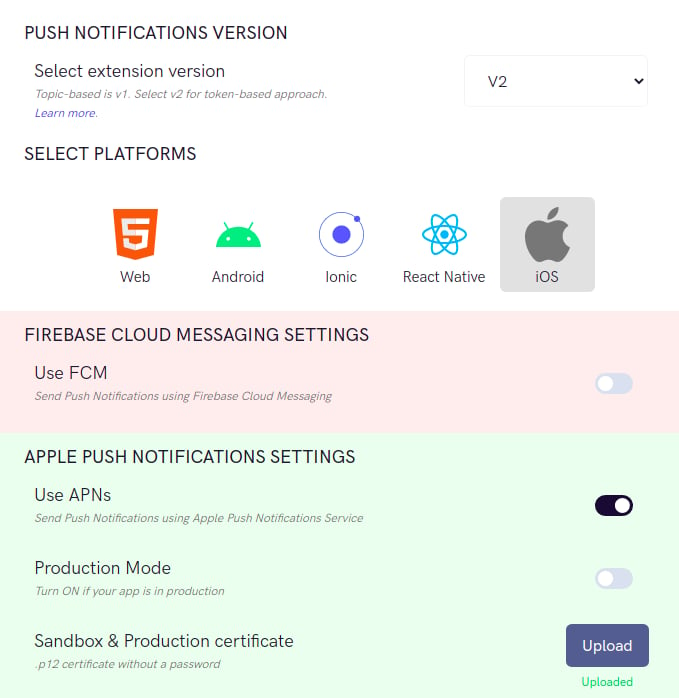
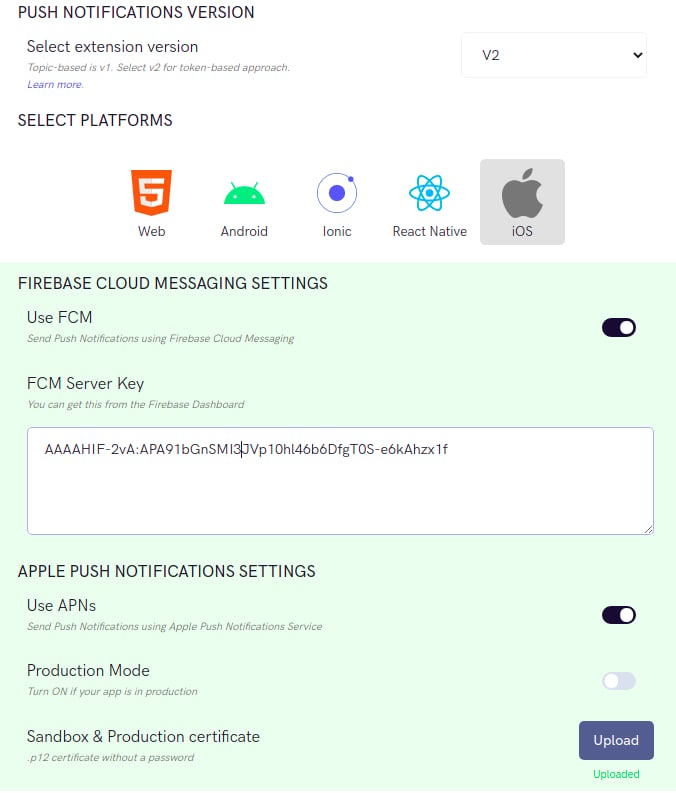 On the Settings page you need to enter the following:
1. **Set extension version**
1. The extension version has to be set to 'V2' or 'V1 & V2' in order to use APNs as the provider.
2. **Select Platforms**
1. You can select the platforms on which you wish to receive Push Notifications.
3. **APNs Settings**
1. You can turn off the Production mode when you create a development build of your application.
2. Upload the .p8 or .p12 certificate exported in the previous step.
4. **Push payload message options**
On the Settings page you need to enter the following:
1. **Set extension version**
1. The extension version has to be set to 'V2' or 'V1 & V2' in order to use APNs as the provider.
2. **Select Platforms**
1. You can select the platforms on which you wish to receive Push Notifications.
3. **APNs Settings**
1. You can turn off the Production mode when you create a development build of your application.
2. Upload the .p8 or .p12 certificate exported in the previous step.
4. **Push payload message options**
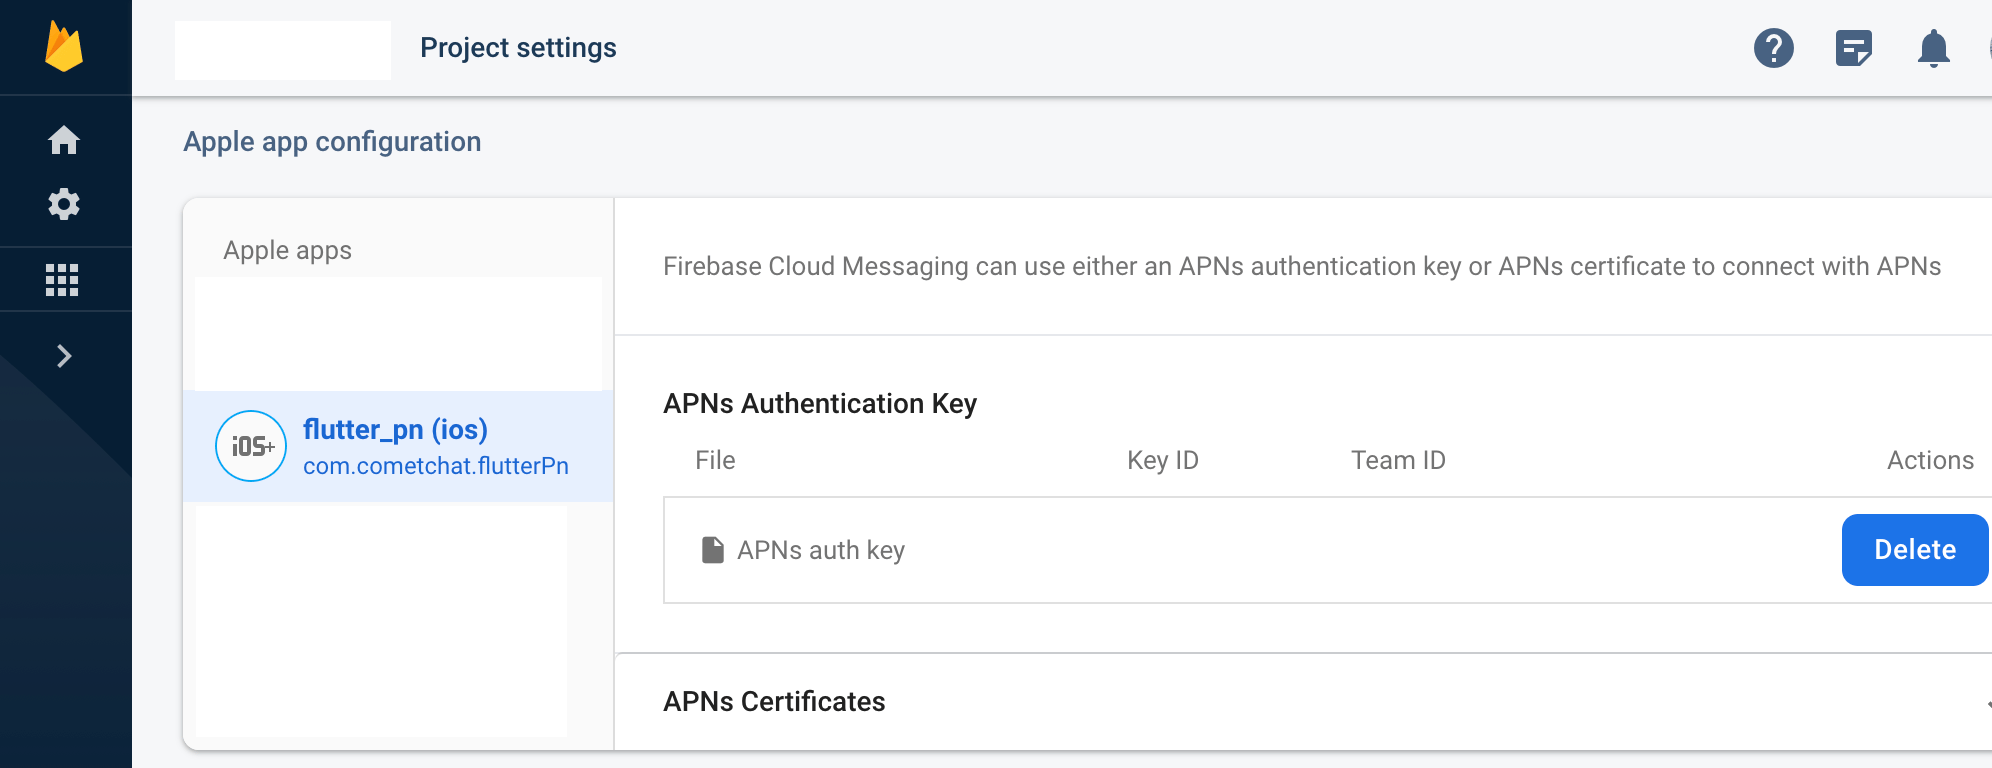 ### Step 3: FCM setup in app
This requires you to first set up a global context. It will help you in opening your app once your notification is tapped. Using this global context, you can write a function to navigate to the screen of choice once the notification is tapped.
### Step 3: FCM setup in app
This requires you to first set up a global context. It will help you in opening your app once your notification is tapped. Using this global context, you can write a function to navigate to the screen of choice once the notification is tapped.
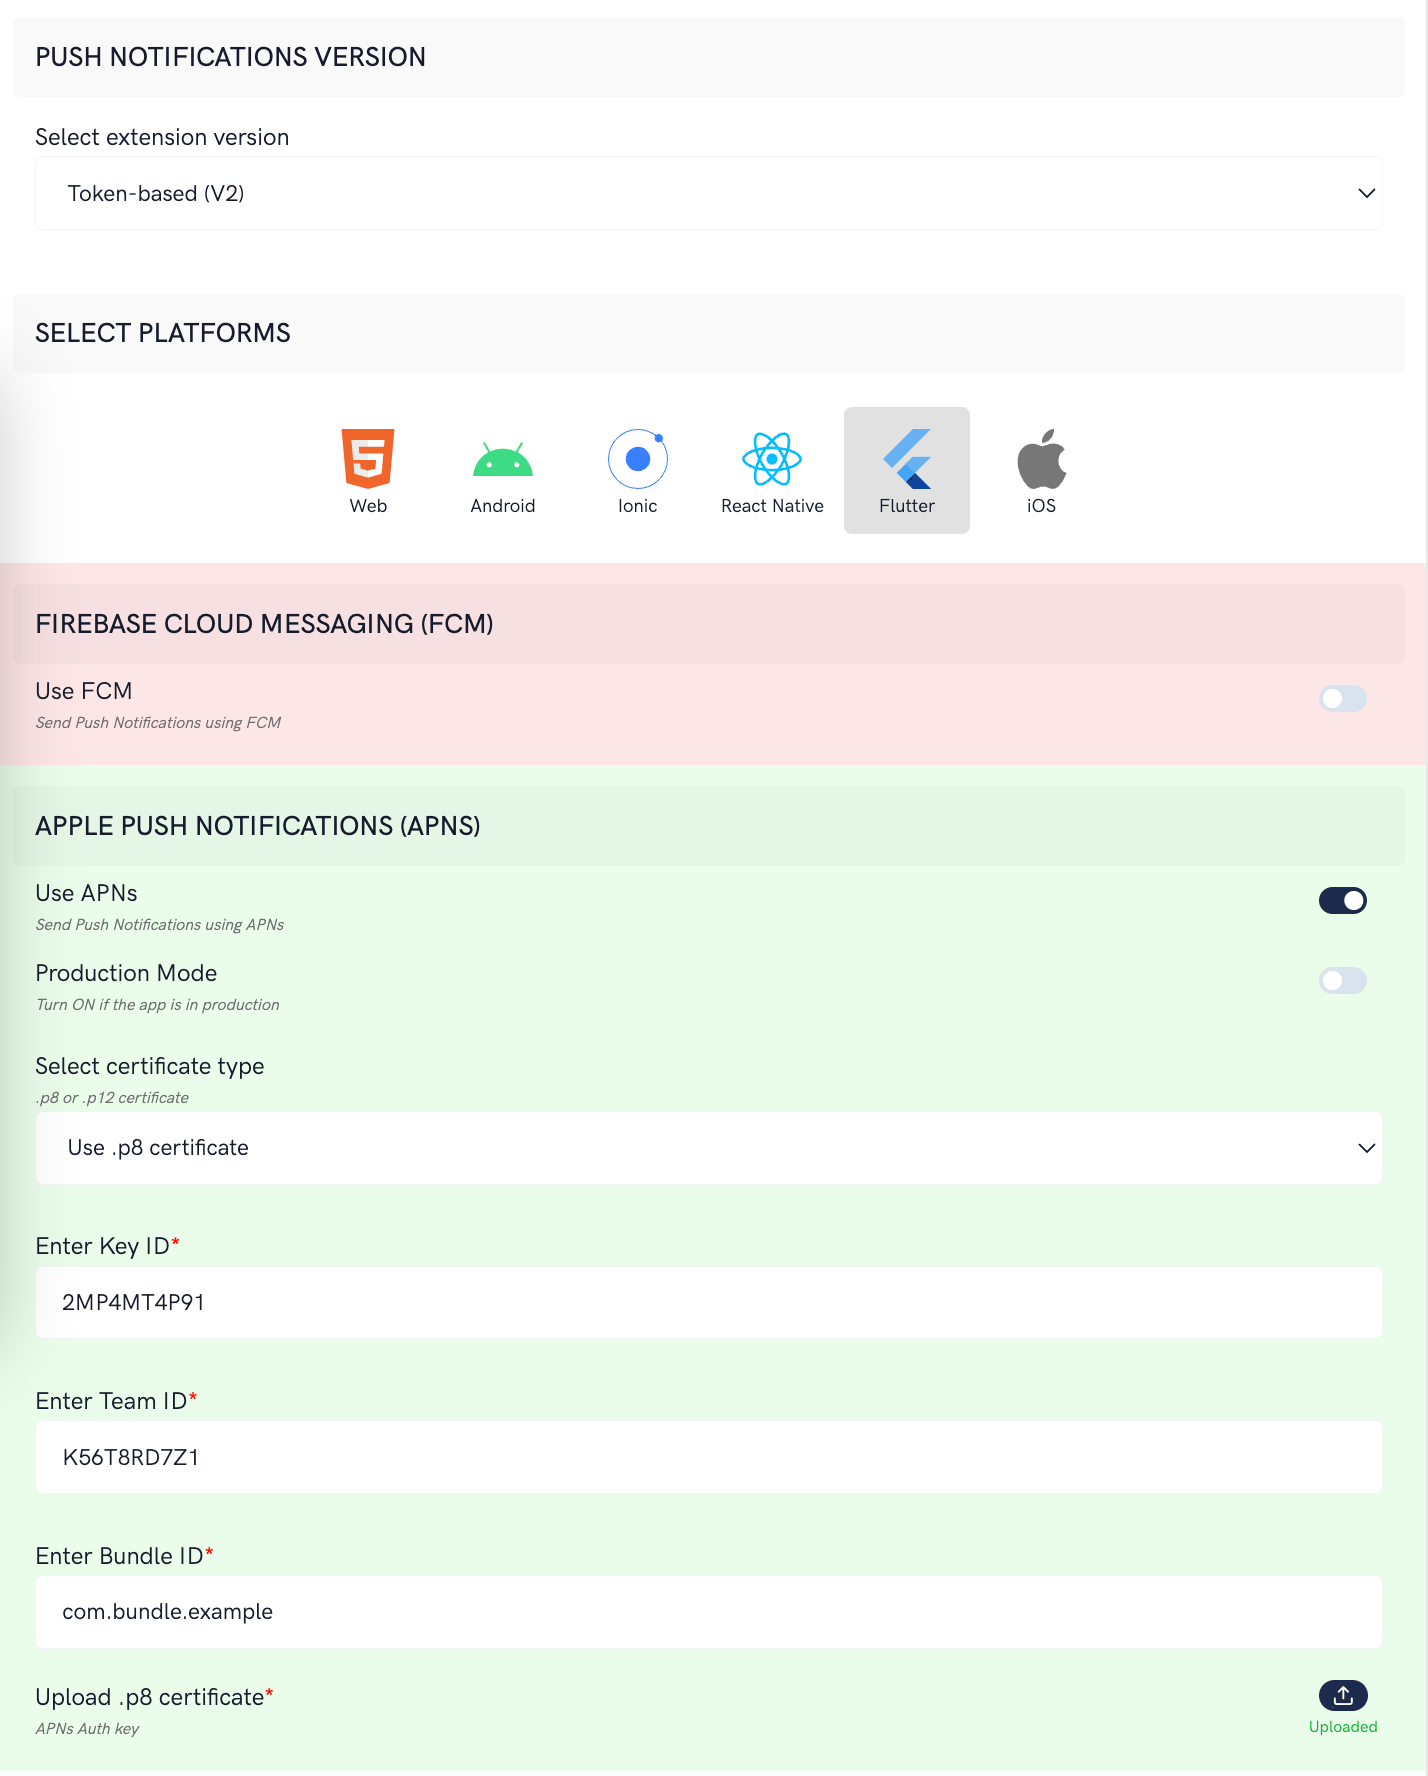 ## React Native
Learn how to set up Push notifications for React Native using Firebase Cloud Messaging or FCM.
## React Native
Learn how to set up Push notifications for React Native using Firebase Cloud Messaging or FCM.
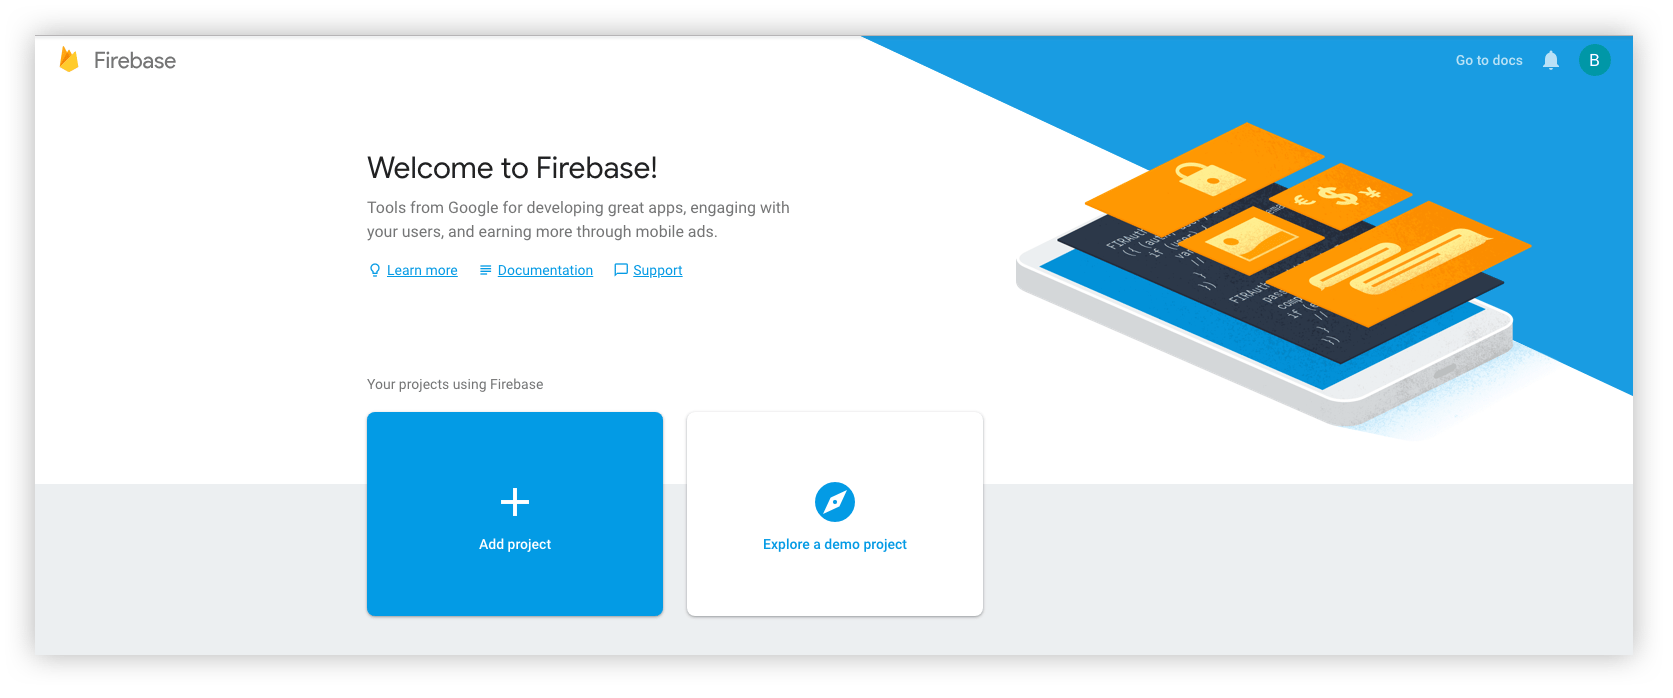 This is a simple 3 step process where:
1. You give a name to your project
2. Add Google Analytics to your project (Optional)
3. Configure Google Analytics account (Optional)
Click on Create and you are ready to go.
### Step 2: Add Firebase to your App
React native setup will require 2 files for Android and iOS:
1. For Android, you need to download the google-services.json file from the Firebase console.
2. For iOS, you need to download the GoogleService-Info.plist file from the Firebase console.
### Step 3: Download the service account file
This is a simple 3 step process where:
1. You give a name to your project
2. Add Google Analytics to your project (Optional)
3. Configure Google Analytics account (Optional)
Click on Create and you are ready to go.
### Step 2: Add Firebase to your App
React native setup will require 2 files for Android and iOS:
1. For Android, you need to download the google-services.json file from the Firebase console.
2. For iOS, you need to download the GoogleService-Info.plist file from the Firebase console.
### Step 3: Download the service account file
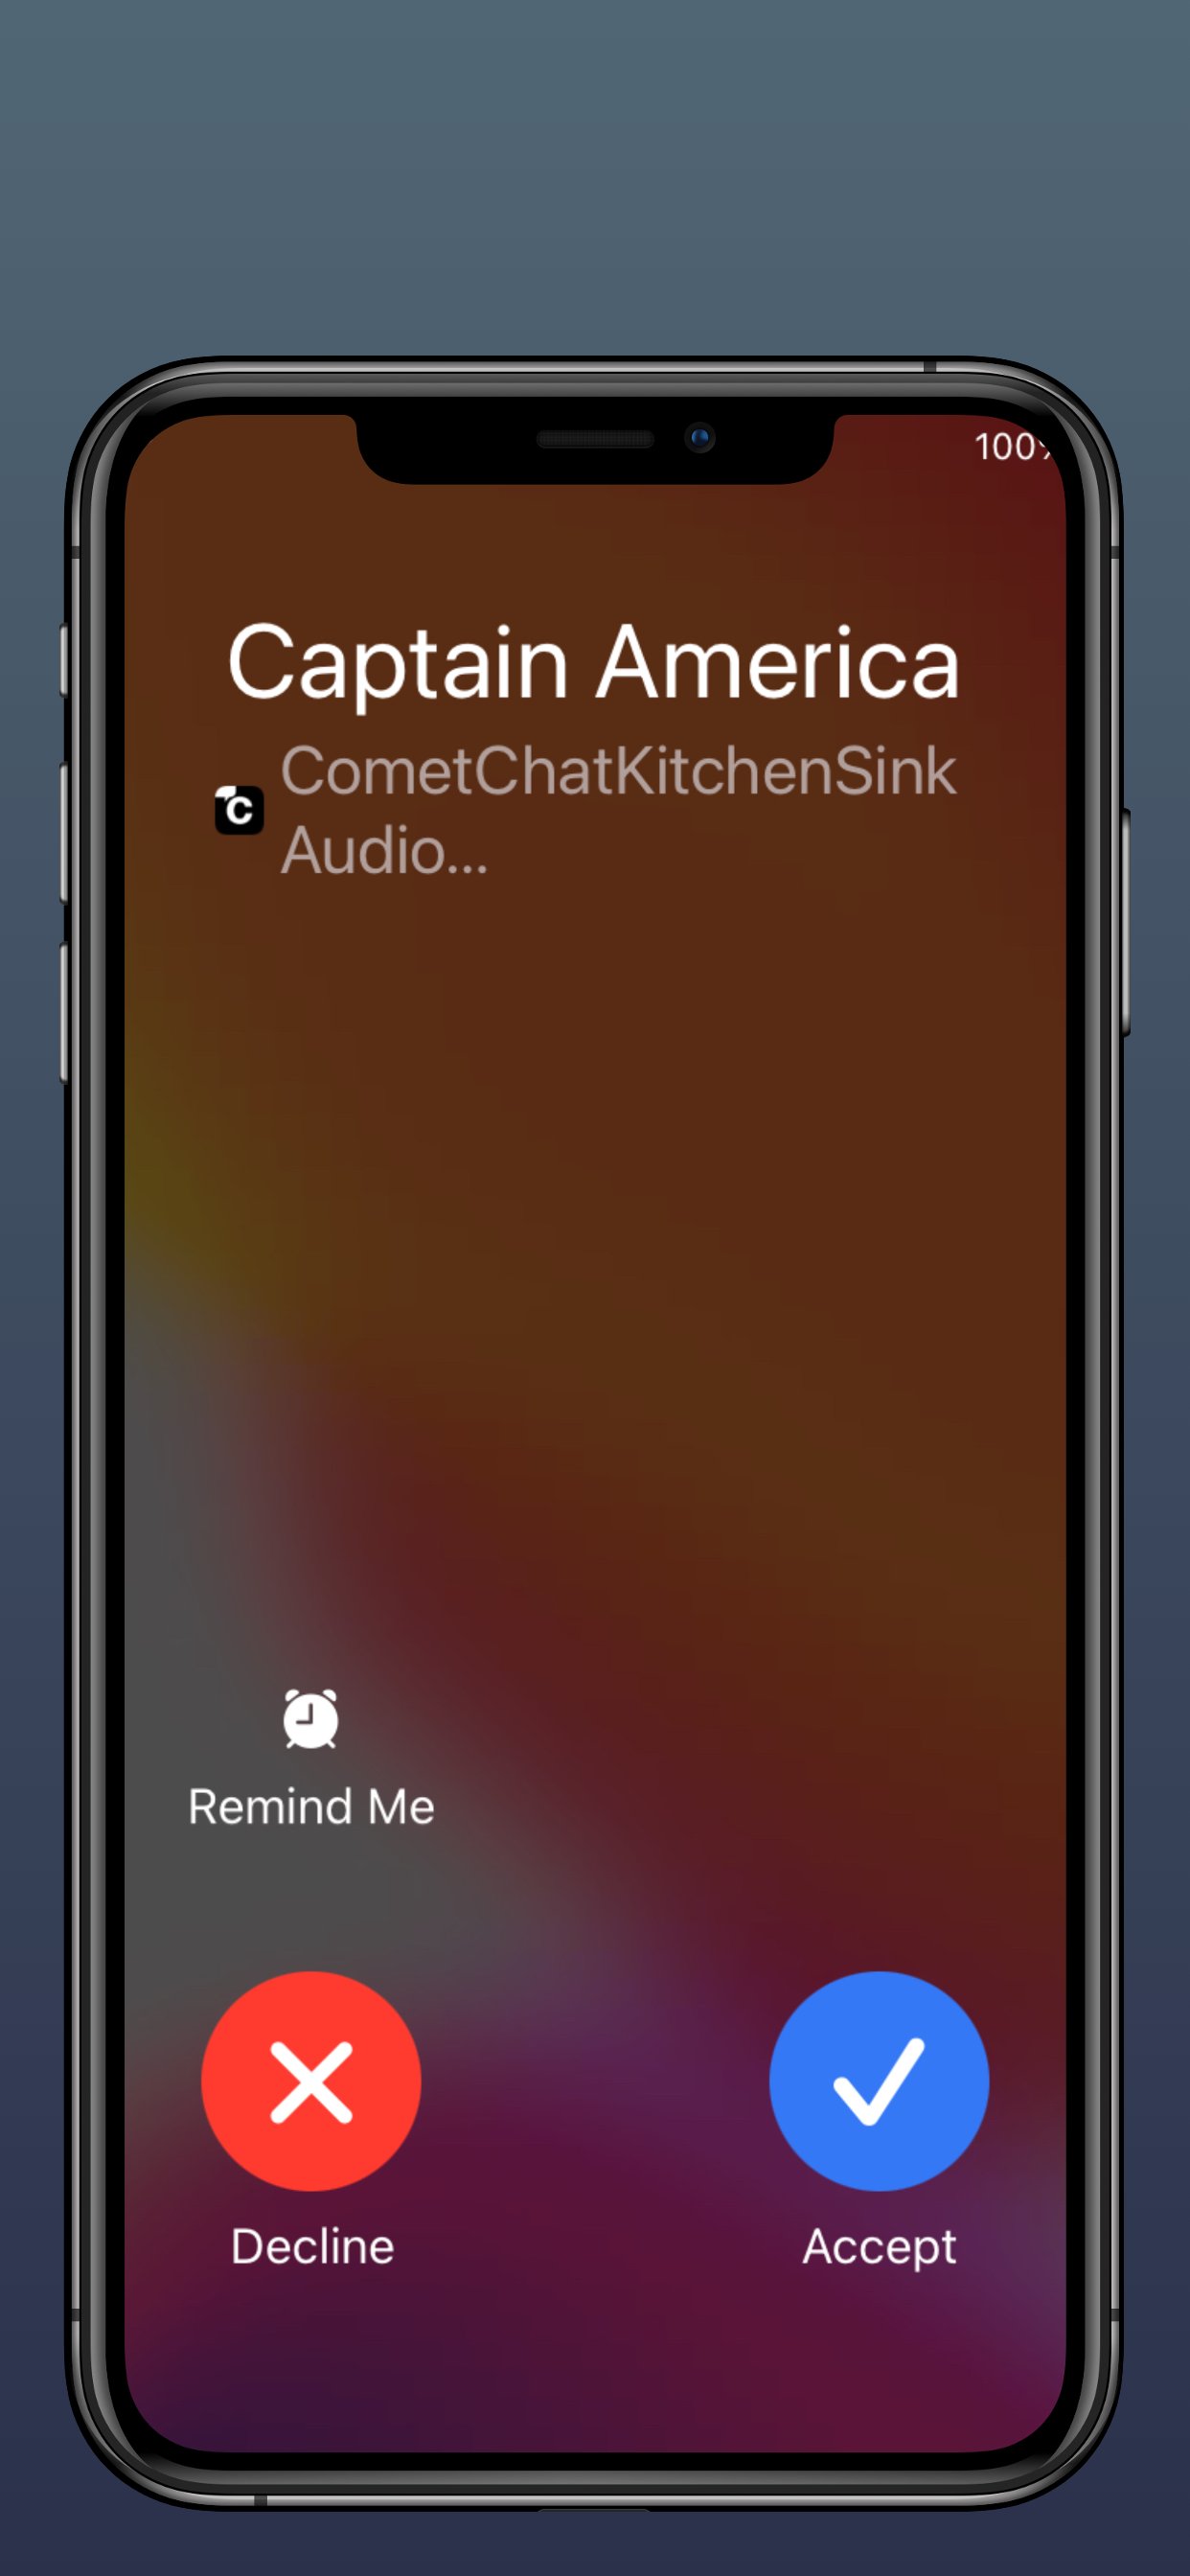
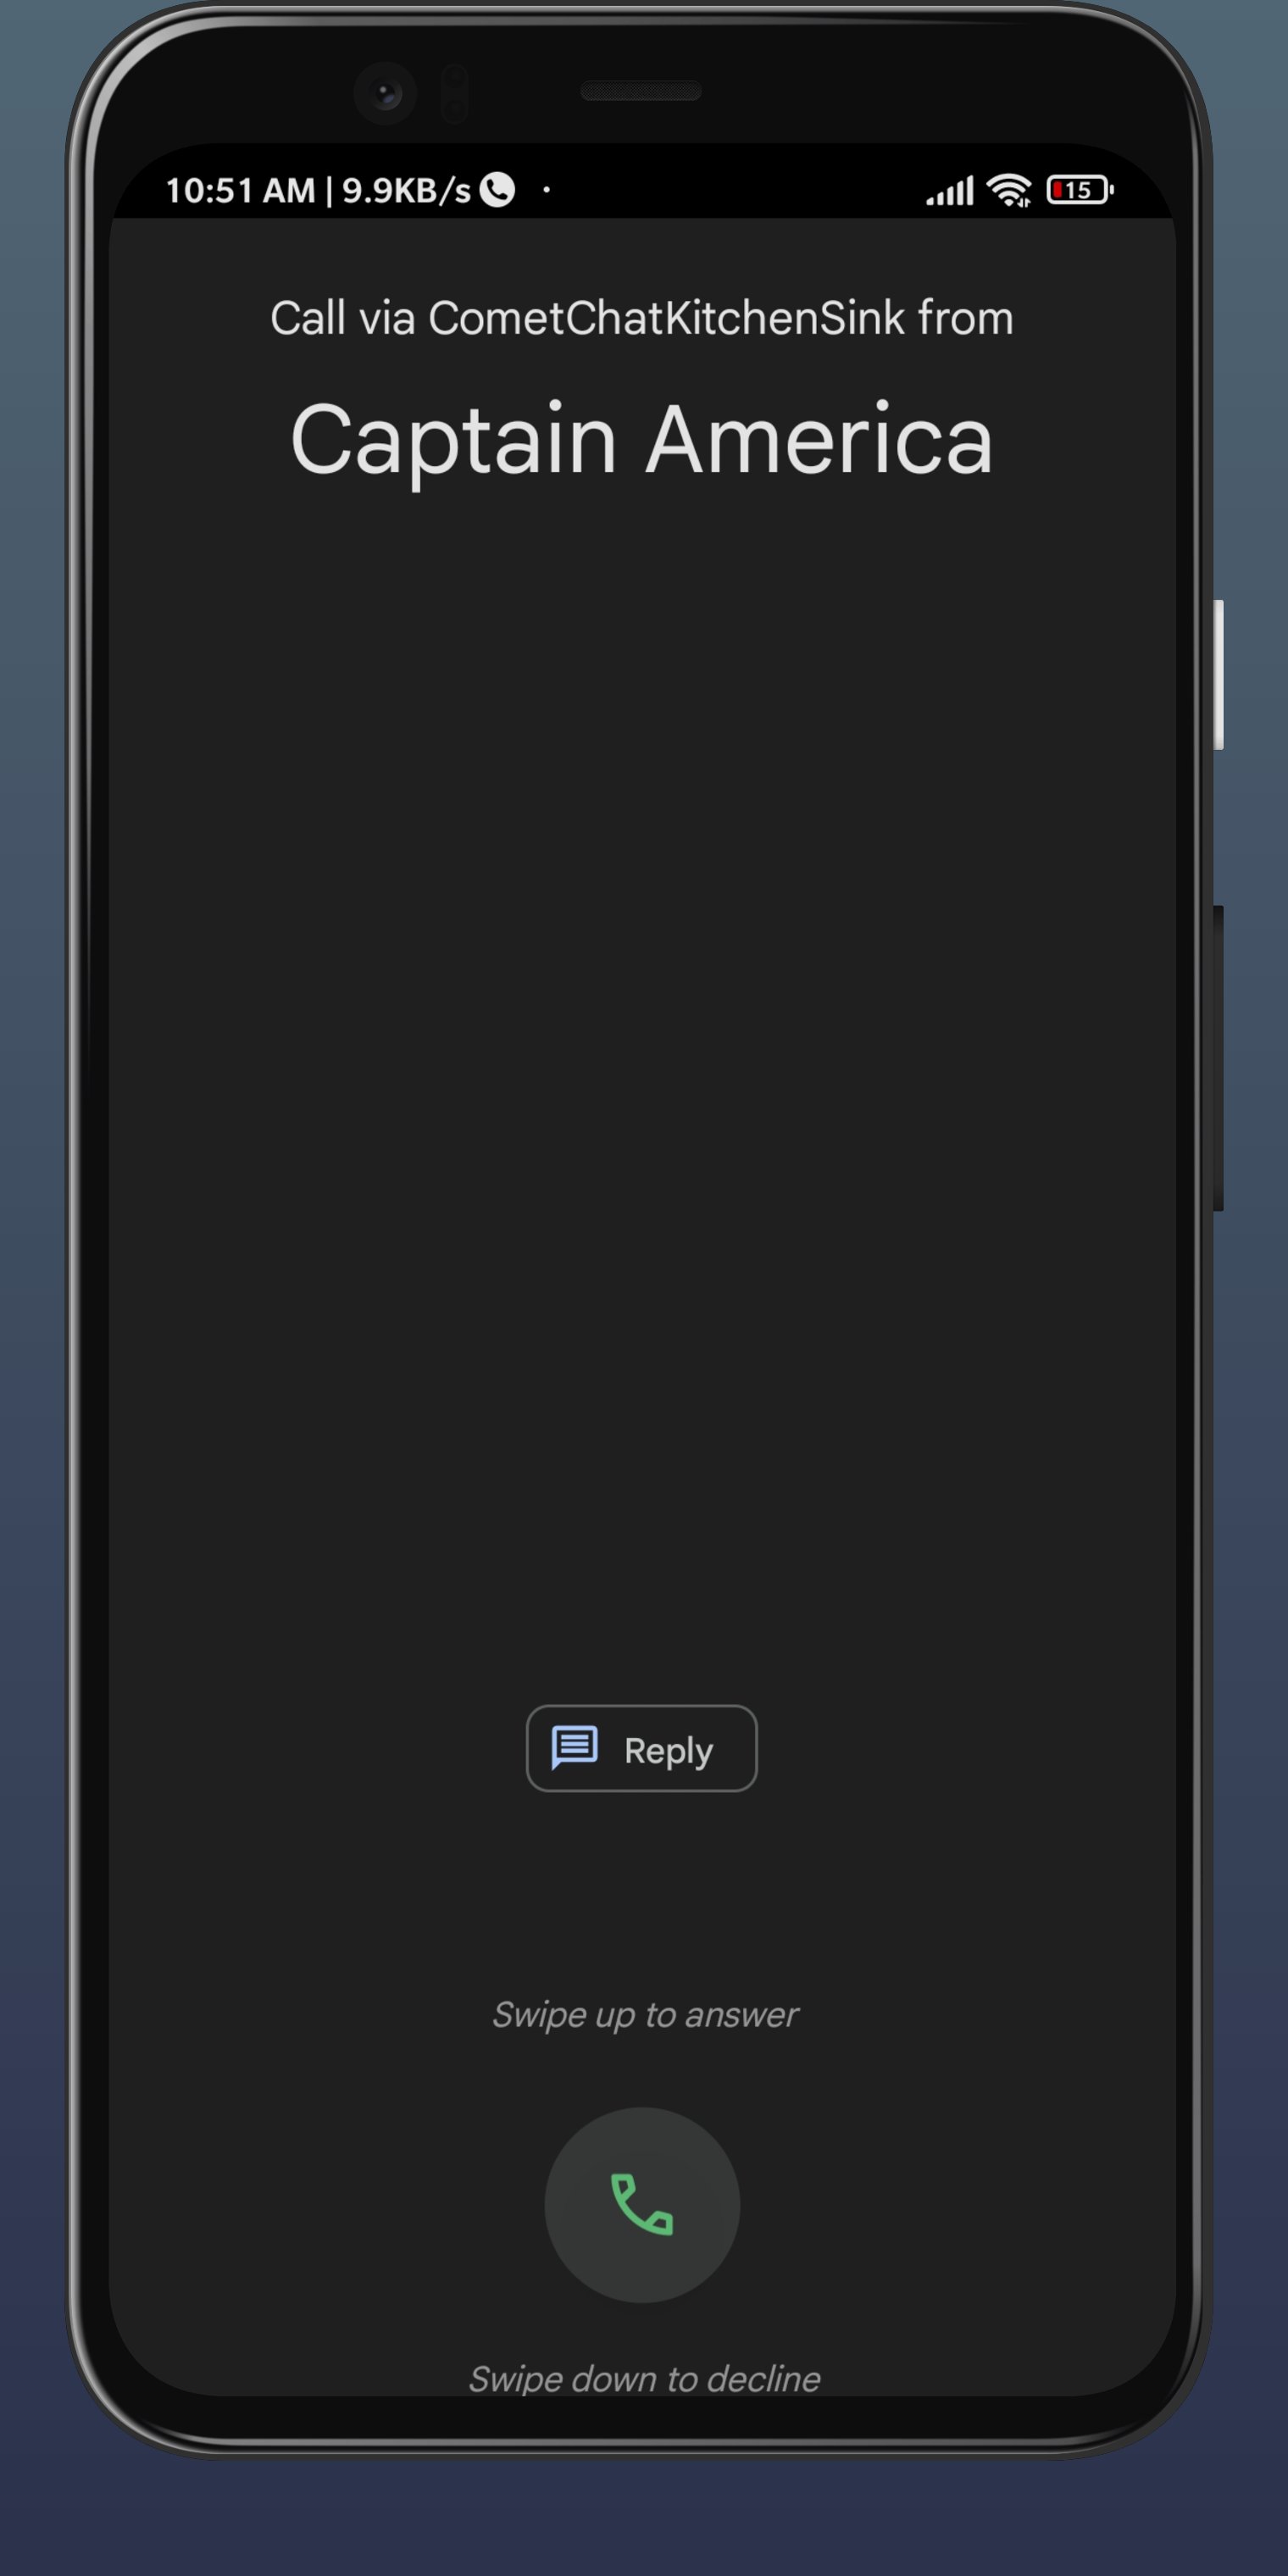
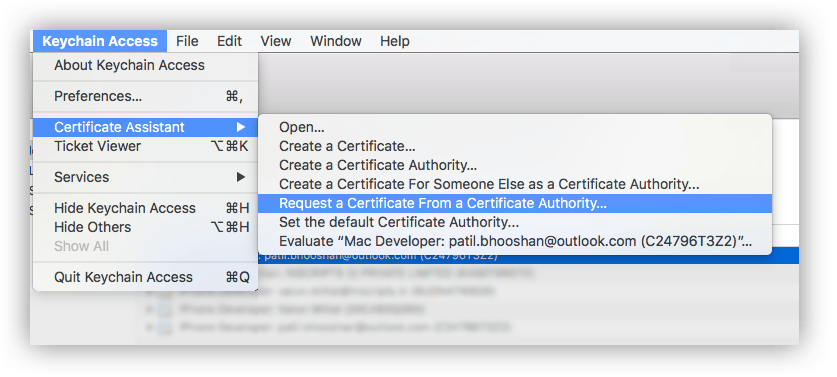 2. The Certificate Information dialog box appears. Enter the email address that you use in your Apple Developer account, and enter a common name for your private key. Don't enter CA email address, choose Saved to disk, and then click the Continue button. \
 \
\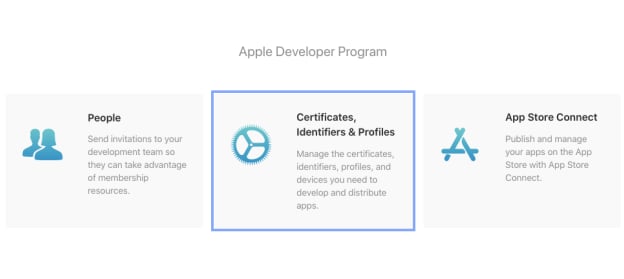 3. Create new Certificate by clicking on the + icon.
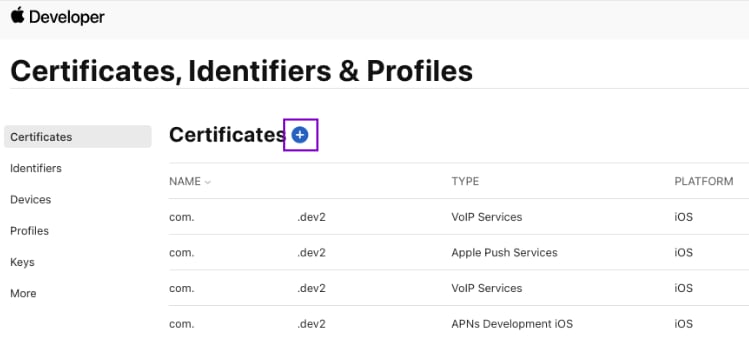 4. Under Services, select - Apple Push Notification services SSL (Sandbox & Production)
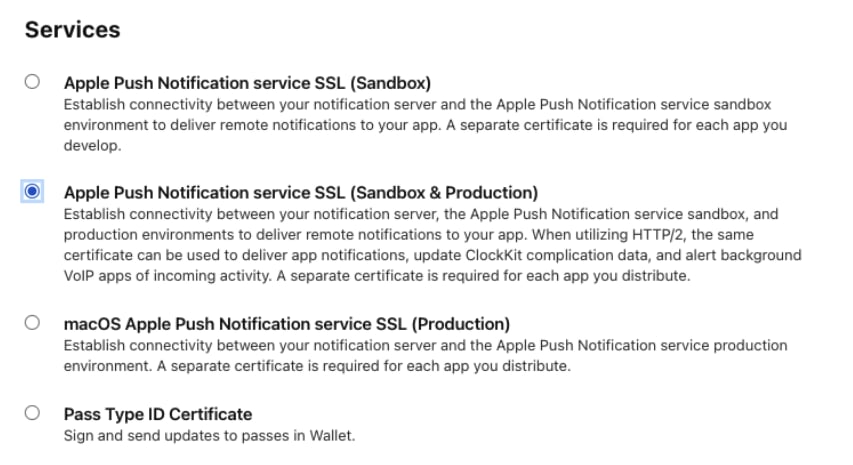 5. Select your App ID from the dropdown.
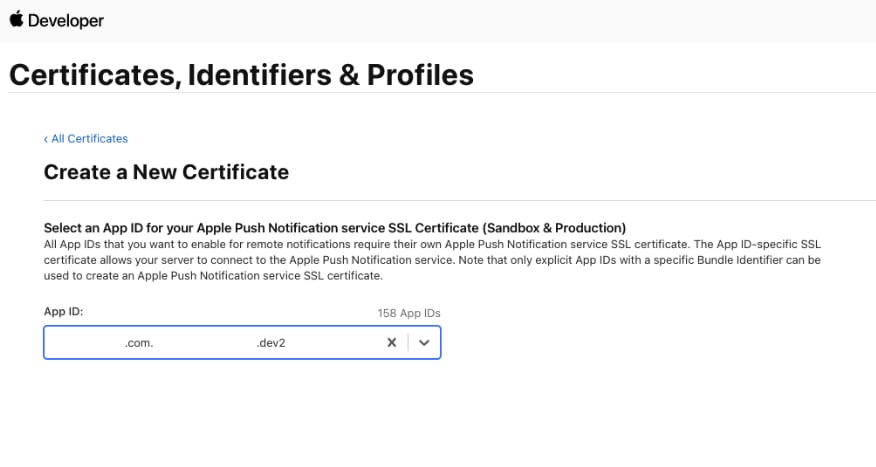 6. Upload CSR file., upload the CSR file you created through the **Choose File** button. To complete the process, choose Continue. When the certificate is ready, choose Download to save it to your Mac.
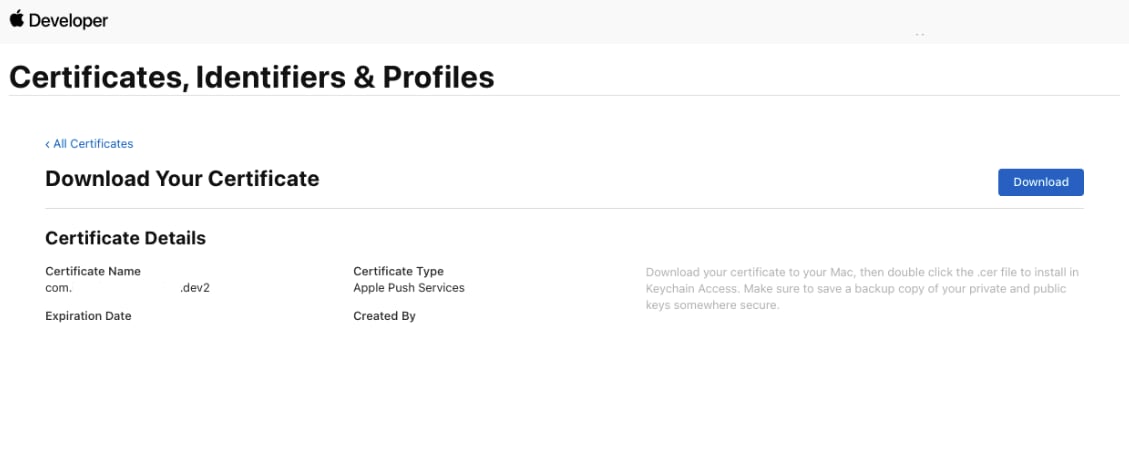
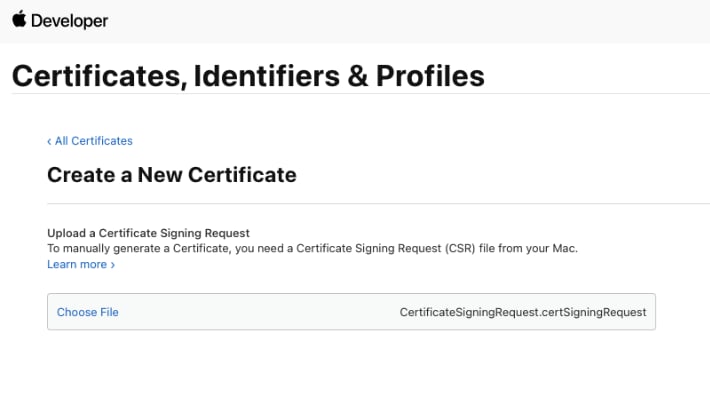 #### Step 3: Export and update .p8 certificate
1. To generate a .p8 key file, go to [Apple Developer Account](https://developer.apple.com/account/), then select Certificates, IDs & Profiles.
2. Select Keys and click on the "+" button to add a new key.
3. In the new key page, type in your key name and check the Apple Push Notification service (APNs) box, then click "Continue" and click "Register".
4. Then proceed to download the key file by clicking Download.
5. Make note of the `Key ID`, `Team ID` and your `Bundle ID` for saving in the Extension's settings.
**If you wish to use the .p12 certificate instead, do the following:**
1. Type a name for the .p12 file and save it to your Mac.
2. Browse to the location where you saved your key, select it, and click Open. Add the key ID for the key (available in Certificates, Identifiers & Profiles in the Apple Developer Member Center) and export it.
3. DO NOT provide an export password when prompted.
4. The .p12 file will be required in the next step for uploading in the CometChat Dashboard.
#### Extension settings
#### Step 1: Enable the extension
1. Login to [CometChat](https://app.cometchat.com/login) and select your app.
2. Go to the Extensions section and Enable the Push Notifications extension.
3. Open the settings for this extension and save the following.
#### Step 3: Export and update .p8 certificate
1. To generate a .p8 key file, go to [Apple Developer Account](https://developer.apple.com/account/), then select Certificates, IDs & Profiles.
2. Select Keys and click on the "+" button to add a new key.
3. In the new key page, type in your key name and check the Apple Push Notification service (APNs) box, then click "Continue" and click "Register".
4. Then proceed to download the key file by clicking Download.
5. Make note of the `Key ID`, `Team ID` and your `Bundle ID` for saving in the Extension's settings.
**If you wish to use the .p12 certificate instead, do the following:**
1. Type a name for the .p12 file and save it to your Mac.
2. Browse to the location where you saved your key, select it, and click Open. Add the key ID for the key (available in Certificates, Identifiers & Profiles in the Apple Developer Member Center) and export it.
3. DO NOT provide an export password when prompted.
4. The .p12 file will be required in the next step for uploading in the CometChat Dashboard.
#### Extension settings
#### Step 1: Enable the extension
1. Login to [CometChat](https://app.cometchat.com/login) and select your app.
2. Go to the Extensions section and Enable the Push Notifications extension.
3. Open the settings for this extension and save the following.
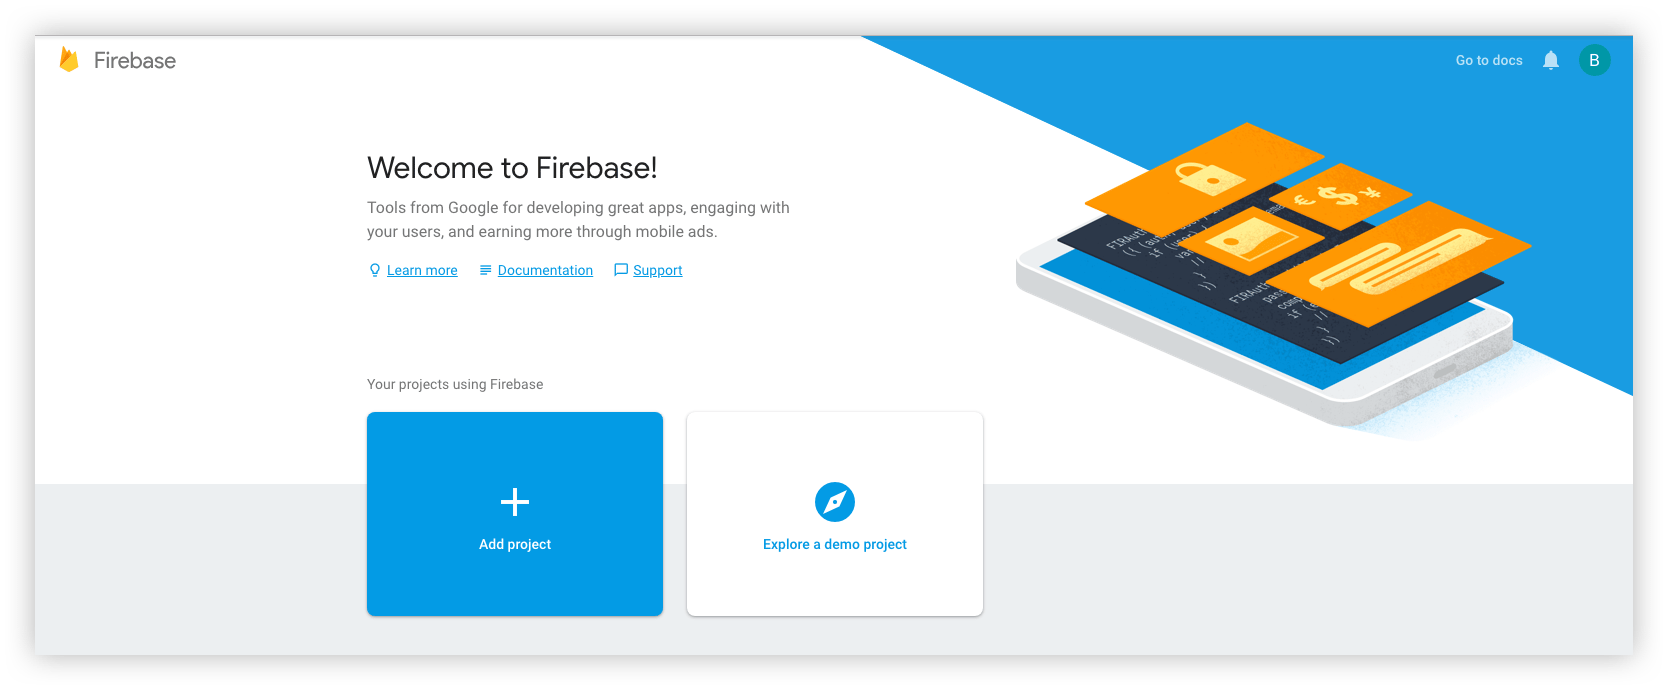 This is a simple 3 step process where:
1. You give a name to your project
2. Add Google Analytics to your project (Optional)
3. Configure Google Analytics account (Optional)
Click on Create and you are ready to go.
### Step 2: Add Firebase to your App
React native setup will require 2 files for Android and iOS:
1. For Android, you need to download the `google-services.json` file. You can refer to the [Android Firebase Project Setup - Step 2](#firebase-project-setup-2) and resume here once done.
2. For iOS, you need to download the `GoogleService-Info.plist` file. You can refer to the [iOS Firebase Project Setup - Step 2](#firebase-project-setup-4) and resume here once done.
3. For web, you need to have the Firebase Config object. You can refer to the [Web Firebase Project Setup - Step 2](#firebase-project-setup) and resume here once done.
### Step 3: Download the service account file
This is a simple 3 step process where:
1. You give a name to your project
2. Add Google Analytics to your project (Optional)
3. Configure Google Analytics account (Optional)
Click on Create and you are ready to go.
### Step 2: Add Firebase to your App
React native setup will require 2 files for Android and iOS:
1. For Android, you need to download the `google-services.json` file. You can refer to the [Android Firebase Project Setup - Step 2](#firebase-project-setup-2) and resume here once done.
2. For iOS, you need to download the `GoogleService-Info.plist` file. You can refer to the [iOS Firebase Project Setup - Step 2](#firebase-project-setup-4) and resume here once done.
3. For web, you need to have the Firebase Config object. You can refer to the [Web Firebase Project Setup - Step 2](#firebase-project-setup) and resume here once done.
### Step 3: Download the service account file